How to Create a Clipping Path in Photoshop [2021]

Clipping paths are powerful tools that allow you to remove or “clip” an item or product from its background when other methods won’t work. This method is particularly useful when you have a product featured against a complex or multicolored background.

How do you create a clipping path in Photoshop?

  1. Set up your Pen tool
  2. Draw a path around your product
  3. Save your path
  4. Create a clipping path
  5. Create a selection from your clipping patha>
  6. Create a clipping mask

Step 1: Set up your Pen tool

You’ll need to use the Photoshop Pen tool to create your clipping path. If you’ve ever used the Pen tool in Adobe Illustrator, you’ll notice that Photoshop’s Pen tool is almost the same.

Before you can start to use the tool, however, you’ll need to ensure your settings are correct so you actually create a clipping path and not a shape.

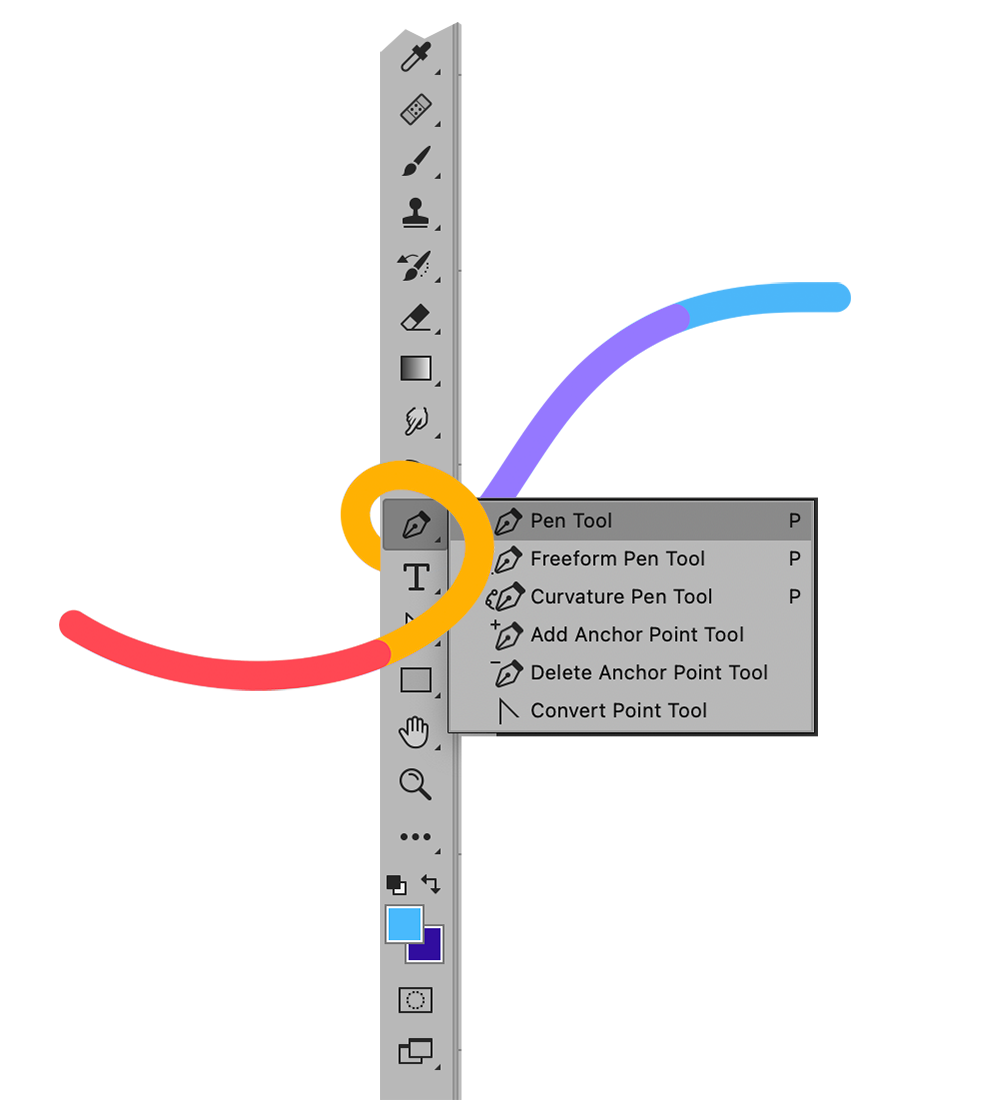
In your image document, select the Pen Tool. You can find it in the Toolbar, or you can type “p” to select it automatically. If you don’t see the Pen Tool, it may be hiding behind the Freeform Pen Tool, the Curvature Pen Tool, the Add Anchor Point Tool, the Delete Vector Point Tool, or the Convert Point Tool.
 

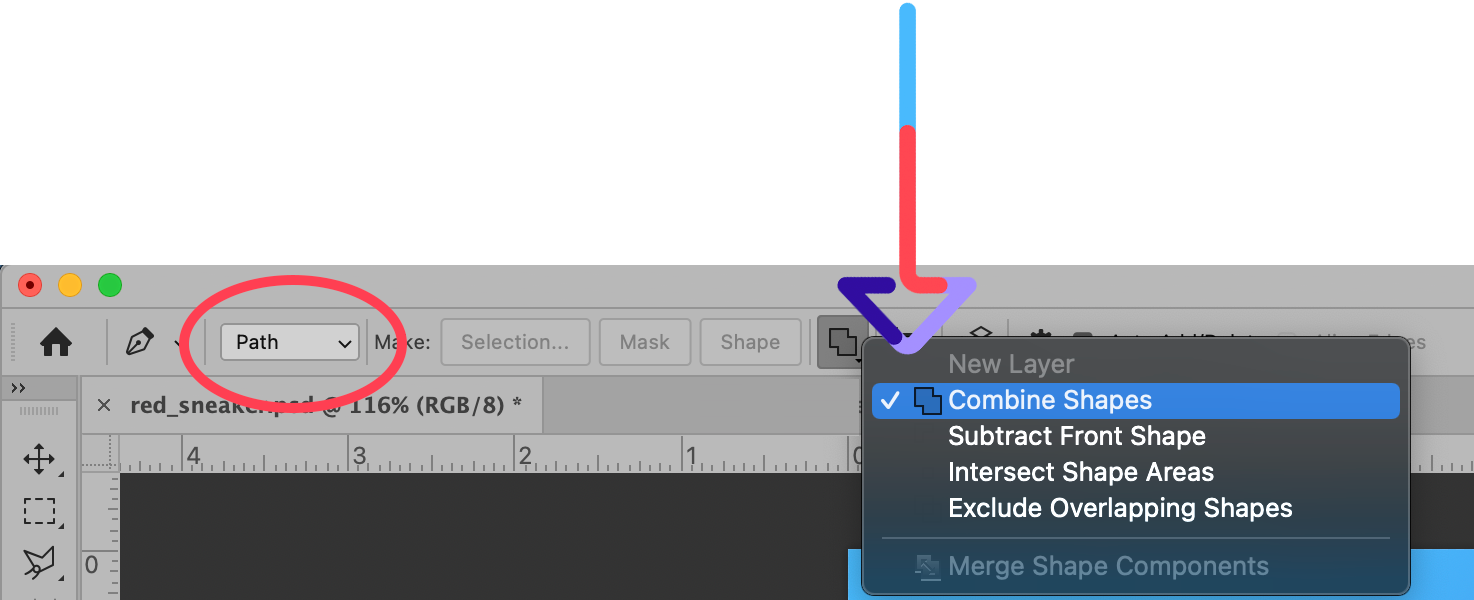
At the top of the application window, in the Options Bar, you’ll see settings for the Pen Tool. Select “Path” and choose “Combine Shapes.” See the image below for reference.
Step 2: Draw a path around your product

If you’re familiar with how the Pen Tool works, drawing a path around your shape should be pretty straightforward. If you’re new to the Pen Tool, we’ll give you the basics to get you started with this powerful tool.

[cta text=”Pen Tool Tutorial | Photoshop for Ecommerce Brands” button=”Learn more” link=”https://pathedits.com/blogs/tips/how-use-pen-tool-photoshop-beginner-tutorial”]

With your Pen Tool, click with your mouse once along the edge of the image you want to “clip.”

Click again to place the next point, but don’t release the mouse button quite yet. Instead, pull the mouse along the edge of your object to create a curved path. Once you’re satisfied with the shape of the curve, you can release the mouse button.

Continue along the edge of your object in this manner until you’ve created a path all the way around the object.

To complete the path, hover your Pen Tool over the starting point until you see a circle appear right next to the Pen Tool. That’s your cue that you’re about to close the path. Click on your first point to close the path.

If you want to modify or tweak the path by adjusting any of the points you’ve placed, you can do so using the Direct Selection Tool.
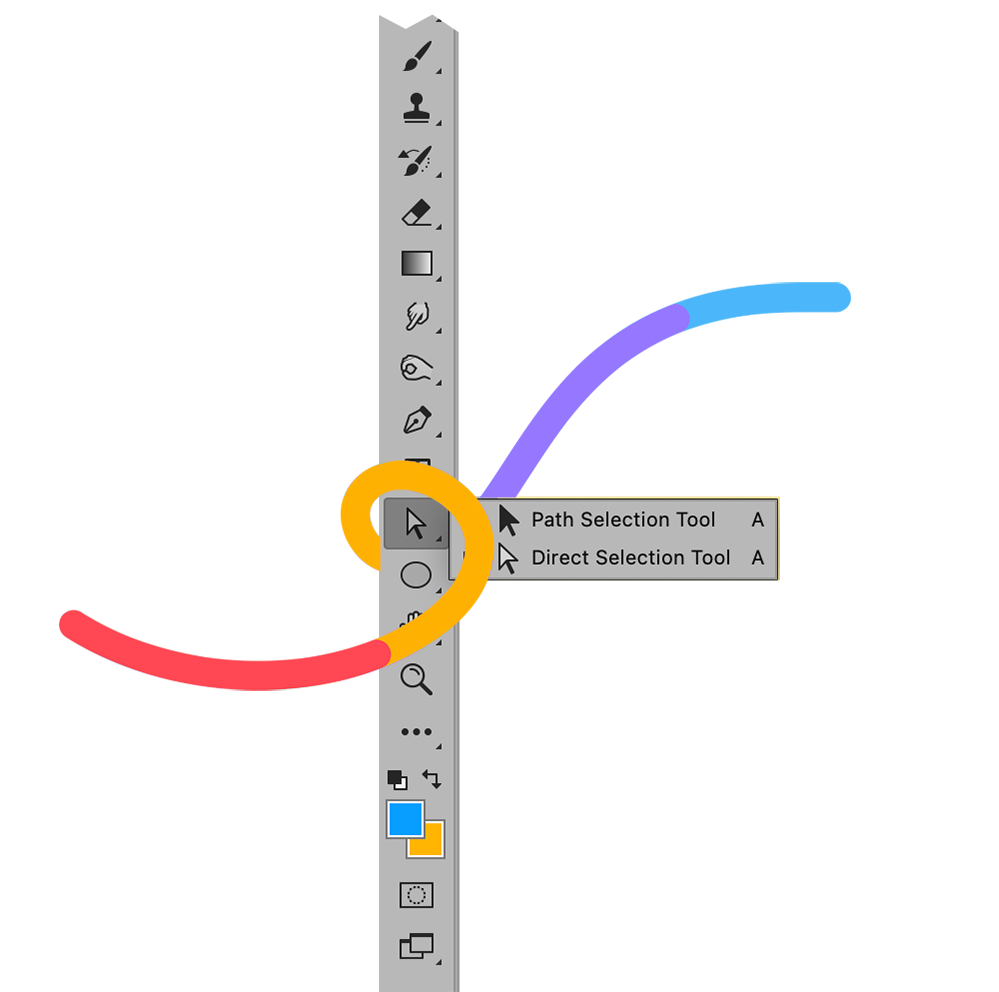
 

[cta text=”4 Photoshop and Clipping Path Shortcuts to Bookmark” button=”Learn more” link=”https://pathedits.com/blogs/tips/clipping-path-photoshop-shortcuts-editing-ecommerce-photos”]

Step 3: Save your path

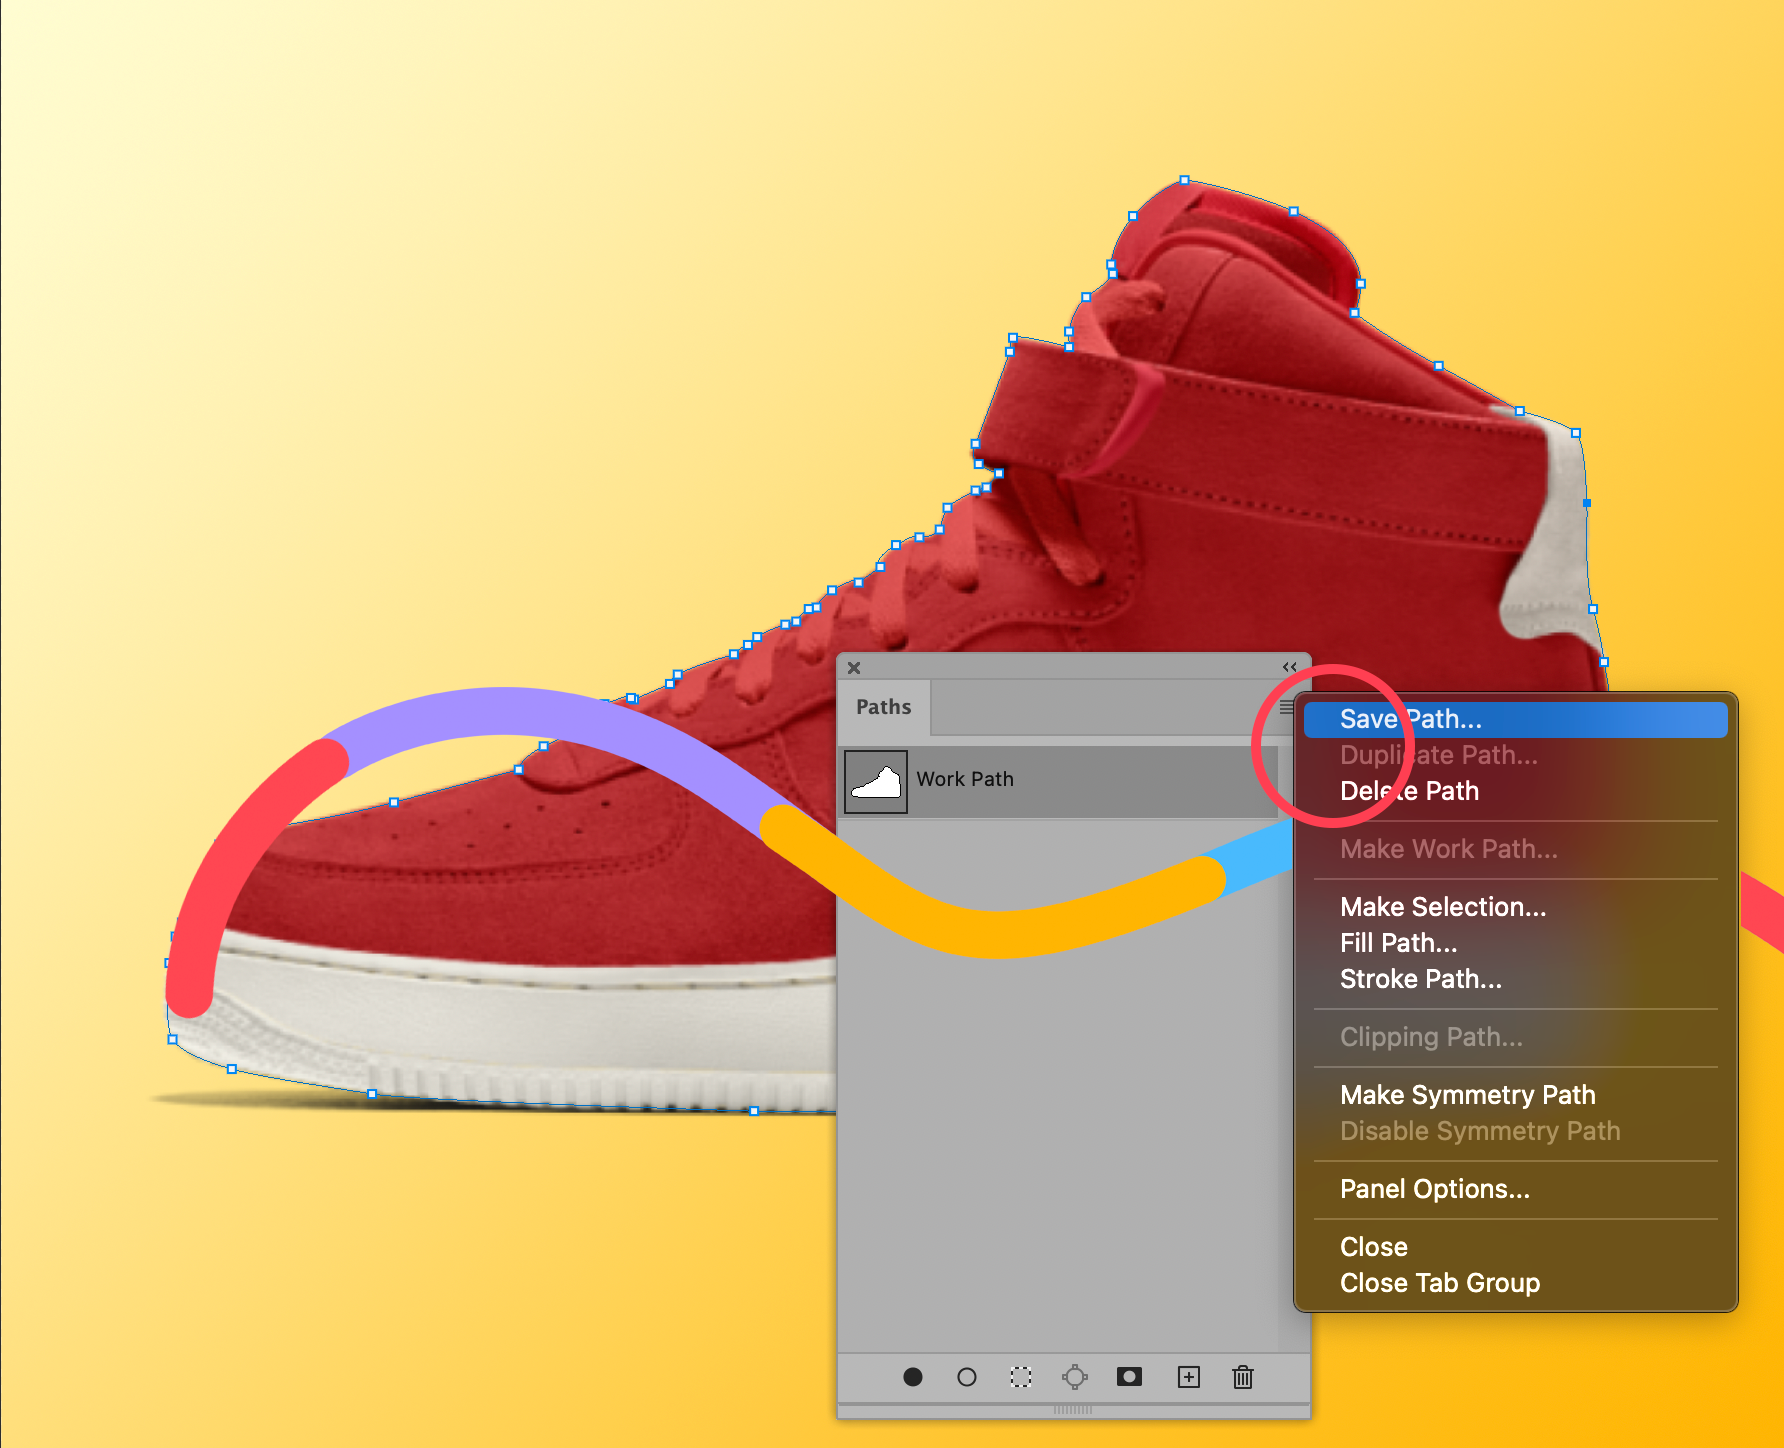
Once you’re happy with the path you’ve created, go to your Paths panel in Photoshop 2021. If you don’t see the panel, you can select Windows > Paths to bring up the Paths panel.

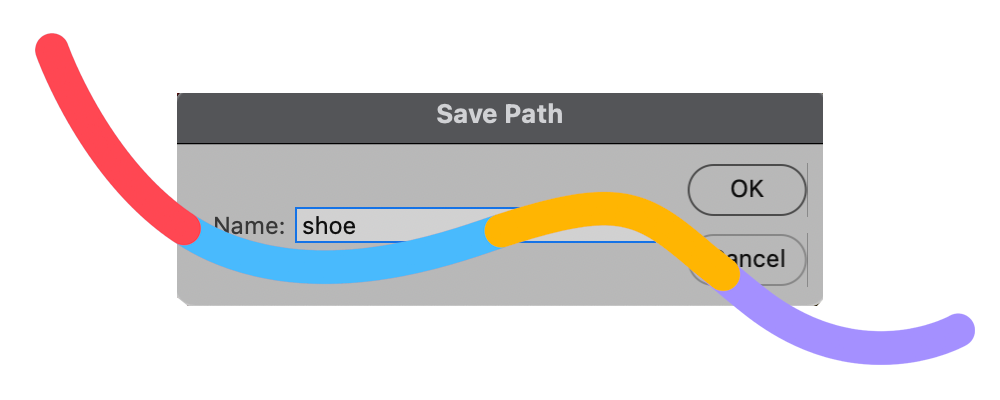
Once in the panel, click on the Work Path you’ve just created (if it’s not already selected). Then click on the panel’s menu and choose Save Path.
 

Tip: Give your new path a name that identifies the object it’s outlining. This is good practice as you may find yourself working in a file that requires multiple clipping paths.
Step 4: Create a clipping path

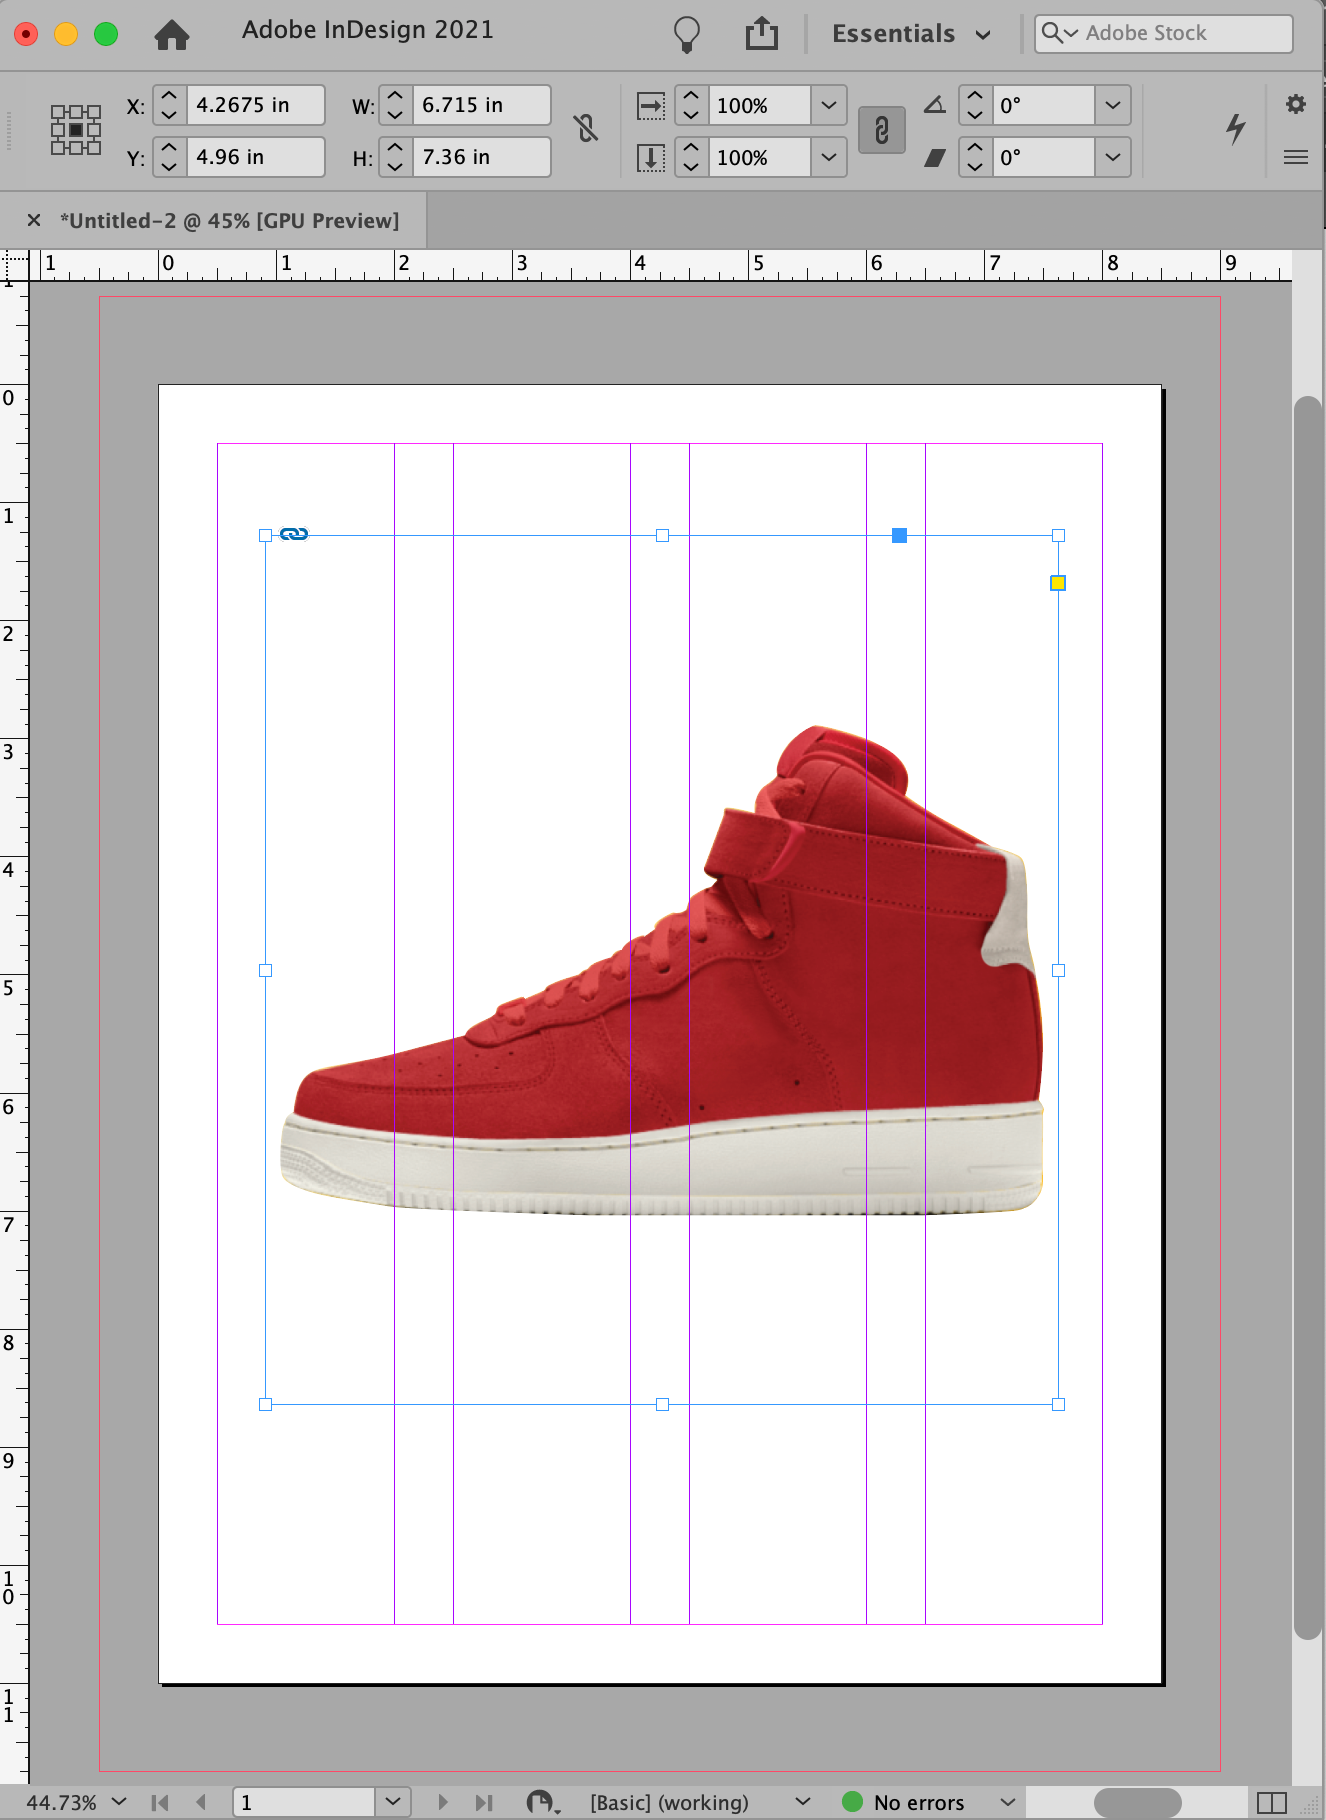
Traditionally, a true clipping path is a path created in Photoshop and can be read in other applications. For example, you can create a clipping path around a product photo in Photoshop without damaging your original image, and then import that image into design software such as InDesign or Illustrator, and the background of your image will be automatically “clipped.”

For this step, we’ll go over how to create a clipping path the “traditional” way. In the next step, you’ll learn how to use the path you created to remove a background directly in Photoshop.

To create a traditional clipping path, simply click on the saved path you just created in your Paths panel. Click on the panel menu again and choose Clipping Path.
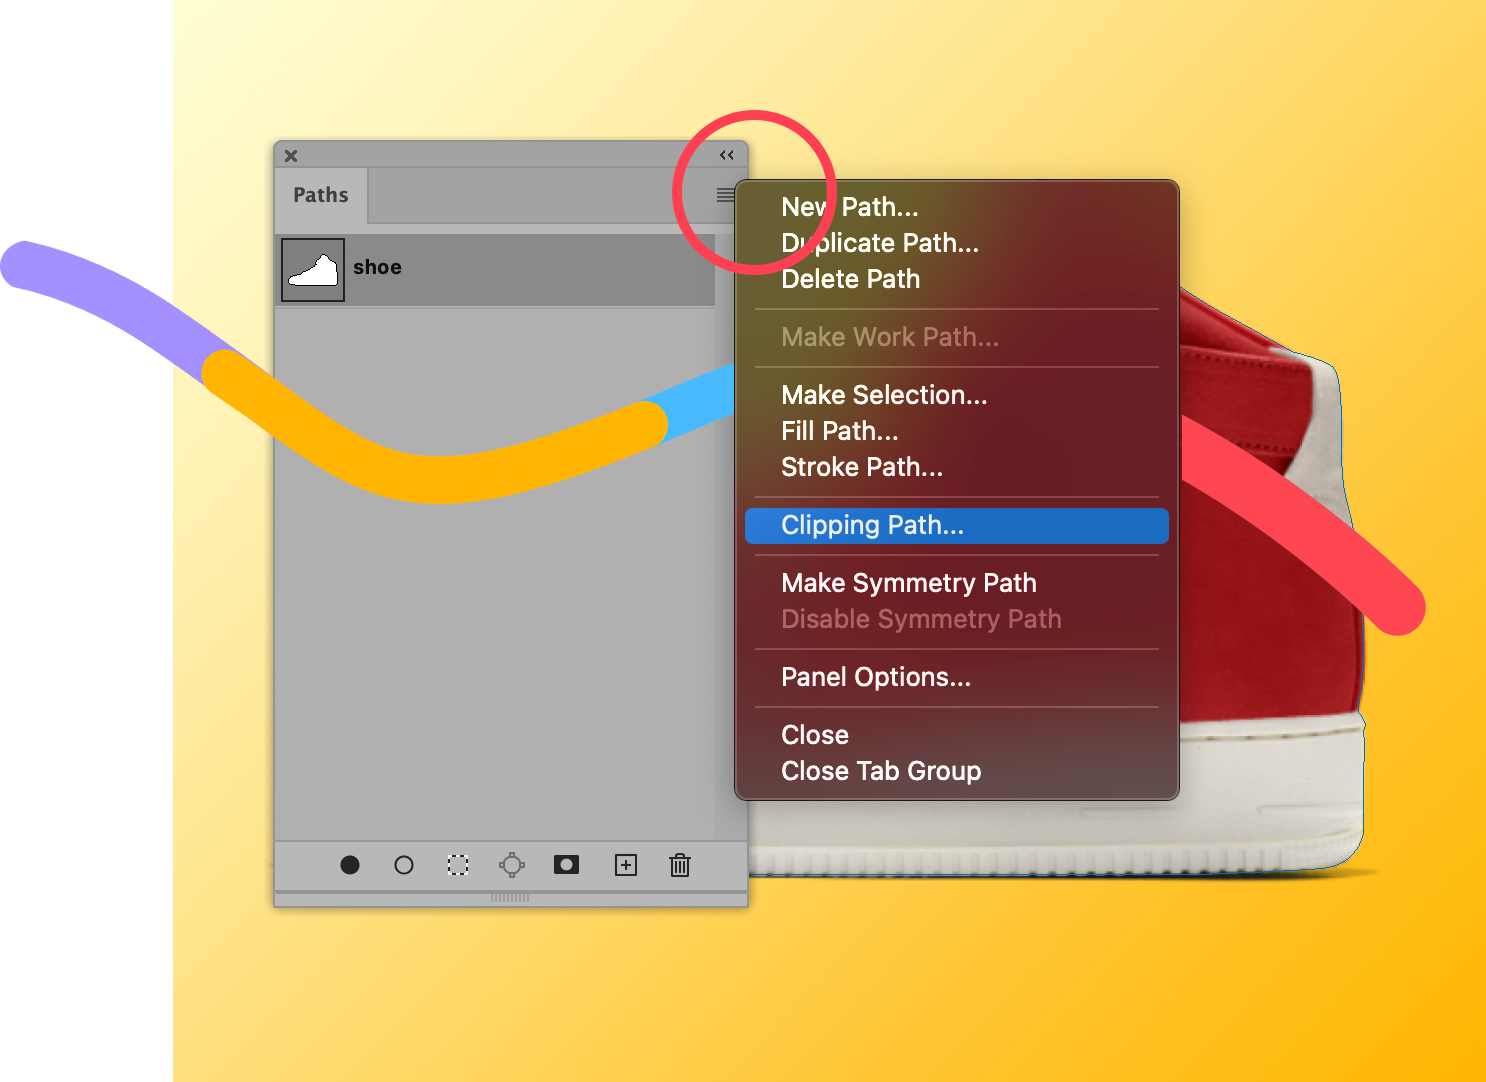
You won’t see a difference in your Photoshop document, but if you save your image in a PSD file format, and then place that image into InDesign or Illustrator, you’ll see the clipping path doing its job.

Step 5: Create a selection from your clipping path

For ecommerce use, you’ll most likely need to remove a background entirely from your product image within Photoshop. And now that you’ve created your path, the next part is easy. First, make sure you’re in a layer you can edit appropriately. Go to your Layers Panel. If you don’t see the panel, you can select Window > Layers from the dropdown menu at the top of the application window.

[cta text=”Photoshop Layers Tutorial: A Beginner’s Guide ” button=”Learn more” link=”https://pathedits.com/blogs/tips/photoshop-tutorial-beginningers-guide-using-layers”]

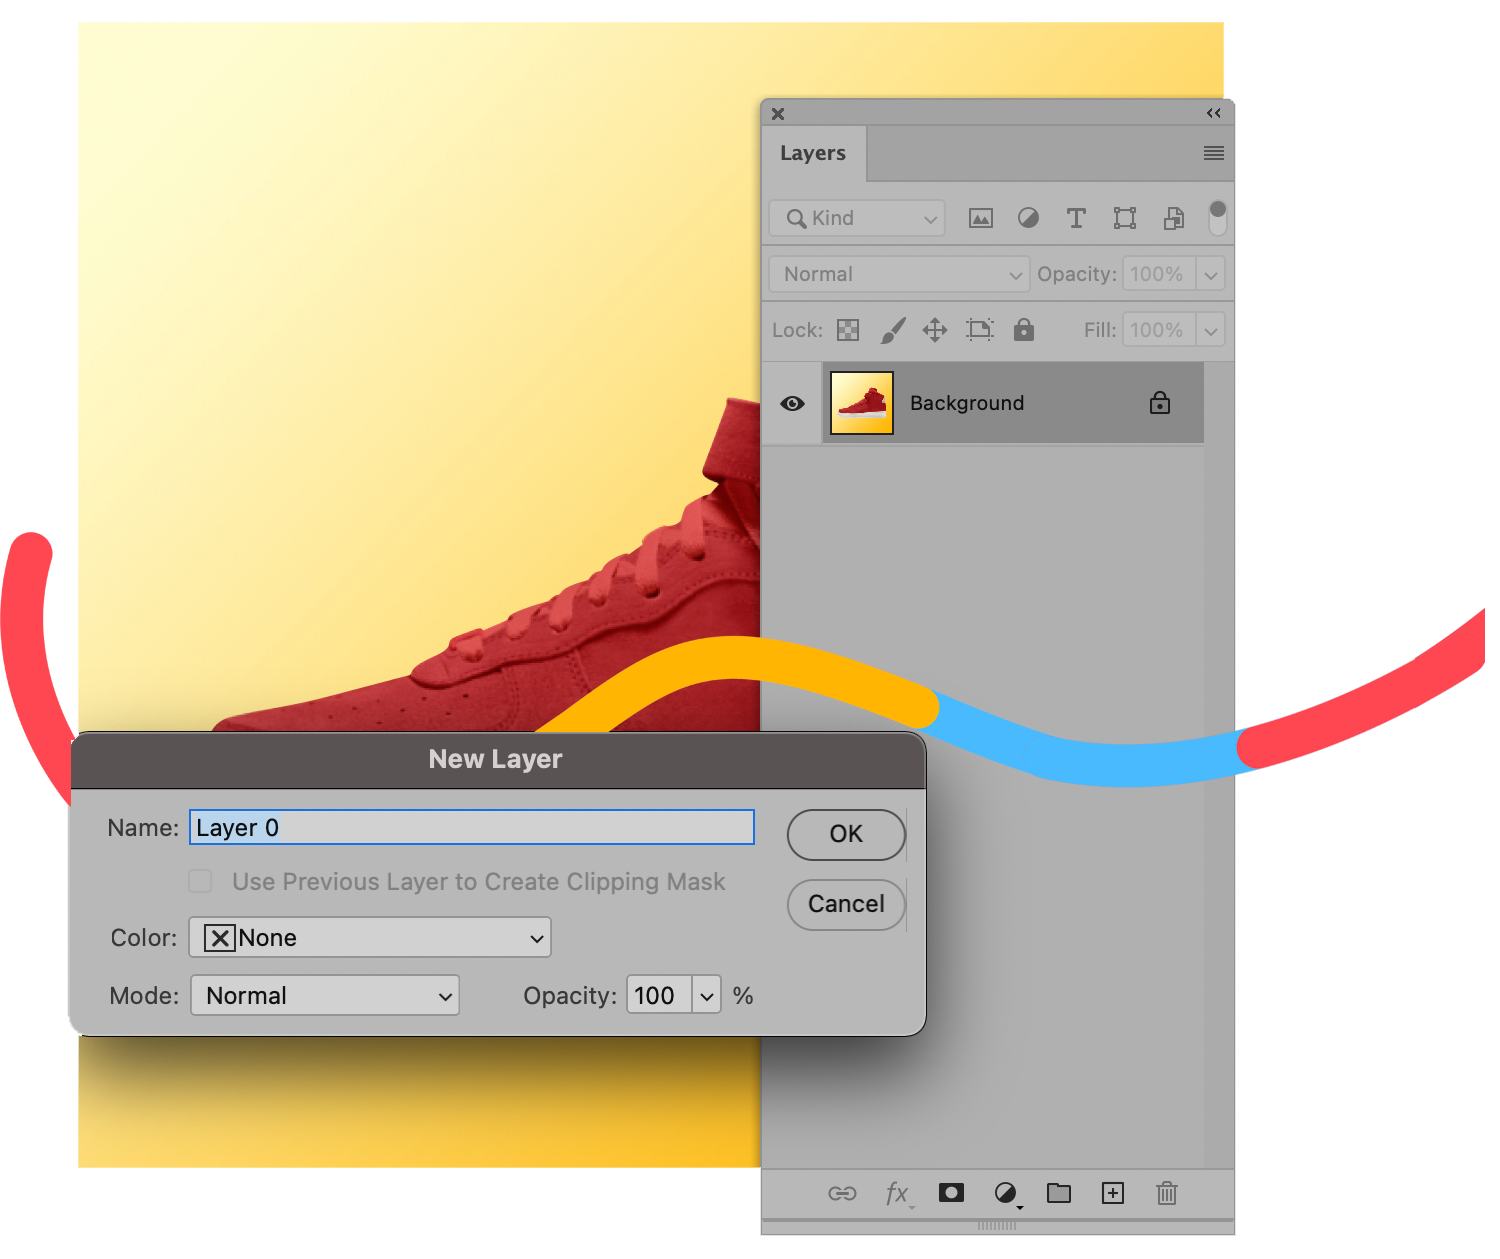
Make sure the layer containing your product image is unlocked. If your image is in a locked Background layer, simply double click on the layer to make it Layer 0. Click OK.
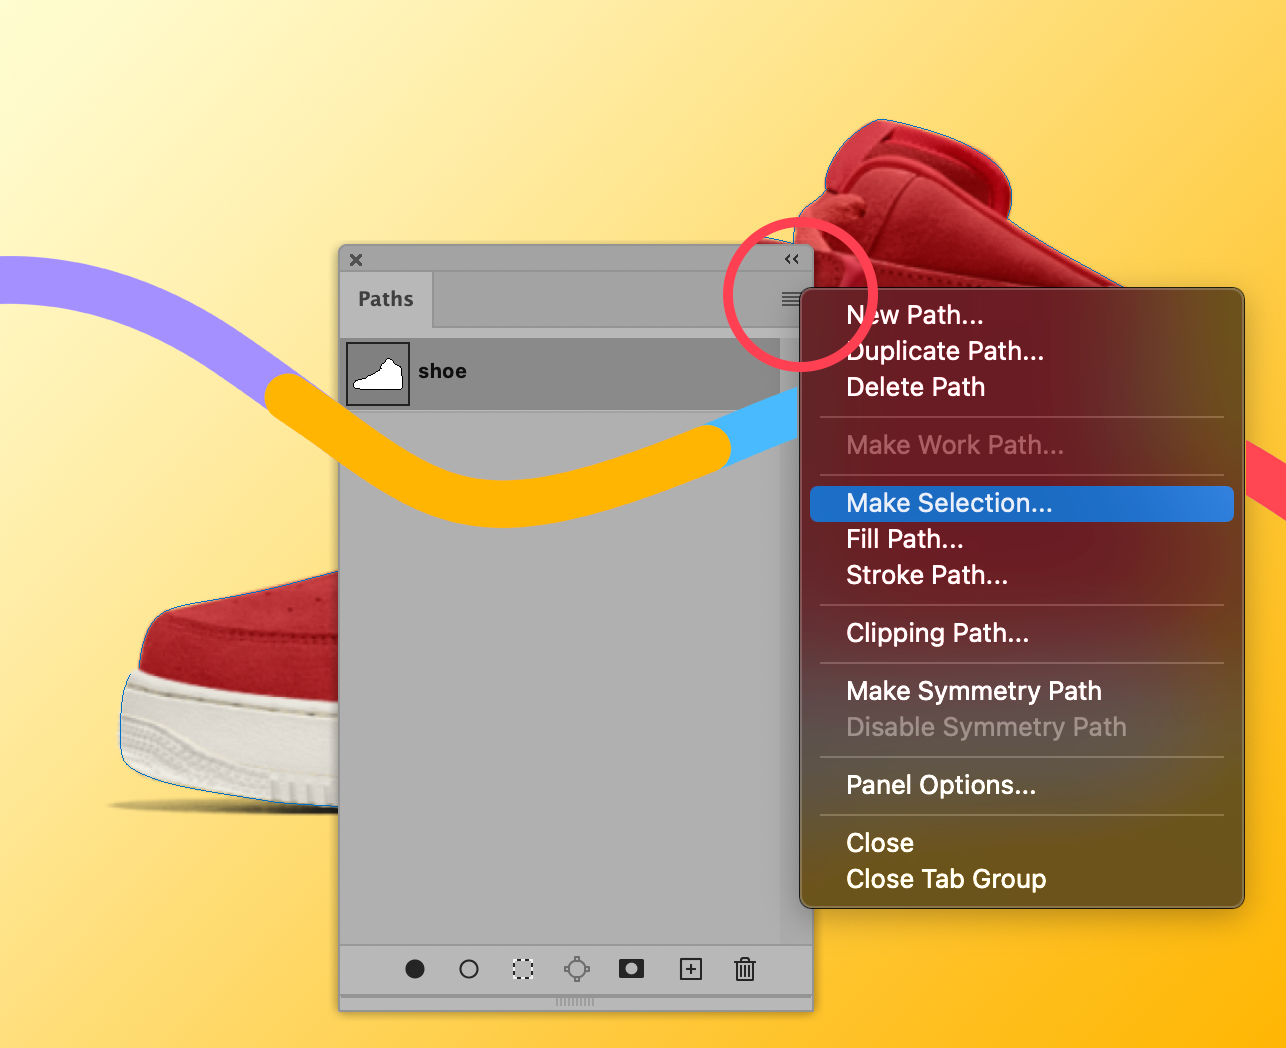
In your Paths panel, make sure your new Path is selected. Then, from the Panel’s menu, choose Make Selection….
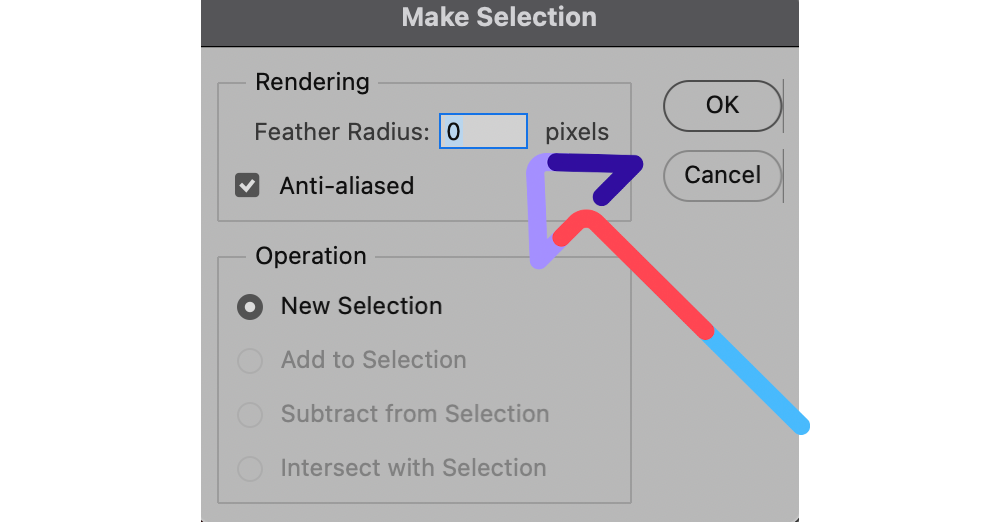
Check and make sure Feather Radius is set to 0. Click OK.
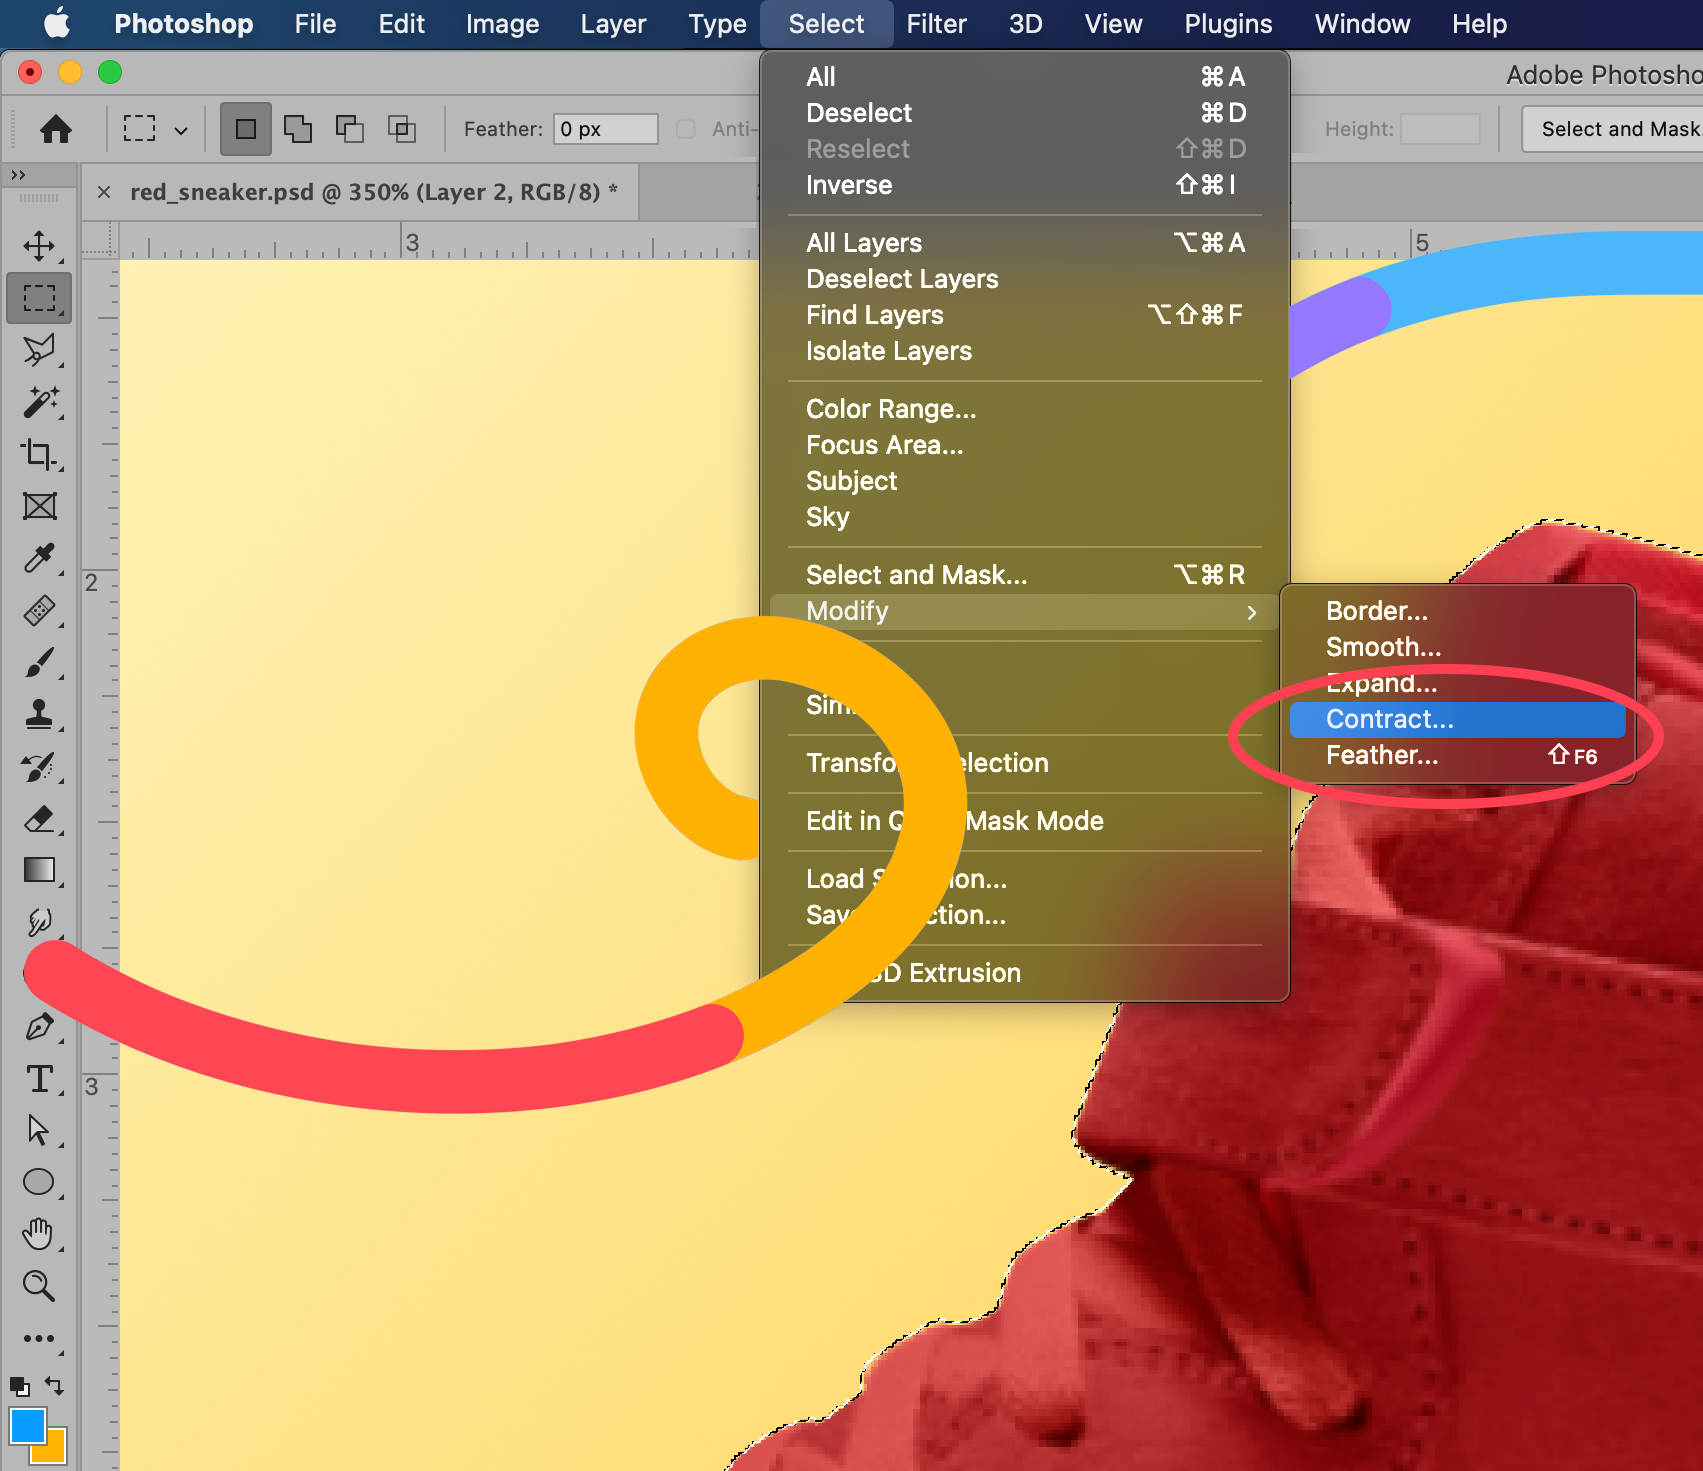
Now, choose Select > Modify > Contract from the dropdown menu at the top of the application window.
In the dialog box that appears, set the contract radius to 1. Click OK.

By doing this, you’ll move your selection just slightly inward, so you don’t end up with any background artifacts showing up in your masked image.

[cta text=”Clipping Path vs. Masking: What’s the Difference?” button=”Learn more” link=”https://pathedits.com/blogs/tips/clipping-path-vs-masking-difference-comparison”]

Step 6: Create a clipping mask

For this next step, you’ll need to go back into your Layers panel.

Make sure your layer containing your product image is selected in your Layers panel. At the bottom of your Layers panel, you’ll see a little icon that looks like a black rectangle with a circle cut out of the middle of it — the Add Layer Mask icon. Click on that icon.

You’ve now created a Layer mask that isolates your product image from its background.
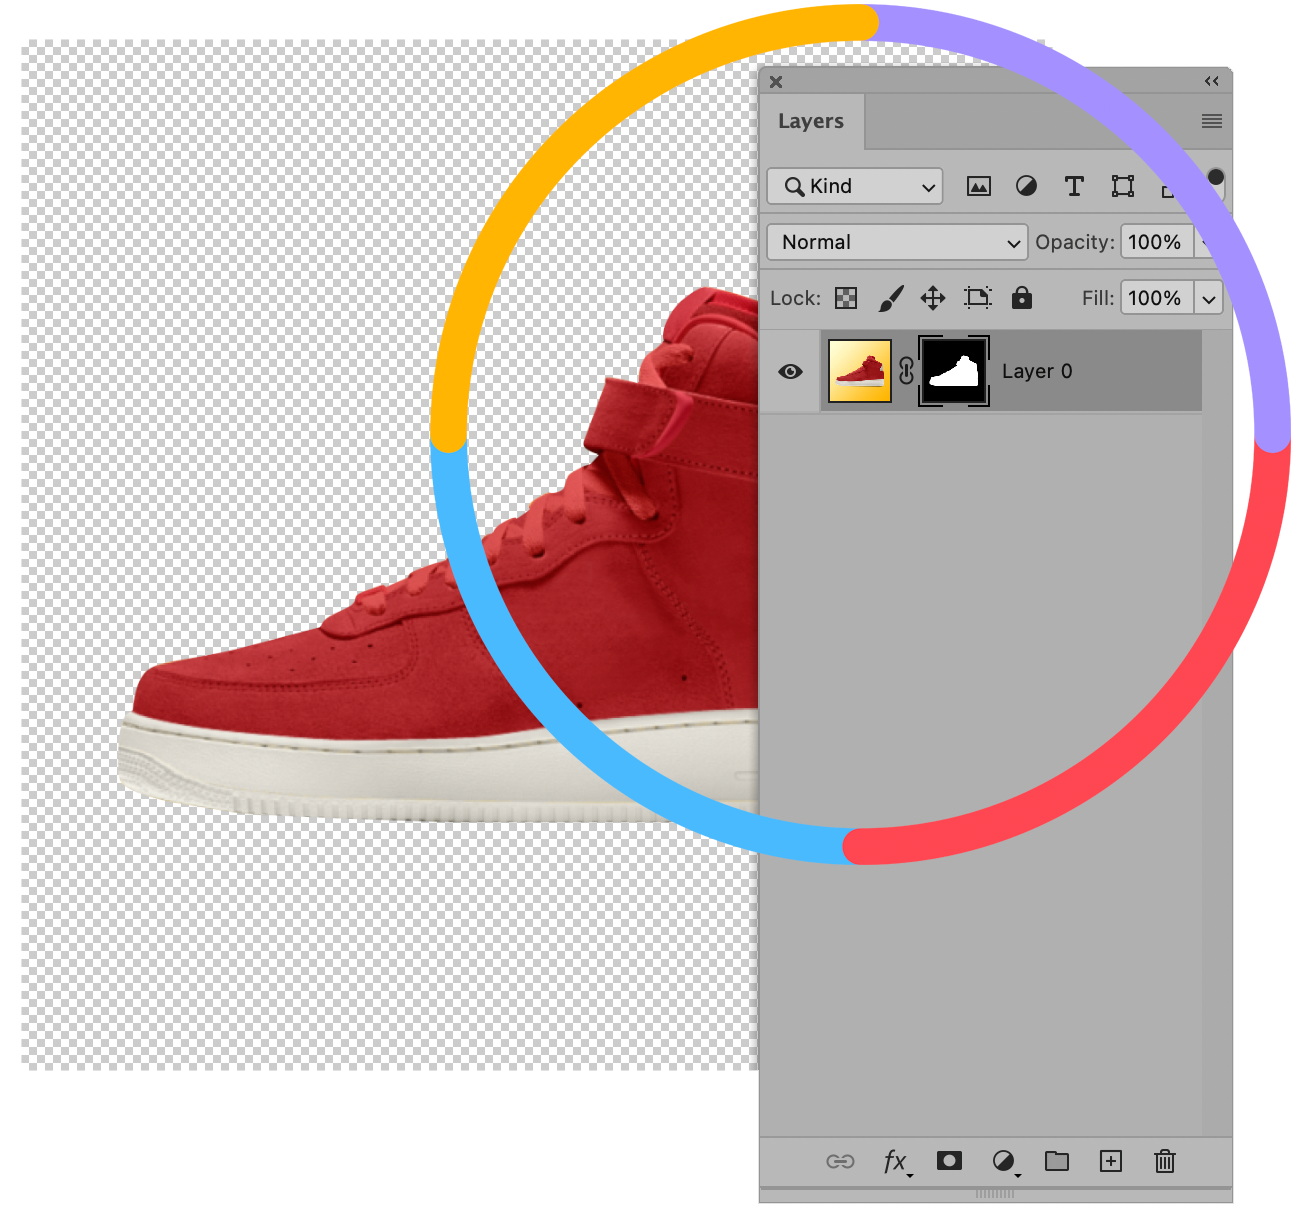
By using a mask, you are isolating the product image in a non-destructive way. Your original background is still there should you need it in the future, but it’s now masked.

You can easily place another background under your Layer 0 to put your product into another setting, or leave it on a transparent background.

[cta text=”Not enough time or patience to handle the clipping paths yourself? Outsource them to Path, your virtual clipping path studio” button=”Learn more” link=”https://pathedits.com/pages/clipping-path”]
How to Create an Instagram Carousel in Photoshop

How to Make a Carousel in Photoshop

How to Make a Carousel in Photoshop 

Throughout the photography community, Instagram carousels are one of the biggest trends that everyone raves about.  Carousels are a great and easy way for creative individuals to showcase MORE than 10 photos across the allowed ten swipes of an individual IG post in a very artistically pleasing way.

Today, I will be showing you how to create a carousel in Photoshop that will give you both easier control over your image layout and improve the quality of your showcased images too. 

Read below to get started:

Lightroom & Photoshop Facebook Group

Step 1. Create Your Base Layer

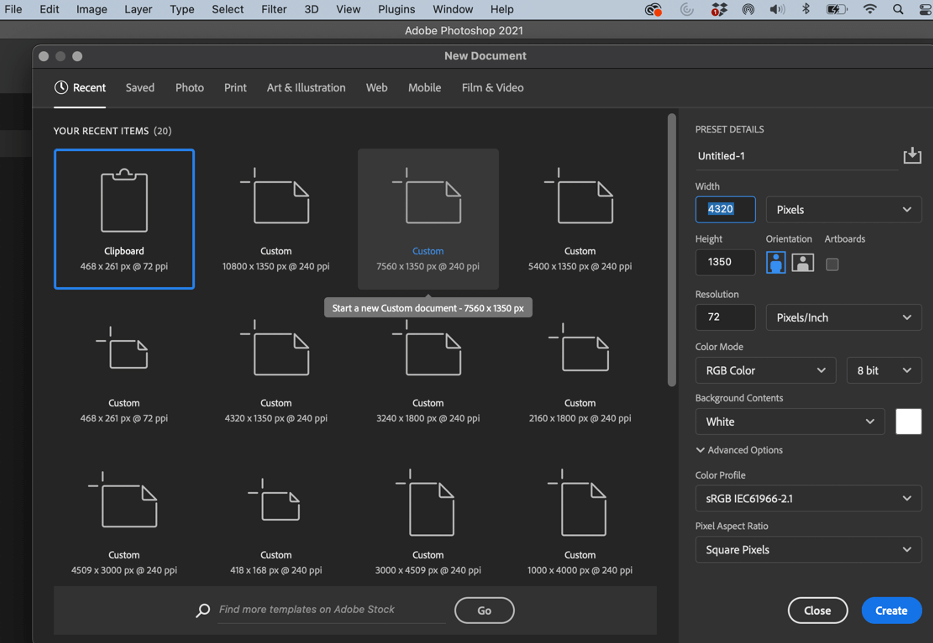
When your Photoshop is up and running, go to the top menu bar and select File>New to open a new document. 

An Instagram post has a maximum height of 1350 pixels by 1080 pixels, so go ahead and enter 1350 into Height.  Then, depending on how many swipes you want your carousel to be, multiply that number (i.e. your swipes) by 1080 and enter that number into Width.  For this example, I want 4 swipes, so I will multiply 4 by 1080 which equals 4320. 

Make sure next to “Width” the drop-down box says “Pixels”.  Once you are ready to continue, click “Create”.

Creating a Photography Carousel in Photoshop

Step 2. Open Your Images

Next, open all the images you want to include in your carousel.  To open your images, go back to the menu bar, and choose File>Open.  Select your photo and hit Open.  Repeat for each of the photos you want to include.

How to create an instagram carousel in Photoshop

Step 3: Bring Images to the Base Layer

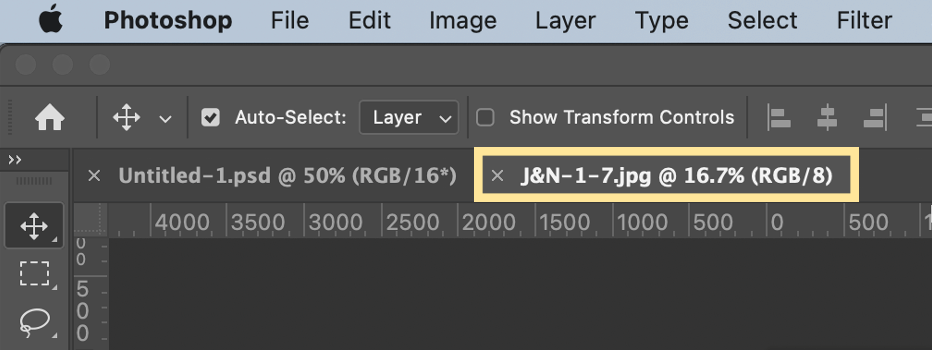
Notice that you now have your base layer as the first tab and your other images will show in the following tabs.  In the tabs, click on the first image you opened up.

Using Photoshop to create an instagram carousel

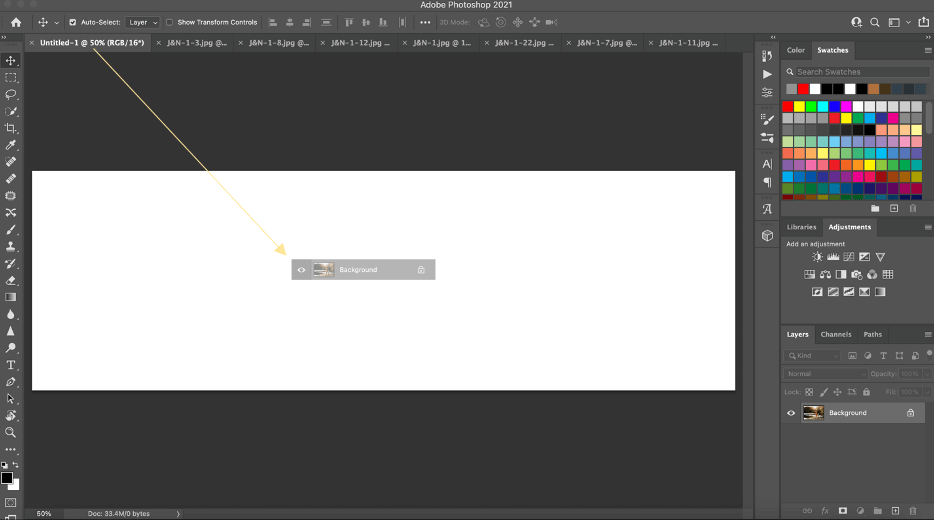
At the bottom right hand side of this photo, hover your cursor over the background layer, click and hold down, and then drag the photo to hover over your base layer.

Instagram Carousel Template PSD

When you hover over the base layer, it will bring the carousel document to the forefront.  Drop the background layer onto the base layer.

How to make a photo carousel in Photoshop

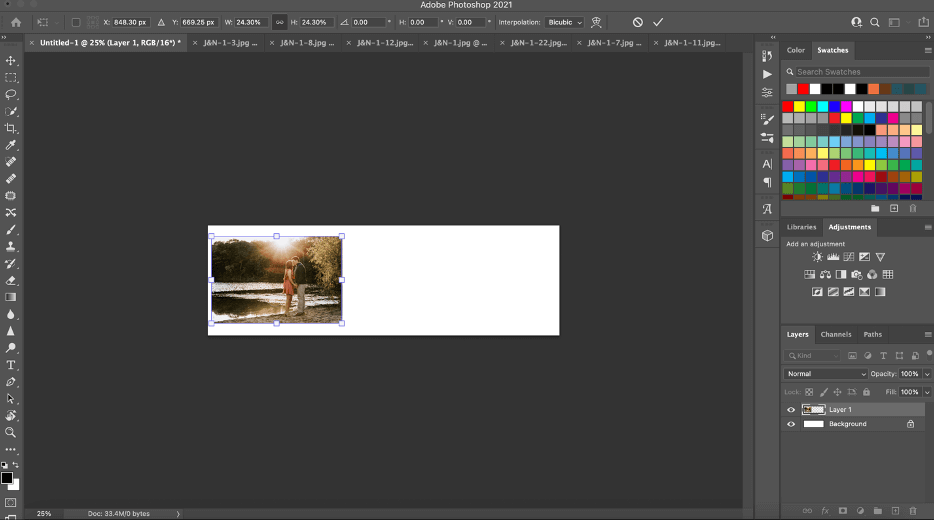
­Next, you will have to resize the image to fit the layer.  To resize your image, press CTRL + T (for PC) or CMD + T (for Mac).  Grab the white squares at the corner of your image and drag to resize and make smaller.  Once you are happy with your image size, click enter to confirm.

Resizing Image for Instagram Carousel

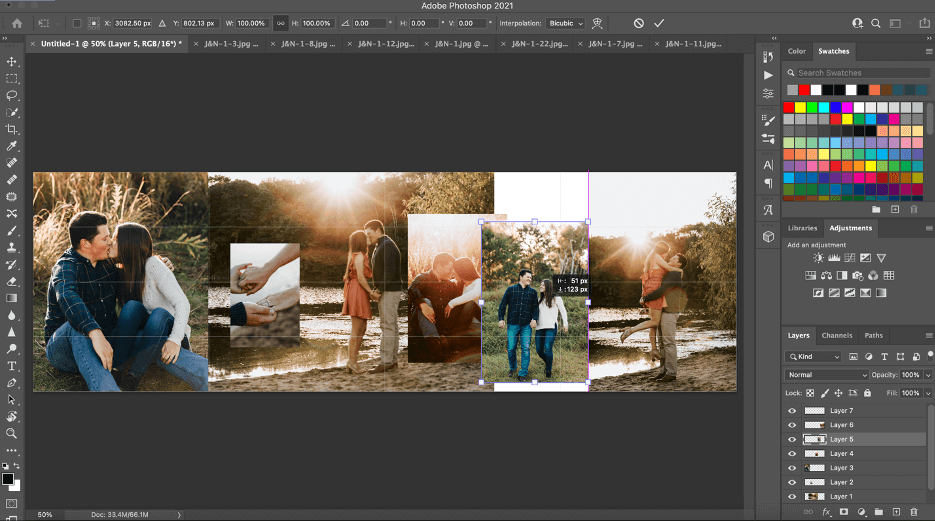
Go ahead and repeat these steps for ALL OF YOUR IMAGES until your base layer looks something like the image below (with all images sized down to fit across the white background).

Make an instagram carousel using photoshop

Step 4: Create Your Grid

Now that you have all of your images on the Base Layer, you will want to turn on the Photoshop grid to see WHERE Instagram will cut off your carousel document with each swipe.  To turn on the grid, press CTRL + apostrophe (‘)(for PC) or CMD + apostrophe (‘)(for Mac).

How to Make Instagram Carousel in Photoshop

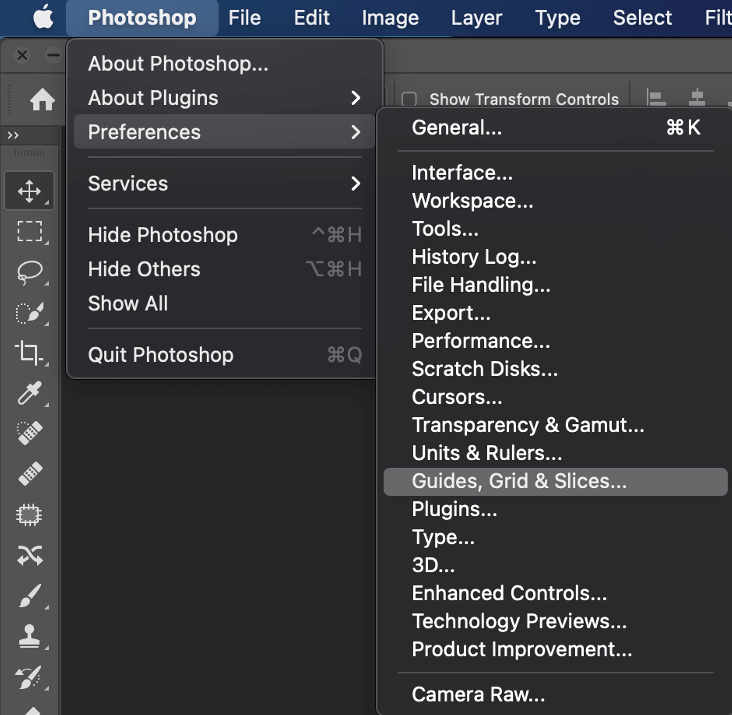
Next, in the top menu go to Photoshop, Preferences, and select “Guides, Grids, & Slices”.

Image Grid Photoshop

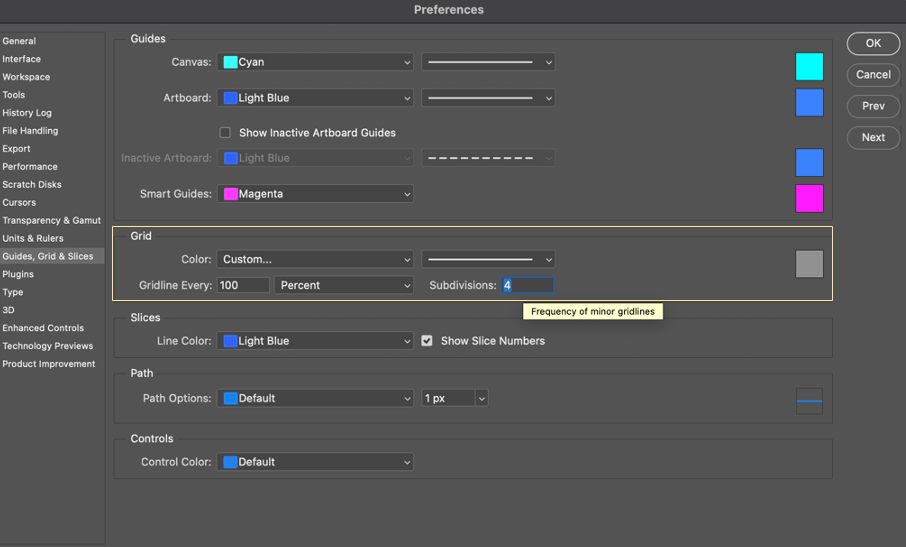
This will open your Preferences screen.  In the Grid section, confirt that your “Gridline Every” is set to 100 and Percent.  Now, remember how many swipes you initially chose.  Enter that number into the “Subdivisions” box and then click OK.

For my example, I entered four because I want my carousel to have 4 swipes.

Photoshop Grid for Instagram Carousel

Step 5: Snap Your Grid

As you rearrange the photos on your Base Layer you will want them to “snap” to the grid you just created. 

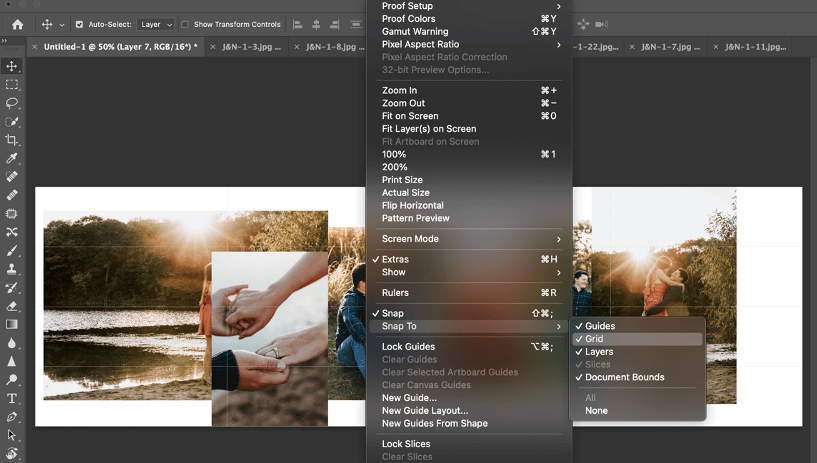
Snapping will help you see where the end of EACH photo in your carousel will be.  To turn snapping on, go to the main menu and select View>Snap To.  Make sure there is check mark next to Grid. 

Carousel Image Grid in Photoshop

Step 6: Create Your Desired Layout

Now you are ready to play around with the layout of your Instagram carousel.  To move your images around, click on the photo you want to move and drag it where you want.  To change the image size, press CTRL + T (for PC) or CMD + T (for Mac) as I mentioned previously.  Grab the white square at the corner of your image and drag to resize

Make sure to take note of where your grid (or swipe) will be cut off when you post your carousel in Instagram.  This is a good place to start if you don’t know how you want your carousel to look. 

How to Create an Instagram Carousel in Photoshop

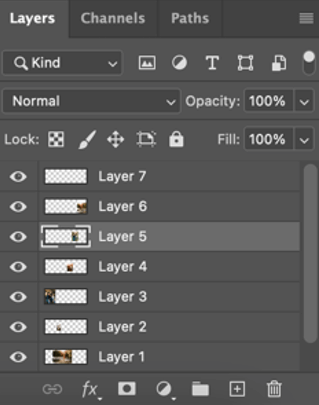
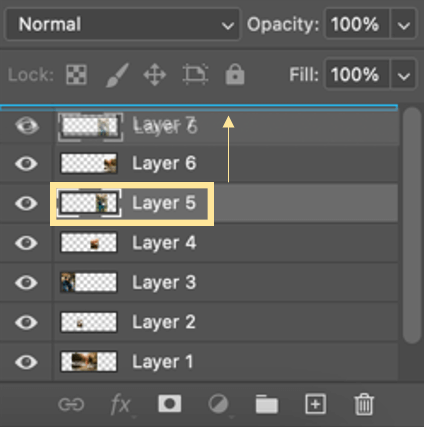
If there’s a photo you want to move but another image is on top of it or the other image is cutting off part of what you want to have shown: go to the layers channel at the bottom left side of your screen and click on the layer of the photo you want to move to the top.

How to Create Instagram Carousel

Now, click and hold that image layer and drag it upwards until a blue line appears above the image layer of the photo that was cutting off your other image.  The blue line will show you where your layer will be dropped.

That particular photo layer will now be above the other one and image will no longer be hiding underneath.

making an instagram carousel in photoshop

Step 7: Slice Your Grid

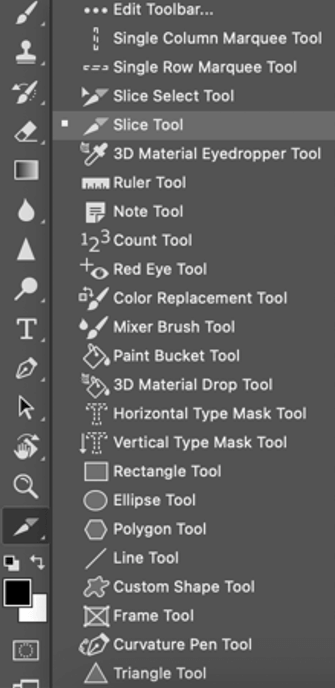
Next, to prepare you document for Instagram, you will need to slice your grid.  On the left side tool bar, choose the three dots at the bottom of your choices.  Click and hold down on the triangle below the three dots until a new tool bar opens.

Slice Photo Instagram

When the new toolbar opens, click on the Slice Tool:

How to Slice an Image in Photoshop

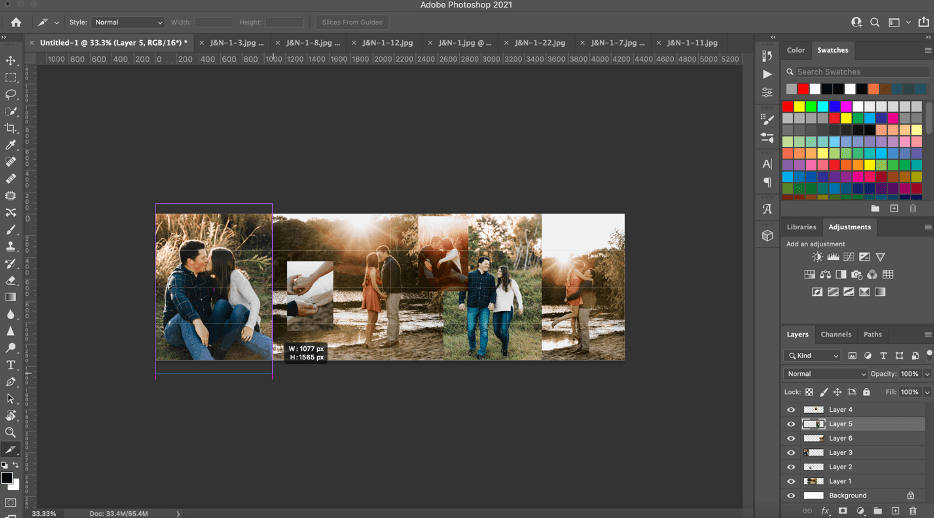
Now click above the top left side of your carousel and drag across your first grid section until it snaps at your grid mark.  Repeat this slicing process for all the grid sections you already created.

Making a carousel for Instagram in Photoshop

Your carousel document should now look something like this.  Note: there will be a blue box above the starting point of each slice.

Sliced Instagram Carousel Image in Photoshop

You can double check that you sliced at the right spots by clicking on the sliced lines and attempt to drag them.  When you do this, it will tell you the width of each particular slice, which should be 1080 pixels.

Instagram Collage Tutorial

Step 8: Save Your Carousel

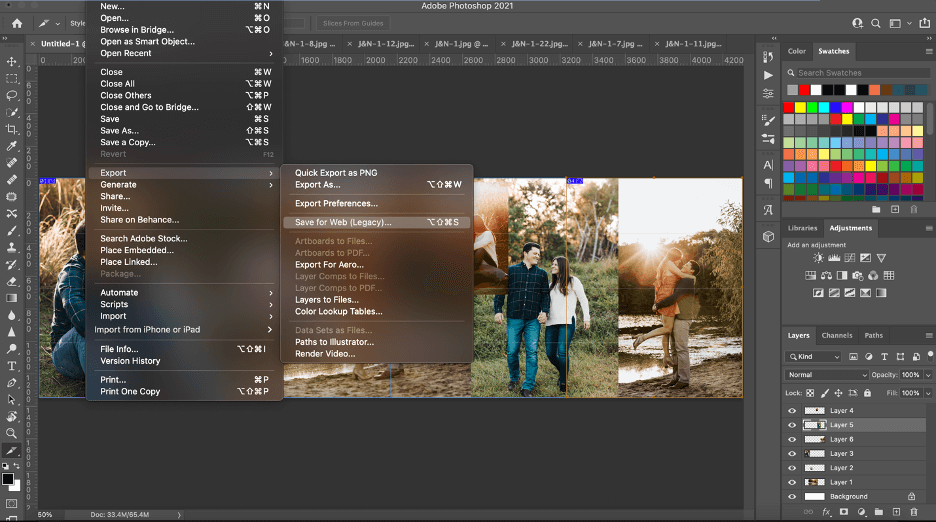
Next, you will want to save your carousel by going to the main menu and selecting File>Export>Save for Web (Legacy).

Saving Instagram Carousel in Photoshop

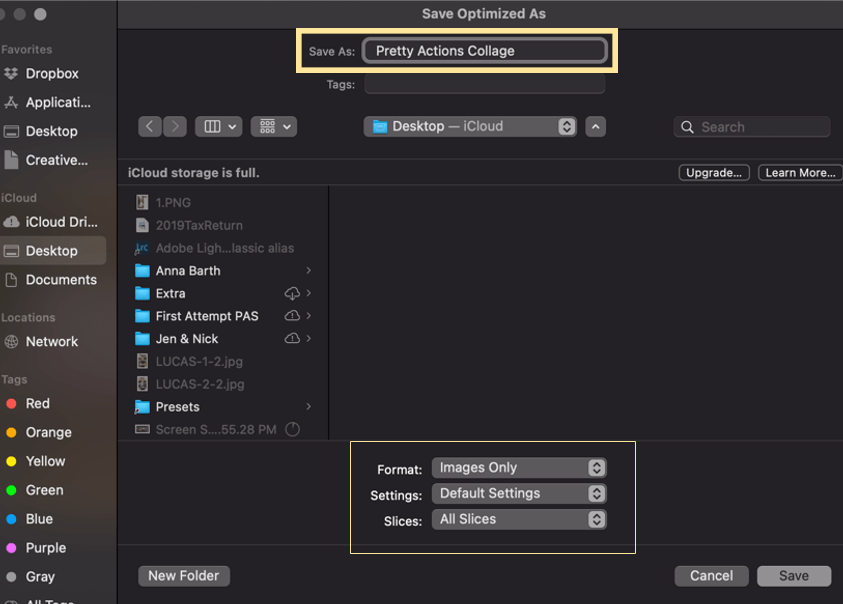
Name your carousel in Save As.  Choose from the far right where the photos will be saved too.  Then double check in the bottom part each section to make sure the following options are selected:

  • Format is set to “Images Only”.
  • Settings is set to “Default Settings”.
  • Slices is set to “All Slices”.

Once that is done, click Save to save each slice as its own image.

Saving Instagram Carousel in Photoshop

You are now ready to post your carousel to Instagram!  Within Instagram, use their multiple photo option to select and display the carousel images you created.

To further inspire you, I’ve include some examples of visually appealing and successful carousels that I created for my own Instagram.

HAPPY CAROUSEL CREATING!

Instagram Carousel Template Photoshop

Additional Reading Just For You:

1. How to Edit Instragram Photos in Lightroom

2. Instagram Marketing Tips for Photographers

Do you have any questions or comments about Creating an Instagram Carousel in Photoshop?  Just leave us a comment below – we would LOVE to hear from you!  And PLEASE SHARE this post using the social sharing buttons (we really appreciate it)!

Warm Lightroom Presets

How to Successfully Update Lightroom

How to Update Lightroom

How to Successfully Update to the Latest Version of Lightroom

I have successfully updated MANY versions of Lightroom (and other software) and completed lots of operating system upgrades.  But last week, I had a VERY DIFFICULT experience that taught me that EVEN I AM NOT IMMUNE FROM THE DIFFICULTIES OF UPDATING LIGHTROOM and my computer’s operating system.

Last week, I saw the big Lightroom update and was really excited.  So I opened my Creative Cloud looking for the update and found my computer wasn’t eligible for the update.

WHAT?  NOT ELIGIBLE?

With a few clicks I found that the reason that I wasn’t eligible to update was that my OPERATING SYSTEM WAS TOO OLD.  Suddenly, there are two updates that needed to happen in order to have the newest version of Lightroom.

**FUNNY SIDE NOTE: The reason my operating system was out of date is that Lightroom didn’t work well with some of the previous operating system updates, so I stuck with the old version.**

Lightroom & Photoshop Facebook Group

I knew this update process could take some time but it ended up taking A LOT LONGER than I originally planned because I ran into trouble updating my operating system.

It was really messy, but I wanted to share some tips from my experience, so that whether you are updating Lightroom, Photoshop, your operating system (or all three), the process will go more smoothly for YOU!

Newest Lightroom Update

Step 1: Back Up EVERYTHING

You might be excited to update your Lightroom RIGHT AWAY, but whatever you do, DO NOT SKIP THIS STEP. 

  • Backup your photos.
  • Backup your files.
  • Backup your Lightroom catalog.
  • Backup your Lightroom presets.
  • Backup EVERYTHING!

I am usually pretty good at doing back ups, but I was SO excited to update my Lightroom this time, I missed a few things.  And when my update took a turn for the worse, unfortunately those things were permanently lost.

Luckily, the losses were minor because I have a pretty good backup system in place.  But those losses could have been completely avoided if I had been a little more diligent about BACKING UP EVERYTHING!

Step 2: Plan Time for the Update

Updates take time, so make sure you set aside enough time in your schedule.  If you ONLY need to update Lightroom or Photoshop, those updates should take around 30-40 minutes.  But if you also need to update your operating system, keep in mind that could take several hours or more.

  • Don’t plan your update when you are in the middle of editing a session or multiple sessions for clients. 
  • If you are a professional photographer, don’t update in the middle of your busy season.
  • Don’t update when you have deadlines to meet or other pressing work that needs to be done.
  • Wait to update when you have enough time to devote to it and won’t be in a complete panic if the update doesn’t go according to plan.

Lightroom Update

Step 3: The Update Went Smoothly (If it Didn’t, See Step 4!)

Congratulations!  This is how we want ALL updates go.  Now, take some time to learn about the new features and practice using them so they can speed up your workflow.  There will be many experts to guide you through these updates.

Check to make sure that everything in the update is working correctly.  If you are updating Lightroom, open your Lightroom catalog and make sure that images are showing up how they should and make sure that you can see all your Lightroom presets.

Step 4: The Update Didn’t go Smoothly

Unfortunately, sometimes updates DON’T GO SMOOTHLY and it can happen when updating Lightroom, Photoshop and/or when you are updating your operating system (which can be even more problematic).

It doesn’t matter which update is causing problems, but when/if it does, make sure to get some help to keep things moving along.  The help may come in the form of using Google to search any errors that come up or find others that had the same issue and asked questions/shared solutions in forums or on their website.

If you can’t readily find answers or the things you are trying aren’t working, it’s probably time to reach out to customer service for whichever product you are trying to update.

No one enjoys working with customer service because it usually involves multiple calls and spending a lot of time on hold (I speak from experience).  However, unless you are an expert or know an expert in the computer field, reaching out to customer service may be the ONLY WAY to keep your install process moving along.

Adobe Lightroom Update

Final Pep Talk

Don’t be afraid to update Lightroom, Photoshop or your operating system.  YOU CAN DO IT!

Generally, most updates install smoothly and problematic updates will be the rare exception.  But either way, IF YOU ARE PREPARED before you begin your update, it won’t matter if it goes smoothly or not – all your data and images will be safely protected and cared for.

Do you have any questions or comments about Preparing to Update Lightroom?  Leave us a comment below – we would LOVE to hear from you!  And PLEASE SHARE this post using the social sharing buttons (We really appreciate it)!

Warm Lightroom Presets

3 Ways to Enhance Color in Photoshop

3 Ways to Enhance Color in Photoshop

“Color! What a deep and mysterious language, the language of dreams.” —Paul Gauguin

If a photo is worth a thousand words, then color might be priceless.  Objects in photographs can be accentuated or toned down through the clever use of color.  Communicating the message and mood of a photo is quickly done through color – or lack of color.  Color creates a natural contrast in neutral scenes, which organically brings depth into a shot.  Viewers’ eyes are immediately drawn towards bright colors and color stories, MAKING COLOR A POWERFUL VISUAL EFFECT.

Despite color being of utmost importance in photography, the camera may not always capture it well.  However, all hope is not lost – image editing software like Photoshop can bring a photo back to life through simple color enhancements.

Say goodbye to dull shots, and try these Photoshop tricks to enhance the color of your photos in a snap:

Photoshop Actions

1. Using a Vibrance Adjustment Layer

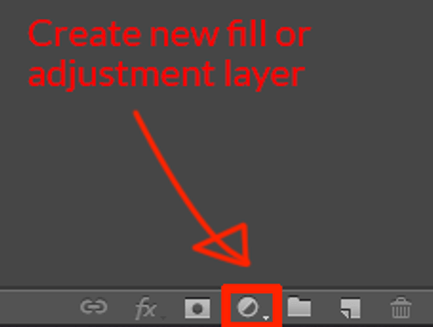
The simplest way to brighten up the colors in a photo is by creating a “Vibrance” adjustment layer.  First, locate the half-shaded circle icon on the bottom right of the “Layers” panel.

create a new adjustment layer

Click the “New Adjustment Layer” icon and select “Vibrance” from the pop-up tab.

creating a vibrance adjustment layer

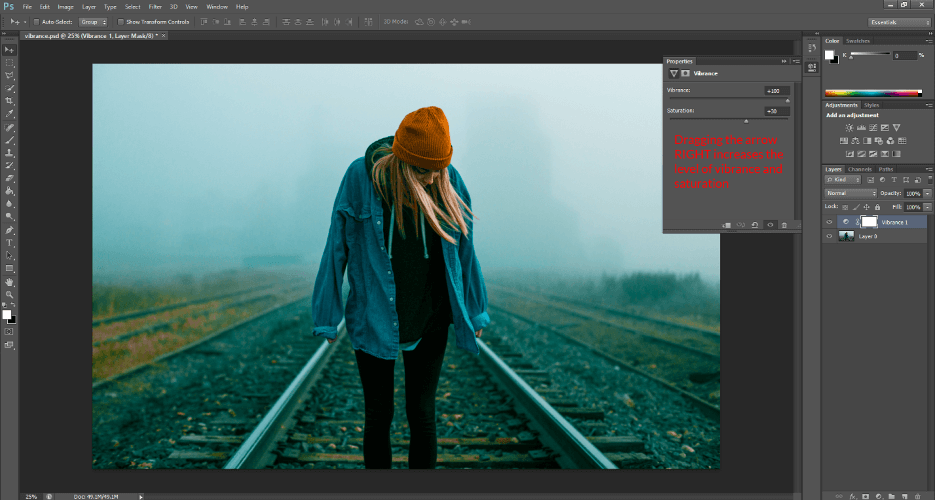
A grey box will open on the right and show the properties of this adjustment layer.  Drag the “Vibrance” to the right to increase the vibrancy.  The “Saturation” arrow functions in a similar way; drag it to the right to increase the saturation and drag it to the left to reduce the saturation.

How to increase vibrance in Photoshop

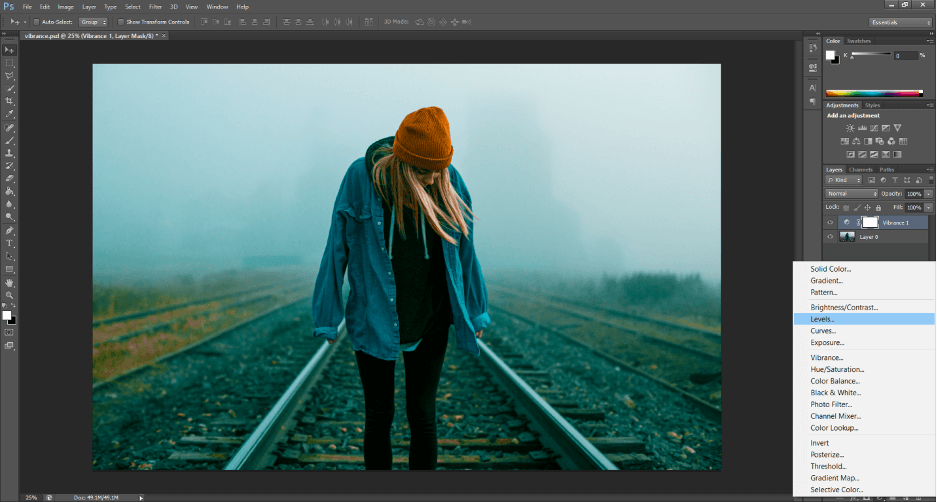
After achieving the desired color, you may want to increase the lighting of your image.  One way to do this is to add a “Levels” adjustment layer.  Choose Layer > New Adjustment Layer > Levels.  Alternatively, hit [Ctrl+L] on PC or [Command+L] on Mac.
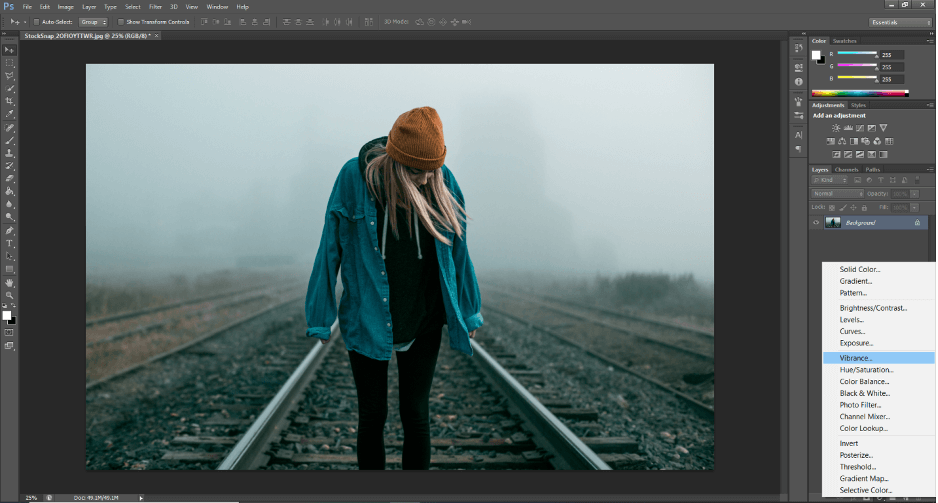
creating a levels adjustment layer in Photoshop

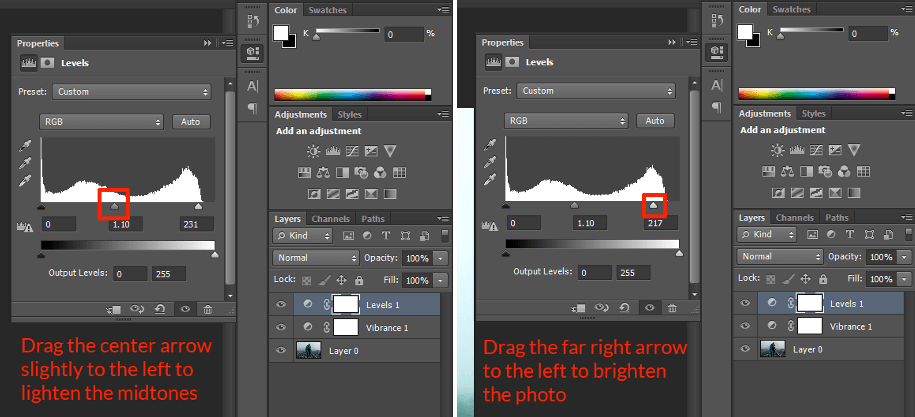
Another grey box will appear from the right and display the properties of the “Levels” layer.  Drag the left arrow to the right to darken the shadows, the center arrow to the left or right to adjust the mid-tones, and the right arrow to the left to brighten highlights in the photo. 

If the image is too dark, slide the middle arrow left, to lighten mid-tones, and the right arrow left, to brighten highlights.

That’s all there is to enchancing color with a vibrance adjustment.

How to use levels in Photoshop

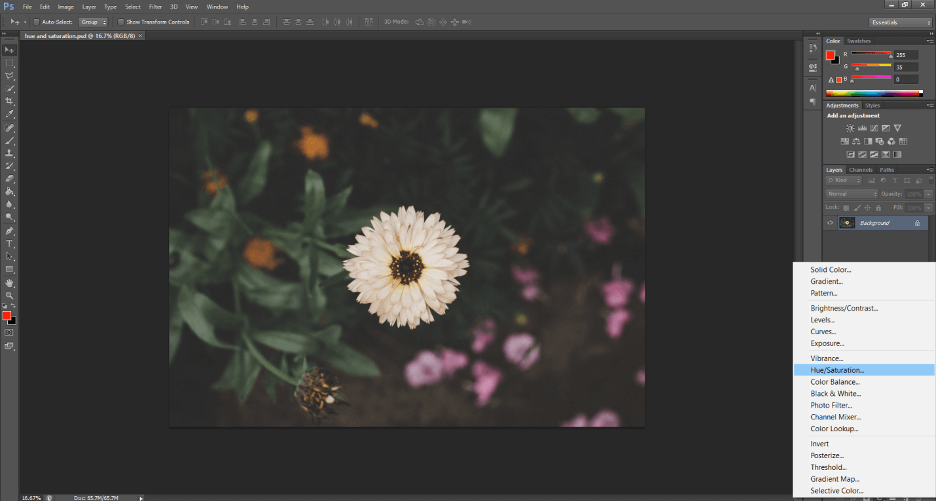
2. Using a Hue & Saturation Adjustment Layer

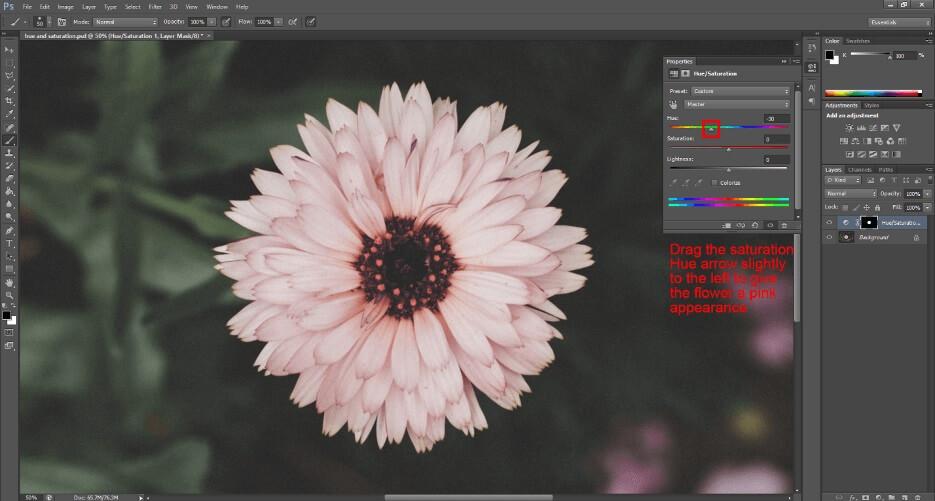
Another great way to enhance color in Photoshop is using a “Hue & Saturation” adjustment layer.  Similar to the “Vibrance” adjustment layer, choose Layer > New Adjustment Layer > Hue/Saturation.

Using Hue Saturation to enhance color in photoshop

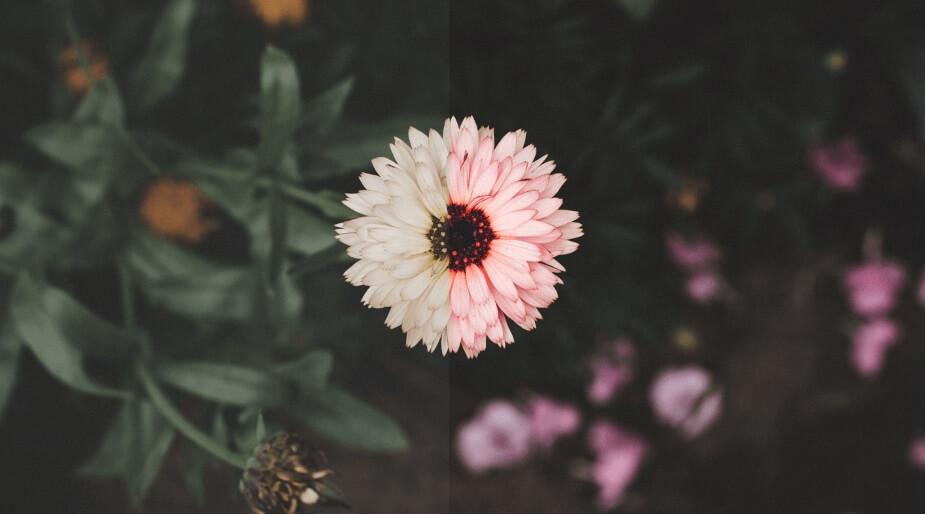
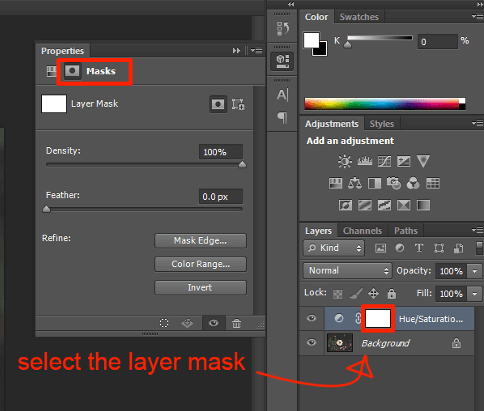
To isolate and make adjustments to the center flower, use a “Layer Mask”.  Select Hue/Saturation Layer > Layer Mask. 

Using a layer mask in Photoshop

Ensure that that the foreground color is black.  Note: you can easily toggle the foreground and background color by pressing [X].

how to set and change foreground color

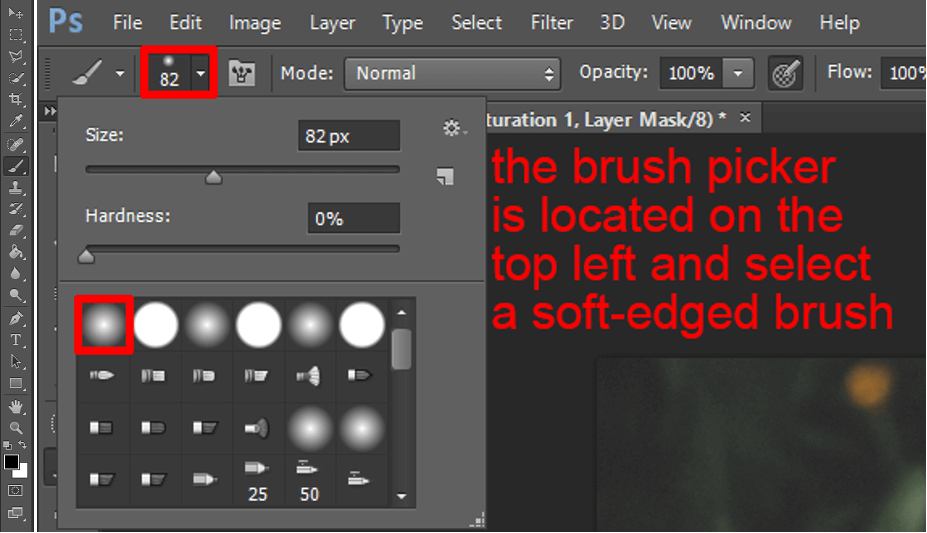
Select the “Brush” tool [B] on the left sidebar, and choose a soft-round brush from the “Brush Picker”.

How to adjust your brush in Photoshop

Paint on the white layer mask in black over areas that will be unaffected by the adjustment layer.  In this photo, the center flower will be the only object affected by the “Hue/Saturation” adjustment layer because it is left white on the layer mask.

Do not worry about making mistakes—simply change the foreground color to white and paint over the black.  Reselect the “Hues/Saturation” properties tab left of the layer mask.

adjust hue/saturation adjustment layer with layer mask

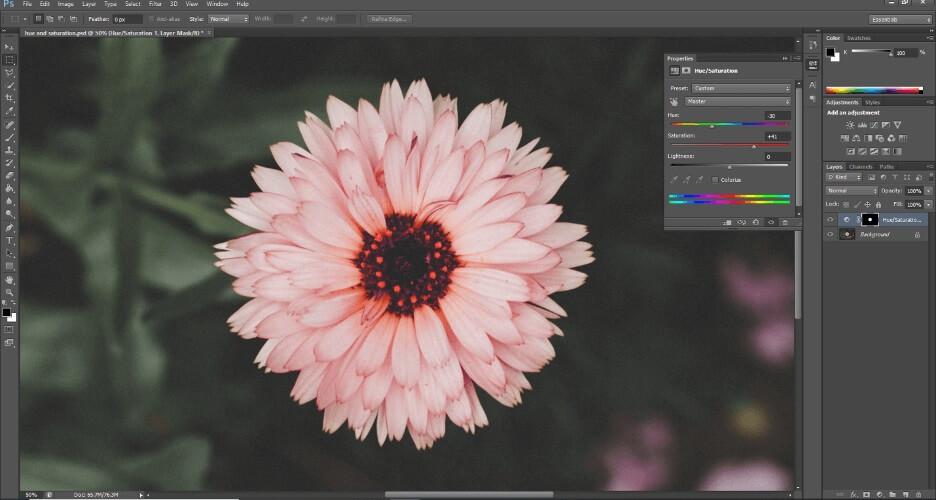
Drag the “Hue” arrow right to shift the colors clockwise around the color wheel, or drag the arrow left to move counterclockwise.  Below is a color wheel for reference.

color picker in Photoshop

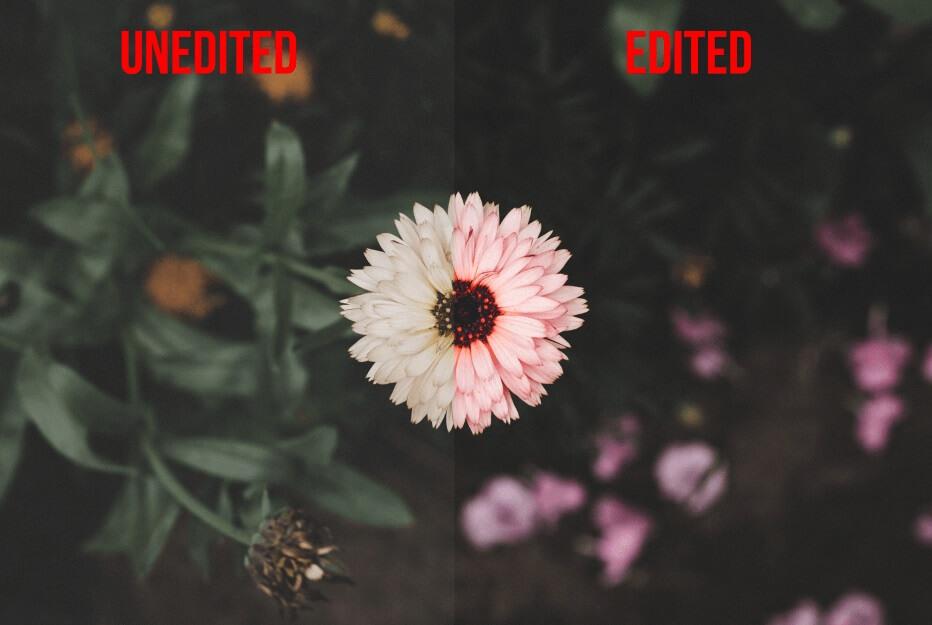
To make the flower “pinker”, drag the “Hue” arrow to the left.

Drag the “Saturation” arrow to the right to increase saturation. 

Just like the previous edit, I will finish the photo off with a level adjustment layer to increase brightness.

3. Using a Selective Color Adjustment Layer

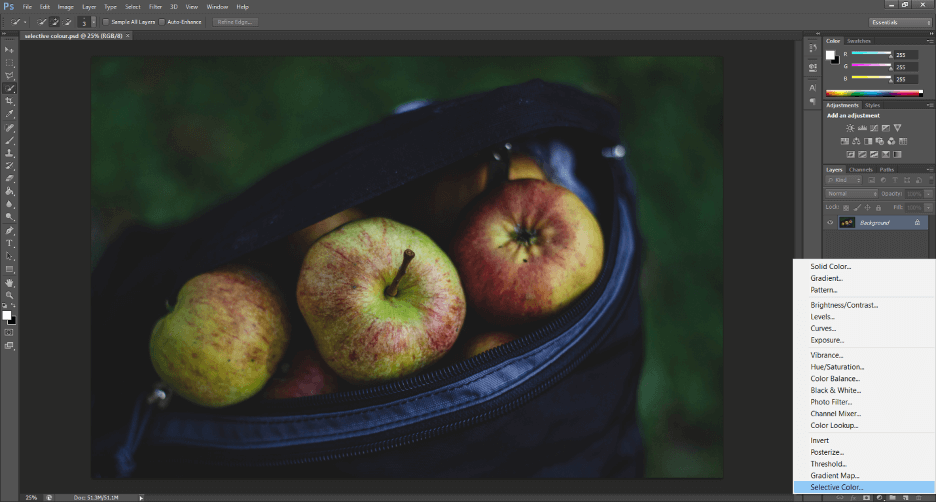
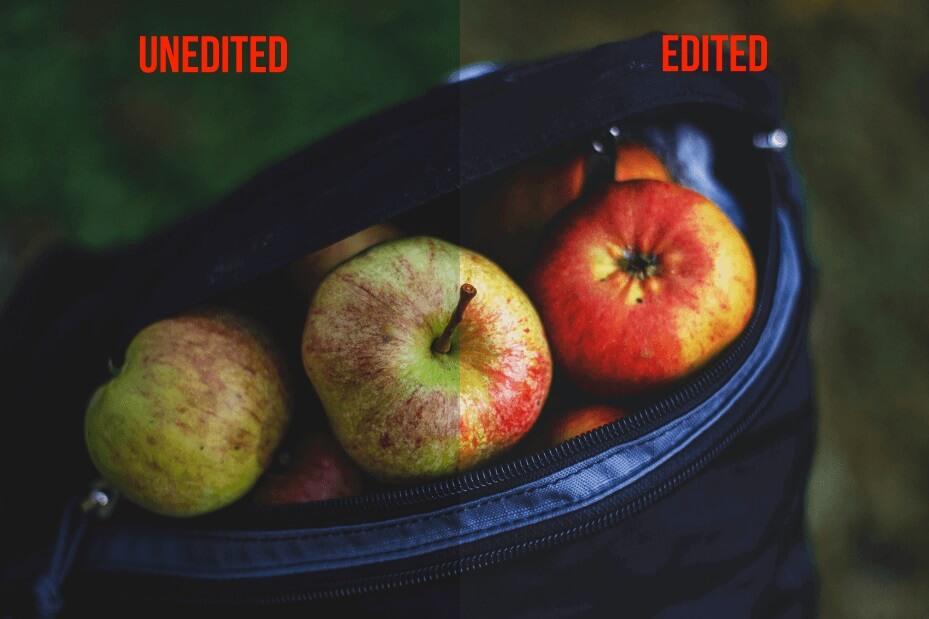
The third way to enhance color in Photoshop is using a “Selective Color” adjustment layer, which is a bit more complex and isolates SPECIFIC TARGET COLORS in a photo to saturate or desaturate.

To use this type of adjustment, choose Layer > New Adjustment Layer > Selective Color

Using selective color in Photoshop

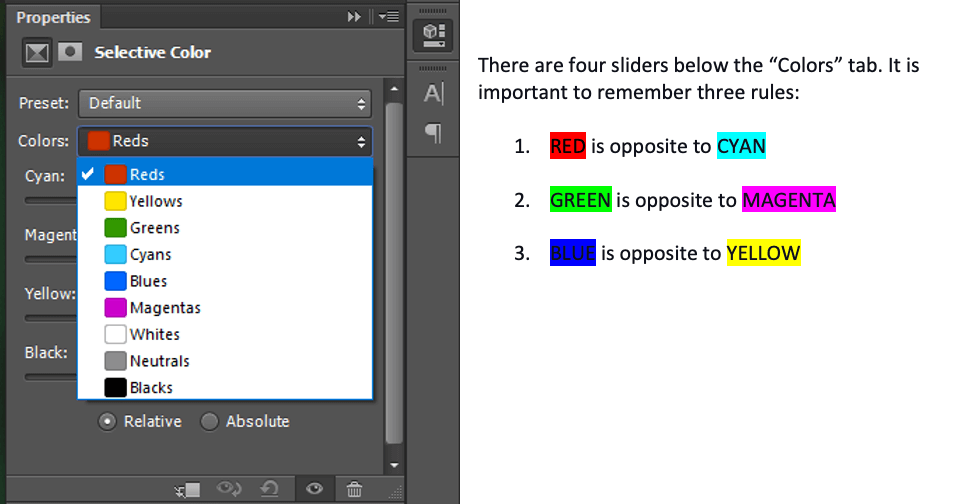
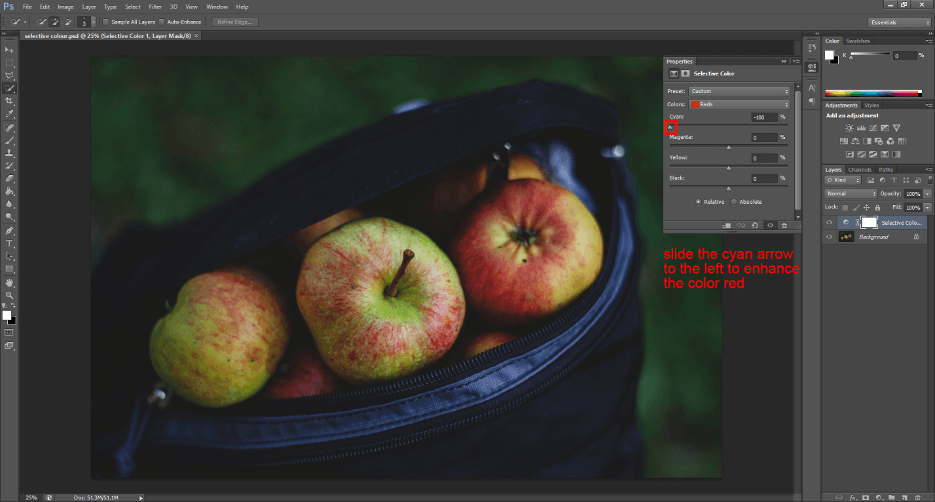
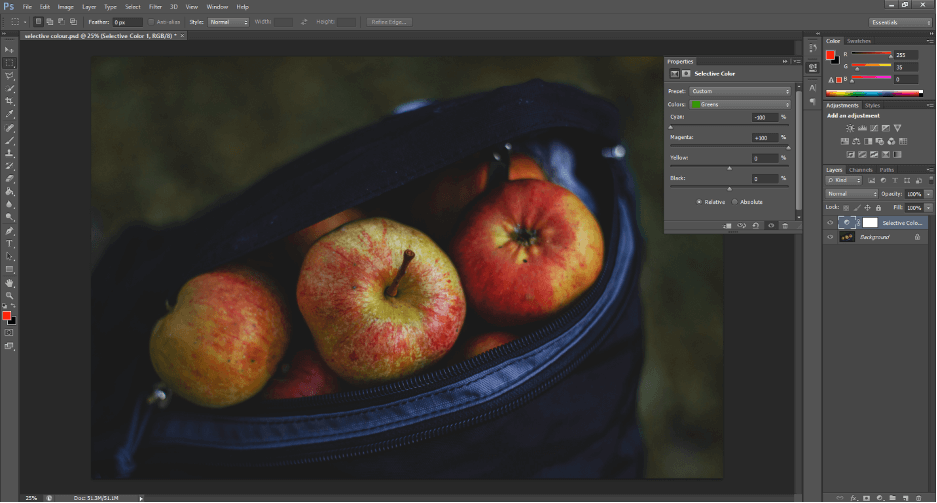
Open the “Colors” tab to select a color that you want to isolate and adjust.  In this photo, the subjects are red apples, so check “Reds” to enhance that particular color.

How to adjust color in Photoshop

Notice that there is no sliders labeled “Red”, “Green”, or “Blue”.  This is because the “Cyan”, “Magenta”, and “Yellow” sliders are correlated. 

With “Reds” selected in the “Colors” tab, sliding the CYAN arrow to the LEFT will decrease the cyan in the photo which will enhance the red. 

enhancing color in photoshop

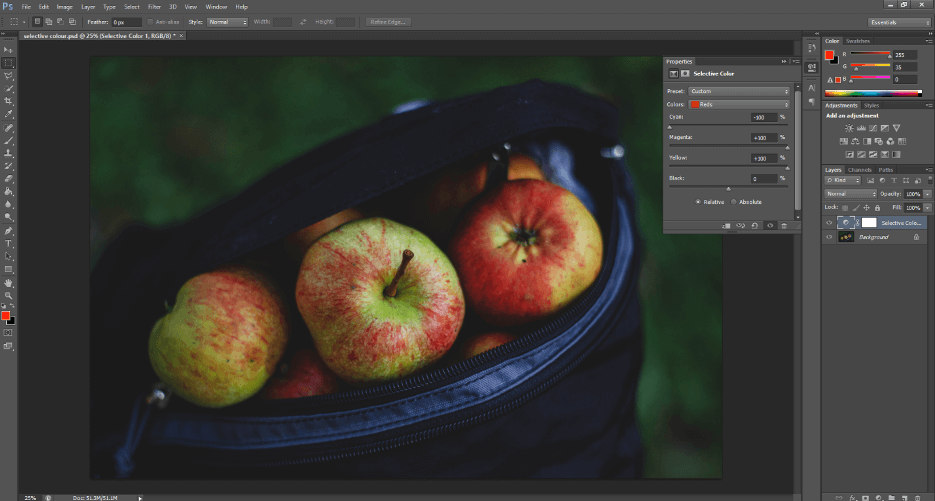
Now, the apples are looking a little TOO green, so I want to take the color opposite to green, and enhance it.  This is the MAGENTA slider, which I will move to the RIGHT.

The apples stiil have a cool tone to them that I want to warm up, so I want to decrease the amount of blue in the red apples.  To do that, locate the YELLOW slider and move the arrow to the RIGHT. 

how to enhance color in photoshop

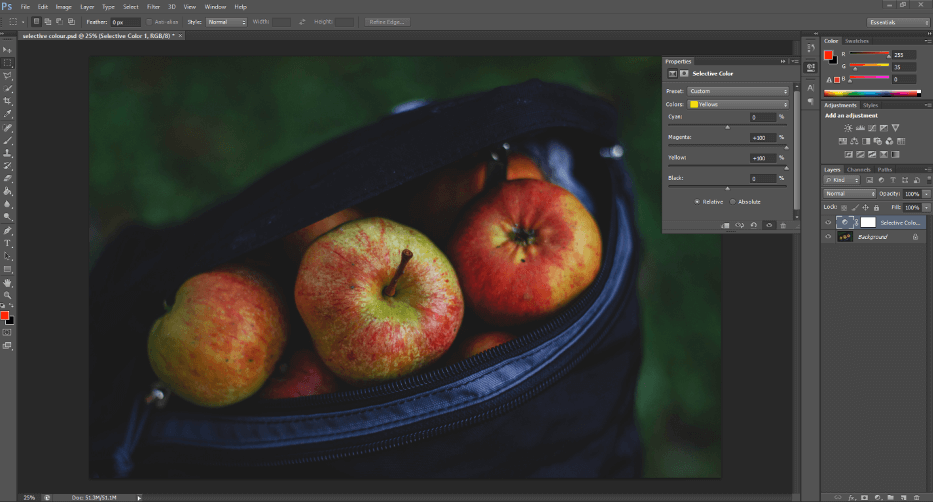
There is STILL a significant amount of green in the apples that I want to tone down.  To do that, choose the Colors Tab > Yellows to alter the yellow color in the apples.  Slide the MAGENTA arrow to the RIGHT to decrease the amount of green in the yellow and slide the YELLOW arrow to the RIGHT to increase the saturation of yellow.

3 ways to enhance color in Photoshop

Finally, choose the Colors Tab > Greens to alter the green color in the apples.  Slide the CYAN arrow to the LEFT to increase the amount of red in the green and slide the MAGENTA arrow to the RIGHT to increase the saturation of magenta. 

using selective color to enhance color in Photoshop

As before, I will finish the photo off with a level adjustment layer.

Conclusion

Congratulations!  You now have everything you need to enhance the color of your photos using only two adjustment layers. 

Now that you have an arsenal of ways to edit color in Photoshop, feel free to experiment and combine these techniques.  You can even create a “Photoshop Action” to save and replicate your specific color enhancement settings.

You can also purchase professional-quality Photoshop Action Collections from Pretty Presets and Actions that will take care of all the color enhancements for you!

These tips are just scratching the surface of what you can do in Photoshop; there are infinite ways to edit a photo to suit your purpose.  Have fun editing; be cheeky and try changing your eyes to a different hue, or reveal a radiant rainbow on a rainy morning.

Colors are meant to be seen, so let yours shine.

Do you have any questions or comments about Enhancing Color in Photoshop?  Leave us a comment below – we would LOVE to hear from you!  And PLEASE SHARE this post using the social sharing buttons (we really appreciate it)!

Portrait Photoshop Actions

How to Use the Powerful New Masking Feature in Lightroom

What Does Masking Do in Lightroom

How to Use the Powerful New Masking Tools in Lightroom

In October 2021, Lightroom released one of the BIGGEST UPDATES TO LIGHTROOM CLASSIC EVER!

I am not being overly dramatic here — this update is GAME CHANGING and WORKFLOW CHANGING!  it has been quite a while since something this big has come to Lightroom (think Lightroom 3 – if you’ve been here that long – or maybe the addition of the Radial Filter).

In this post, I will focus solely on the new Lightroom masking feature and how to find and use this exciting new tool!  

Let’s dive right in…..

Warm Lightroom Presets

FIRST THINGS FIRST—Where are the Brush and Filter tools now?

This is THE #1 QUESTION we are getting asked about right now regarding this new update and something you should know BEFORE we get into masking.

Why, you ask?

After the update, the tool bar in the Develop Module looks VERY different, so it’s quite easy to get confused with the new layout and how to proceed. 

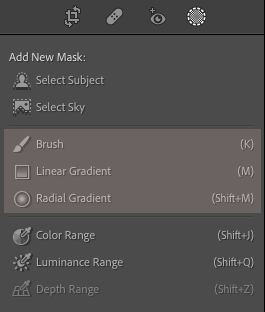
To find your brushes and filters, simply click on the far-right circle on the tool bar and navigate down to “Brush”, “Linear Gradient”, or “Radial Gradient” (these are the new names for the Graduated Filter and Radial Filter).  When you click on these, the familiar tools will open and your brush presets will still be there, too.

Masking in Lightroom CC

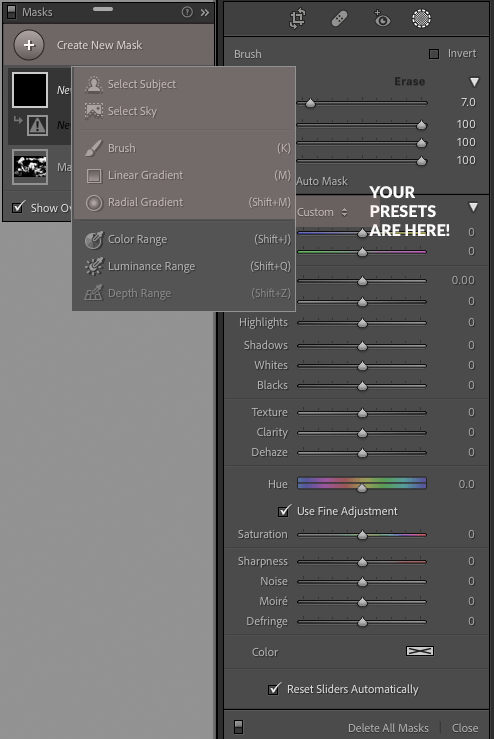
If you open an old image to work on that has been previously edited using filters and/or brushes, the NEW Masking Panel will open.  When it opens, simply click on “Create New Mask”.  Choosing any of the top 5 options in that panel will open a tool menu where you can find and use your brush presets.

What is Masking in Lightroom

What Does Masking Do in Lightroom?

MASKS and MASKING are the new words for ANY TYPE OF SELECTION or ADJUSTMENT to your image that DOESN’T AFFECT THE WHOLE IMAGE.

In previous versions of Lightroom, these tools were called local adjustments.  MASKS OR MASKING is a term borrowed from Photoshop.  In Photoshop, a mask allows you to make a change to a SPECIFIC AREA of an image, and that is exactly what the new Lightroom tools in the new Masking Panel will help you do.

Lightroom & Photoshop Facebook Group

Where to Find the Masking Panel?

To find these new masking tools, move to the Develop Module by clicking the word “Develop” at the top right side of Lightroom.  Once inside the Develop Module, you will notice the tool panel thats located just above the Basic Panel looks a little different. 

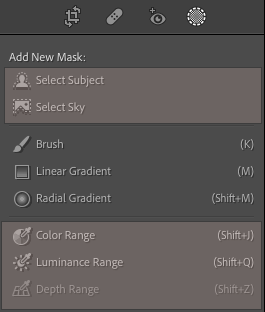
After the update, the Adjustment Brush, Radial Gradient (formerly Radial Filter), and Linear Gradient (formerly Graduated Filter) are now located inside the new Masking Panel, which can be accessed by clicking the “dotted circle” icon on the far-right. 

All three of these tools will allow you to make changes to a specific area of your image that you choose.

Where to find the new masking tools in Lightroom version 11

Once you have clicked on the “dotted circle” icon, a Masking Panel will appear floating over your image.  You can leave it floating or you can dock it with the other panels on the right-side of Lightroom.

As I mentioned previously, once you open the Masking Panel will see some familiar options such as Brush, Linear Gradient, and Radial Gradient. These tools are going to behave in the same way they did previously.

We have in-depth tutorial blog posts on each of these tools that will help you learn how to use them.  Keep in mind, we will be updating these with updated tool names and screenshots from Lightroom 11.

Where to find Lightroom Brushes and Filters after update

You will also find some some BRAND NEW options in the Masking Panel that are going to BLOW YOUR MIND WITH THEIR POWER TO SAVE YOU TIME.  These tools are:

  • Select Subject
  • Select Sky
  • Color Range
  • Luminance Range
  • Depth Range

We’ll talk about each of these tools in-depth below:

Where is Auto Mask In Lightroom

Masking Tool #1: Select Subject

The Select Subject Tool utilizes Adobe’s incredible new Lightroom AI technology to identify the subject(s) of your photo and select it for you quickly.

With this tool you can now make adjustments to your subject (only) using the tool panel or your brush presets WITHOUT having to painstakingly brush over your subject OR create a radial filter.

How to Use Masking in Lightroom

Equally game-changing, Lightroom has added an “INVERT” feature to each of these masks that will automatically select EVERYTHING EXCEPT THE SUBJECT(S) so you can make changes to the background of your image without having to painstakingly brush everywhere.

You will find the invert option when you click on the mask thumbnail.  When you click on the mask thumbnail, you will see another box called Subject1 and to the right of that you will see three dots.  When you click on the three dots, it will bring up several options, including an option to invert the mask.

How to Invert a Mask in Lightroom Classic

Masking Tool #2: Select Sky Tool

The Select Sky Tool works the same way as the Select Subject Tool.  In this case, it utilizes Lightroom AI technology to identify the sky area(s) of your image.  Once your sky selection is made using this tool, you can use any of the Lightroom sliders OR brush presets to enhance your sky.

What Does Masking Do in Lightroom

And just like the Select Subject Tool, you can also invert this selection.  The inverted selection will allow you to select and make adjustments to EVERYTHING EXCEPT THE SKY.

Auto Mask Lightroom

Masking Tool #3 & 4: Color Range and Luminance Range Tools

Two additional tools in the Masking Panel allow you to make selections based on a color (Color Range) or luminance value (Luminance Range). 

If you aren’t sure what luminance is I can quickly tell you that refers to the brightness or darkness of a particular color.  There was some ability to make changes like this in previous versions of Lightroom, but those tools were well hidden and rarely used.  Now, the Masking Panel brings these tools to the forefront.

Once you click either of these options, you will be presented with an eyedropper tool.  Using the eyedropper, simply click on the area of the photo you want to adjust.

  • If you have selected the Color Range tool, the eye dropper will select all the color values similar to the one you clicked on
  • If you have selected the Luminance Range tool, a click of the eye dropper will select all the values in your image that are approximately the same brightness or darkness as what you clicked on.

Lightroom Mask Panel Select Color Range

You can then refine your selection using the accompanying adjustment tools that open up.

  • For the Luminance Range Tool you can use the gradient box and sliders to really target the exact value you want selected. 
  • For the Color Range Tool, you can further refine your selection using the Color Range slider to adjust exactly what color is selected.

How to Add and Subtract from Masks

While Lightroom’s Masking Panel uses some amazing technology to help you make selections, IT ALSO GIVES YOU THE ABILITY TO REFINE THOSE SELECTIONS MANUALLY, IF NEEDED. 

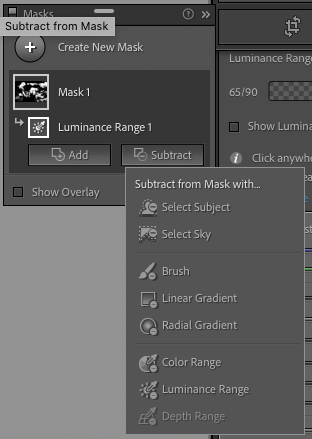
Once you start working with a mask, an “Add” and “Subtract” button will appear just beneath the mask icon (see image below).

  • To add to the areas in your selection, click on the “Add” button and then choose the selection tool that will best help you add to the area you also want to adjust. 
  • To remove some areas from the selection, click the “Subtract” button and then choose the selection tool that will best help you subtract areas from your selection.

How to Add and Subtract from Lightroom Mask

Conclusion

Masking in Lightroom is an incredible new feature that’s going to revolutionize and speed up your workflow!

Keep in mind however, these changes are big and with most big changes, they certainly come with a learning curve.

My recommendation is to take it slow and ask questions in our Facebook group. Subscribe to our blog and mailing list.  We will continue to create written and video tutorials to teach you how to use all these new features!

How to Mask in Lightroom – Video Tutorial


Do you have any questions or comments about How to use the Masking Feature in Lightroom Classic?  Leave us a comment below – we would LOVE to hear from you!  And PLEASE SHARE this post using the social sharing buttons (We really appreciate it)!

Dark & Moody Lightroom Presets