
How to Use the Powerful New Masking Tools in Lightroom
In October 2021, Lightroom released one of the BIGGEST UPDATES TO LIGHTROOM CLASSIC EVER!
I am not being overly dramatic here — this update is GAME CHANGING and WORKFLOW CHANGING! it has been quite a while since something this big has come to Lightroom (think Lightroom 3 – if you’ve been here that long – or maybe the addition of the Radial Filter).
In this post, I will focus solely on the new Lightroom masking feature and how to find and use this exciting new tool!
Let’s dive right in…..

FIRST THINGS FIRST—Where are the Brush and Filter tools now?
This is THE #1 QUESTION we are getting asked about right now regarding this new update and something you should know BEFORE we get into masking.
Why, you ask?
After the update, the tool bar in the Develop Module looks VERY different, so it’s quite easy to get confused with the new layout and how to proceed.
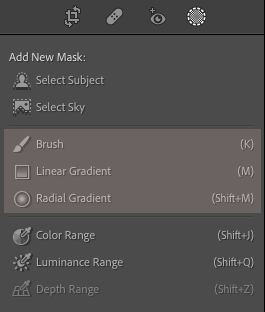
To find your brushes and filters, simply click on the far-right circle on the tool bar and navigate down to “Brush”, “Linear Gradient”, or “Radial Gradient” (these are the new names for the Graduated Filter and Radial Filter). When you click on these, the familiar tools will open and your brush presets will still be there, too.
If you open an old image to work on that has been previously edited using filters and/or brushes, the NEW Masking Panel will open. When it opens, simply click on “Create New Mask”. Choosing any of the top 5 options in that panel will open a tool menu where you can find and use your brush presets.

What Does Masking Do in Lightroom?
MASKS and MASKING are the new words for ANY TYPE OF SELECTION or ADJUSTMENT to your image that DOESN’T AFFECT THE WHOLE IMAGE.
In previous versions of Lightroom, these tools were called local adjustments. MASKS OR MASKING is a term borrowed from Photoshop. In Photoshop, a mask allows you to make a change to a SPECIFIC AREA of an image, and that is exactly what the new Lightroom tools in the new Masking Panel will help you do.

Where to Find the Masking Panel?
To find these new masking tools, move to the Develop Module by clicking the word “Develop” at the top right side of Lightroom. Once inside the Develop Module, you will notice the tool panel thats located just above the Basic Panel looks a little different.
After the update, the Adjustment Brush, Radial Gradient (formerly Radial Filter), and Linear Gradient (formerly Graduated Filter) are now located inside the new Masking Panel, which can be accessed by clicking the “dotted circle” icon on the far-right.
All three of these tools will allow you to make changes to a specific area of your image that you choose.

Once you have clicked on the “dotted circle” icon, a Masking Panel will appear floating over your image. You can leave it floating or you can dock it with the other panels on the right-side of Lightroom.
As I mentioned previously, once you open the Masking Panel will see some familiar options such as Brush, Linear Gradient, and Radial Gradient. These tools are going to behave in the same way they did previously.
We have in-depth tutorial blog posts on each of these tools that will help you learn how to use them. Keep in mind, we will be updating these with updated tool names and screenshots from Lightroom 11.
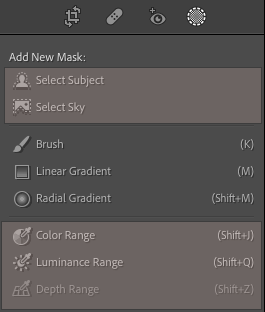
You will also find some some BRAND NEW options in the Masking Panel that are going to BLOW YOUR MIND WITH THEIR POWER TO SAVE YOU TIME. These tools are:
- Select Subject
- Select Sky
- Color Range
- Luminance Range
- Depth Range
We’ll talk about each of these tools in-depth below:
Masking Tool #1: Select Subject
The Select Subject Tool utilizes Adobe’s incredible new Lightroom AI technology to identify the subject(s) of your photo and select it for you quickly.
With this tool you can now make adjustments to your subject (only) using the tool panel or your brush presets WITHOUT having to painstakingly brush over your subject OR create a radial filter.

Equally game-changing, Lightroom has added an “INVERT” feature to each of these masks that will automatically select EVERYTHING EXCEPT THE SUBJECT(S) so you can make changes to the background of your image without having to painstakingly brush everywhere.
You will find the invert option when you click on the mask thumbnail. When you click on the mask thumbnail, you will see another box called Subject1 and to the right of that you will see three dots. When you click on the three dots, it will bring up several options, including an option to invert the mask.

Masking Tool #2: Select Sky Tool
The Select Sky Tool works the same way as the Select Subject Tool. In this case, it utilizes Lightroom AI technology to identify the sky area(s) of your image. Once your sky selection is made using this tool, you can use any of the Lightroom sliders OR brush presets to enhance your sky.

And just like the Select Subject Tool, you can also invert this selection. The inverted selection will allow you to select and make adjustments to EVERYTHING EXCEPT THE SKY.

Masking Tool #3 & 4: Color Range and Luminance Range Tools
Two additional tools in the Masking Panel allow you to make selections based on a color (Color Range) or luminance value (Luminance Range).
If you aren’t sure what luminance is I can quickly tell you that refers to the brightness or darkness of a particular color. There was some ability to make changes like this in previous versions of Lightroom, but those tools were well hidden and rarely used. Now, the Masking Panel brings these tools to the forefront.
Once you click either of these options, you will be presented with an eyedropper tool. Using the eyedropper, simply click on the area of the photo you want to adjust.
- If you have selected the Color Range tool, the eye dropper will select all the color values similar to the one you clicked on
- If you have selected the Luminance Range tool, a click of the eye dropper will select all the values in your image that are approximately the same brightness or darkness as what you clicked on.

You can then refine your selection using the accompanying adjustment tools that open up.
- For the Luminance Range Tool you can use the gradient box and sliders to really target the exact value you want selected.
- For the Color Range Tool, you can further refine your selection using the Color Range slider to adjust exactly what color is selected.
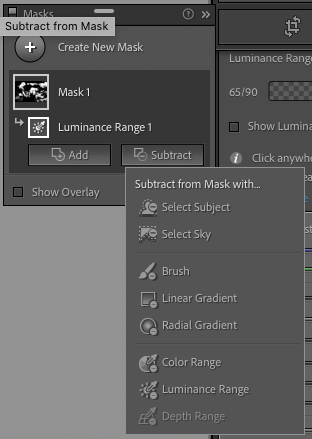
How to Add and Subtract from Masks
While Lightroom’s Masking Panel uses some amazing technology to help you make selections, IT ALSO GIVES YOU THE ABILITY TO REFINE THOSE SELECTIONS MANUALLY, IF NEEDED.
Once you start working with a mask, an “Add” and “Subtract” button will appear just beneath the mask icon (see image below).
- To add to the areas in your selection, click on the “Add” button and then choose the selection tool that will best help you add to the area you also want to adjust.
- To remove some areas from the selection, click the “Subtract” button and then choose the selection tool that will best help you subtract areas from your selection.
Conclusion
Masking in Lightroom is an incredible new feature that’s going to revolutionize and speed up your workflow!
Keep in mind however, these changes are big and with most big changes, they certainly come with a learning curve.
My recommendation is to take it slow and ask questions in our Facebook group. Subscribe to our blog and mailing list. We will continue to create written and video tutorials to teach you how to use all these new features!
How to Mask in Lightroom – Video Tutorial
Do you have any questions or comments about How to use the Masking Feature in Lightroom Classic? Leave us a comment below – we would LOVE to hear from you! And PLEASE SHARE this post using the social sharing buttons (We really appreciate it)!
