3 Ways to Enhance Color in Photoshop

3 Ways to Enhance Color in Photoshop

“Color! What a deep and mysterious language, the language of dreams.” —Paul Gauguin

If a photo is worth a thousand words, then color might be priceless.  Objects in photographs can be accentuated or toned down through the clever use of color.  Communicating the message and mood of a photo is quickly done through color – or lack of color.  Color creates a natural contrast in neutral scenes, which organically brings depth into a shot.  Viewers’ eyes are immediately drawn towards bright colors and color stories, MAKING COLOR A POWERFUL VISUAL EFFECT.

Despite color being of utmost importance in photography, the camera may not always capture it well.  However, all hope is not lost – image editing software like Photoshop can bring a photo back to life through simple color enhancements.

Say goodbye to dull shots, and try these Photoshop tricks to enhance the color of your photos in a snap:

Photoshop Actions

1. Using a Vibrance Adjustment Layer

The simplest way to brighten up the colors in a photo is by creating a “Vibrance” adjustment layer.  First, locate the half-shaded circle icon on the bottom right of the “Layers” panel.

create a new adjustment layer

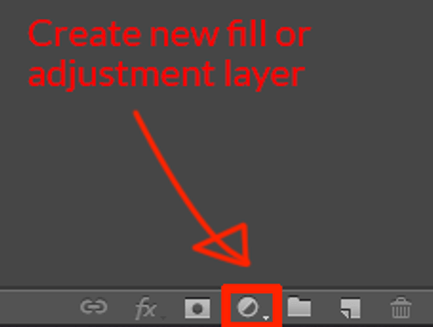
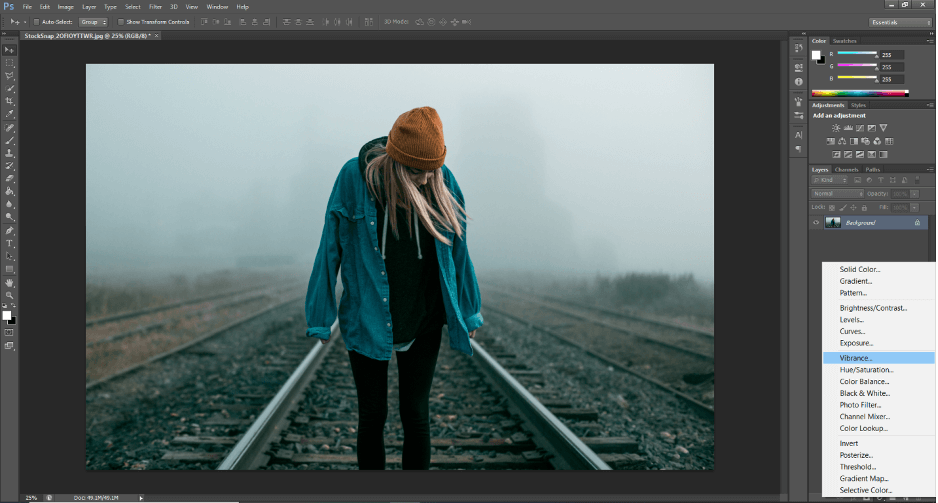
Click the “New Adjustment Layer” icon and select “Vibrance” from the pop-up tab.

creating a vibrance adjustment layer

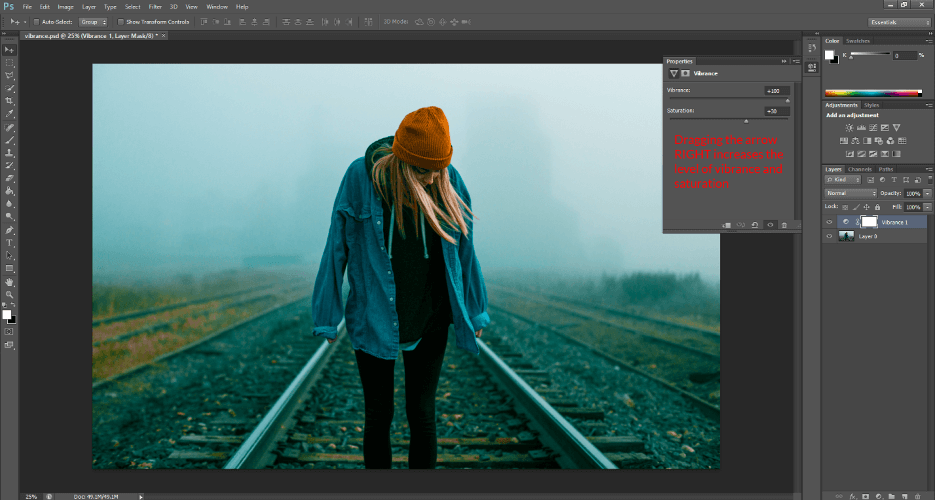
A grey box will open on the right and show the properties of this adjustment layer.  Drag the “Vibrance” to the right to increase the vibrancy.  The “Saturation” arrow functions in a similar way; drag it to the right to increase the saturation and drag it to the left to reduce the saturation.

How to increase vibrance in Photoshop

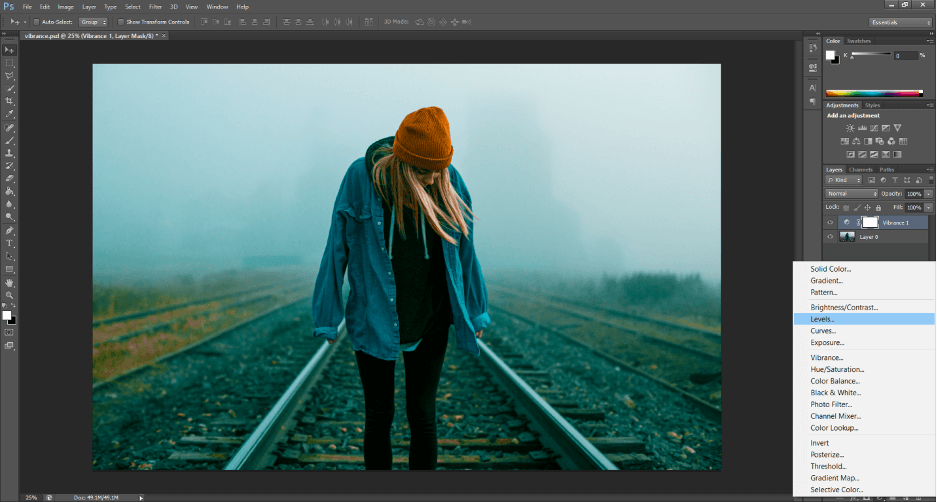
After achieving the desired color, you may want to increase the lighting of your image.  One way to do this is to add a “Levels” adjustment layer.  Choose Layer > New Adjustment Layer > Levels.  Alternatively, hit [Ctrl+L] on PC or [Command+L] on Mac.

creating a levels adjustment layer in Photoshop

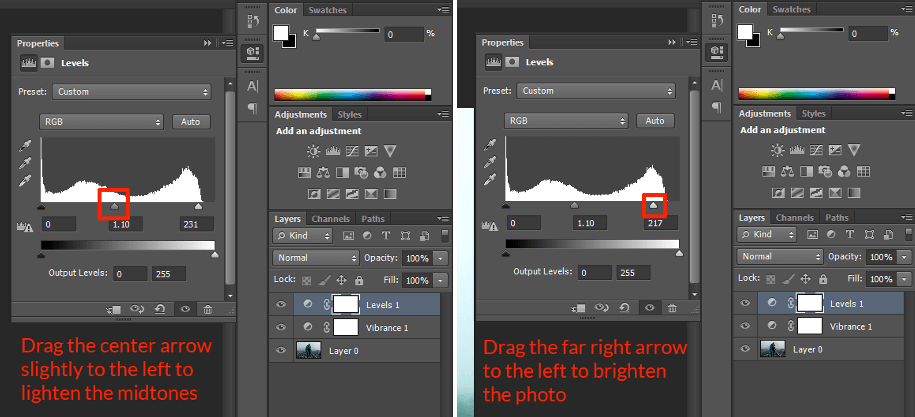
Another grey box will appear from the right and display the properties of the “Levels” layer.  Drag the left arrow to the right to darken the shadows, the center arrow to the left or right to adjust the mid-tones, and the right arrow to the left to brighten highlights in the photo. 

If the image is too dark, slide the middle arrow left, to lighten mid-tones, and the right arrow left, to brighten highlights.

That’s all there is to enchancing color with a vibrance adjustment.

How to use levels in Photoshop

2. Using a Hue & Saturation Adjustment Layer

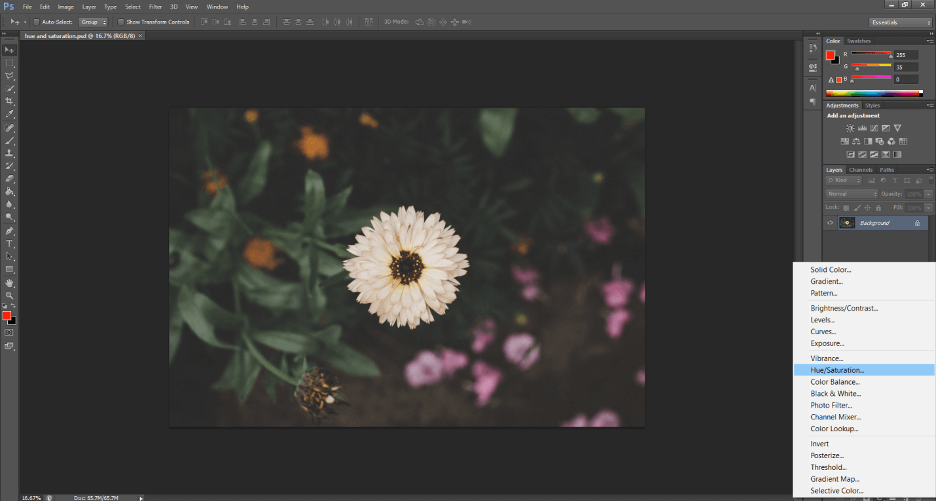
Another great way to enhance color in Photoshop is using a “Hue & Saturation” adjustment layer.  Similar to the “Vibrance” adjustment layer, choose Layer > New Adjustment Layer > Hue/Saturation.

Using Hue Saturation to enhance color in photoshop

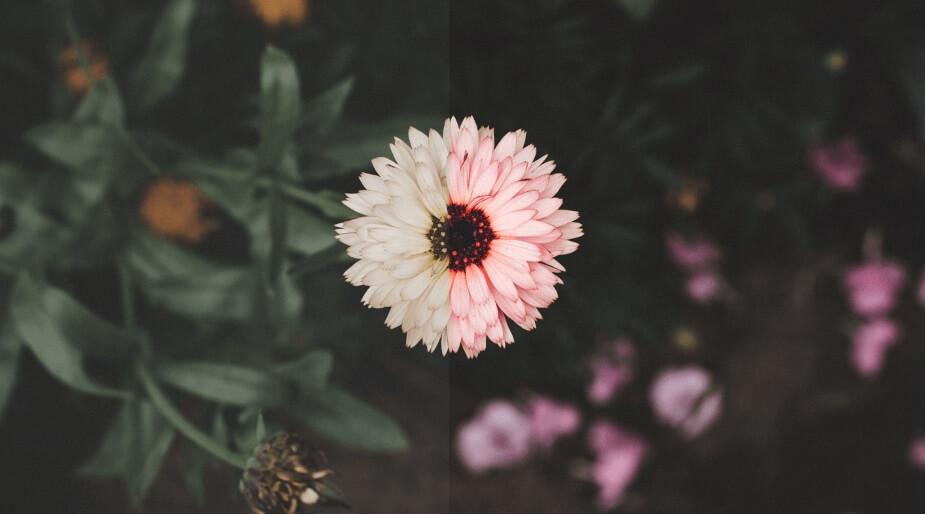
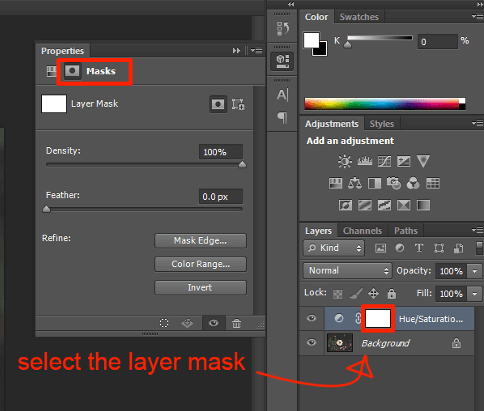
To isolate and make adjustments to the center flower, use a “Layer Mask”.  Select Hue/Saturation Layer > Layer Mask. 

Using a layer mask in Photoshop

Ensure that that the foreground color is black.  Note: you can easily toggle the foreground and background color by pressing [X].

how to set and change foreground color

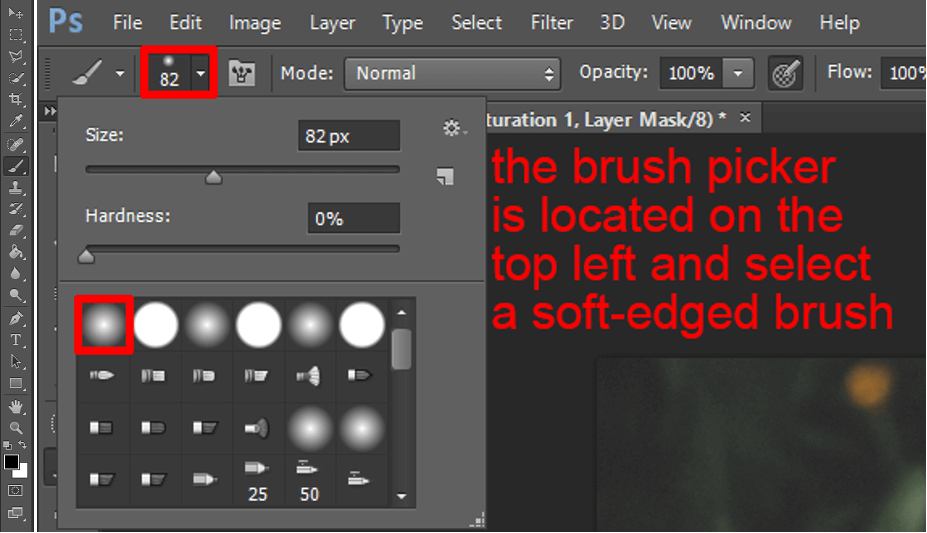
Select the “Brush” tool [B] on the left sidebar, and choose a soft-round brush from the “Brush Picker”.

How to adjust your brush in Photoshop

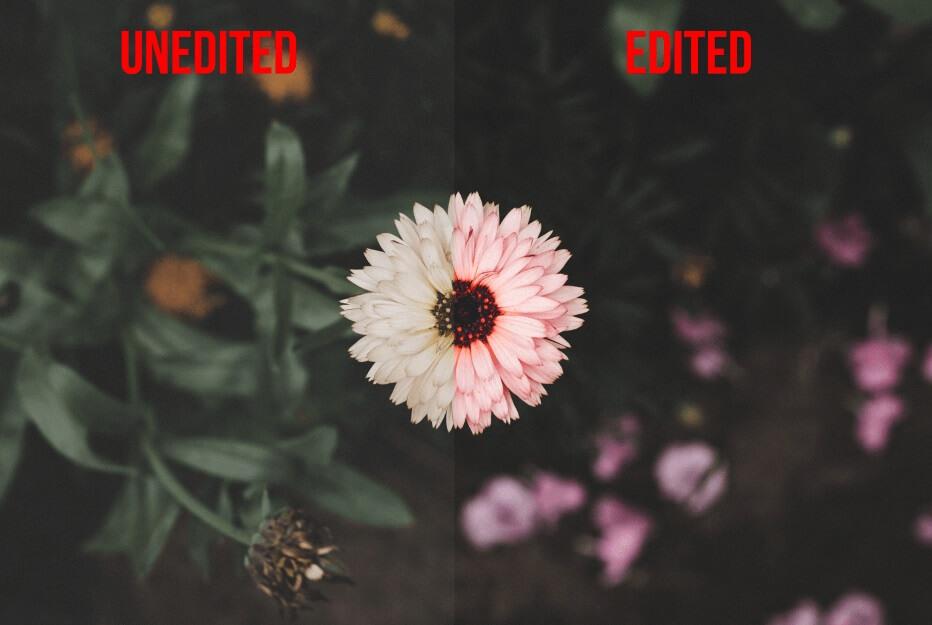
Paint on the white layer mask in black over areas that will be unaffected by the adjustment layer.  In this photo, the center flower will be the only object affected by the “Hue/Saturation” adjustment layer because it is left white on the layer mask.

Do not worry about making mistakes—simply change the foreground color to white and paint over the black.  Reselect the “Hues/Saturation” properties tab left of the layer mask.

adjust hue/saturation adjustment layer with layer mask

Drag the “Hue” arrow right to shift the colors clockwise around the color wheel, or drag the arrow left to move counterclockwise.  Below is a color wheel for reference.

color picker in Photoshop

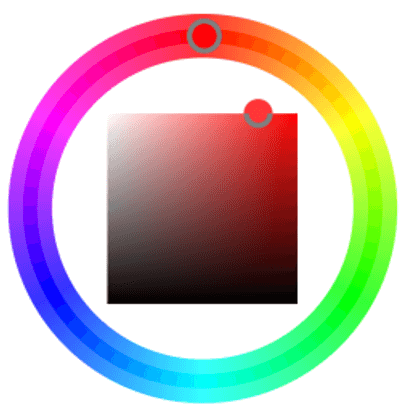
To make the flower “pinker”, drag the “Hue” arrow to the left.

Drag the “Saturation” arrow to the right to increase saturation. 

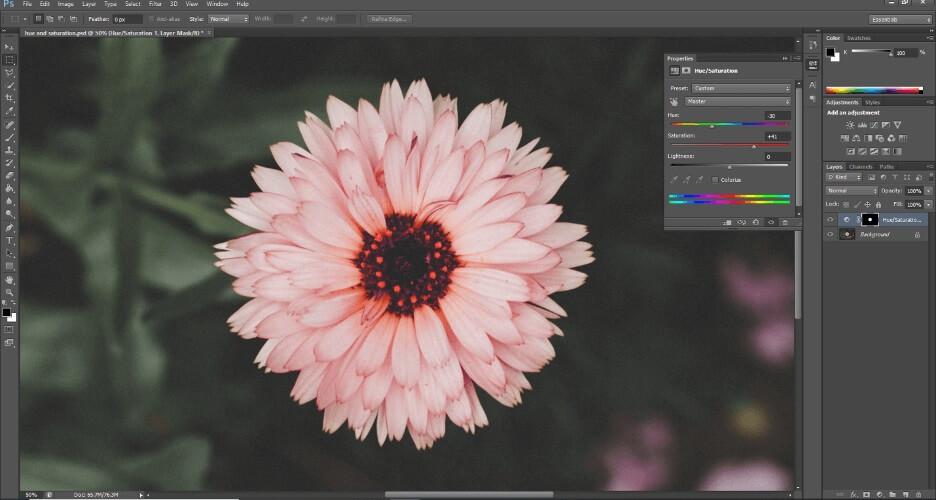
Just like the previous edit, I will finish the photo off with a level adjustment layer to increase brightness.

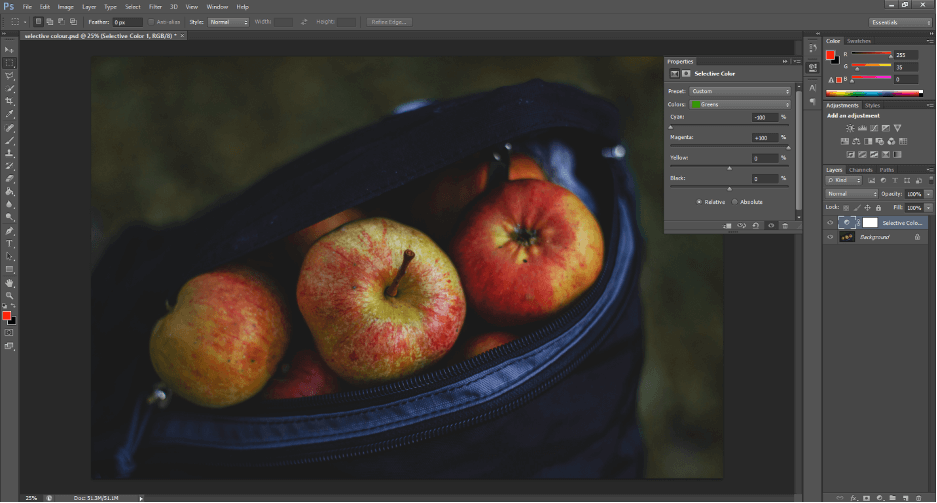
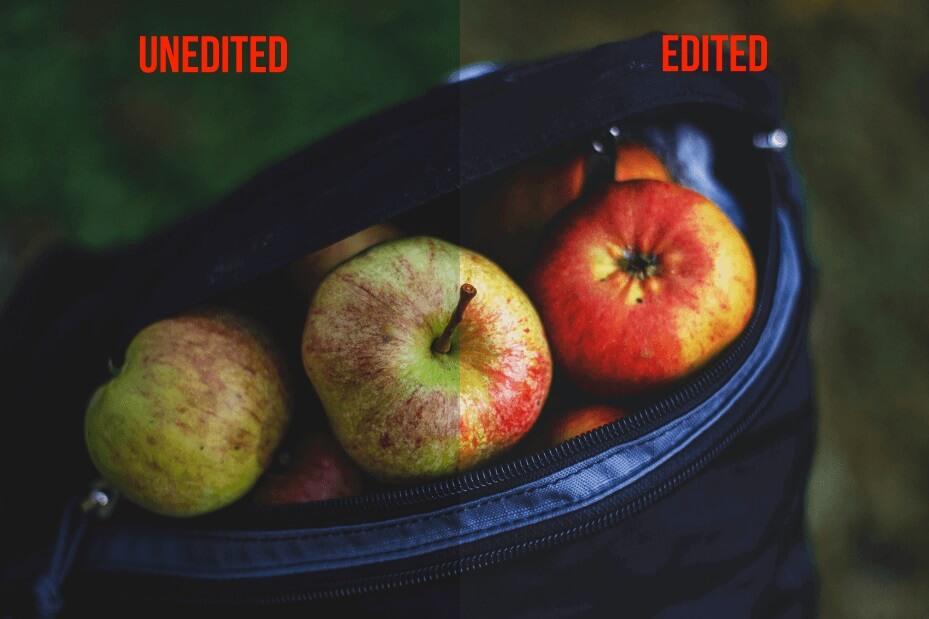
3. Using a Selective Color Adjustment Layer

The third way to enhance color in Photoshop is using a “Selective Color” adjustment layer, which is a bit more complex and isolates SPECIFIC TARGET COLORS in a photo to saturate or desaturate.

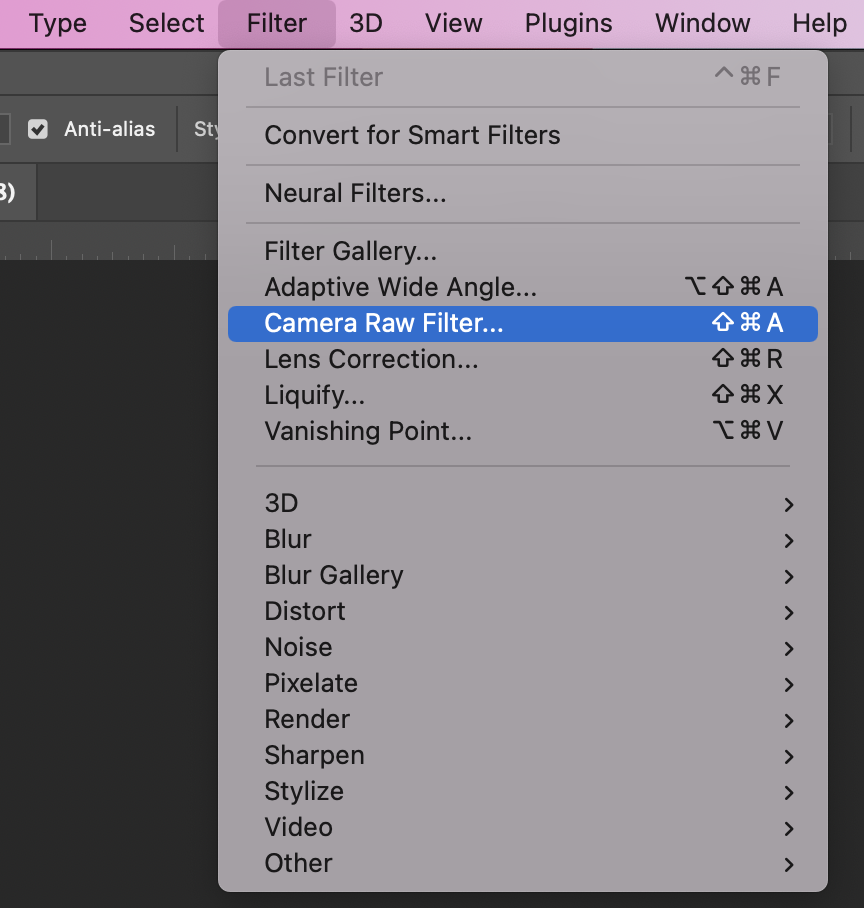
To use this type of adjustment, choose Layer > New Adjustment Layer > Selective Color

Using selective color in Photoshop

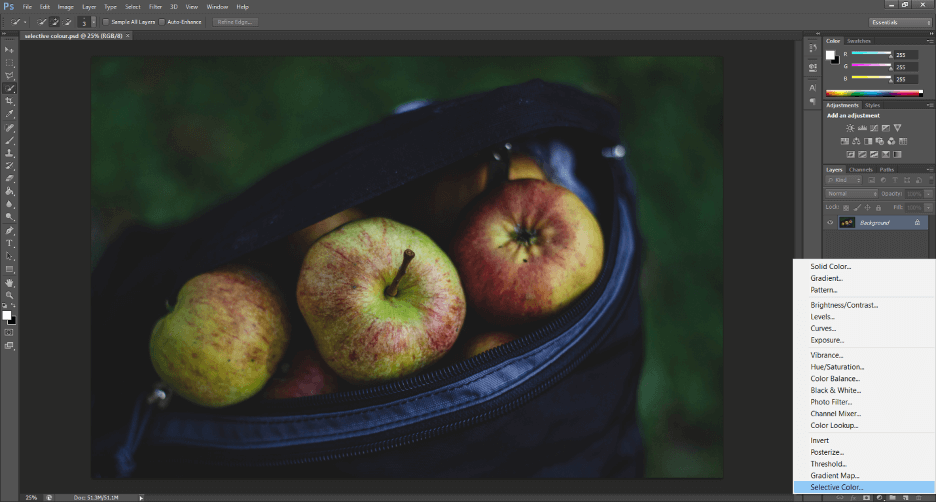
Open the “Colors” tab to select a color that you want to isolate and adjust.  In this photo, the subjects are red apples, so check “Reds” to enhance that particular color.

How to adjust color in Photoshop

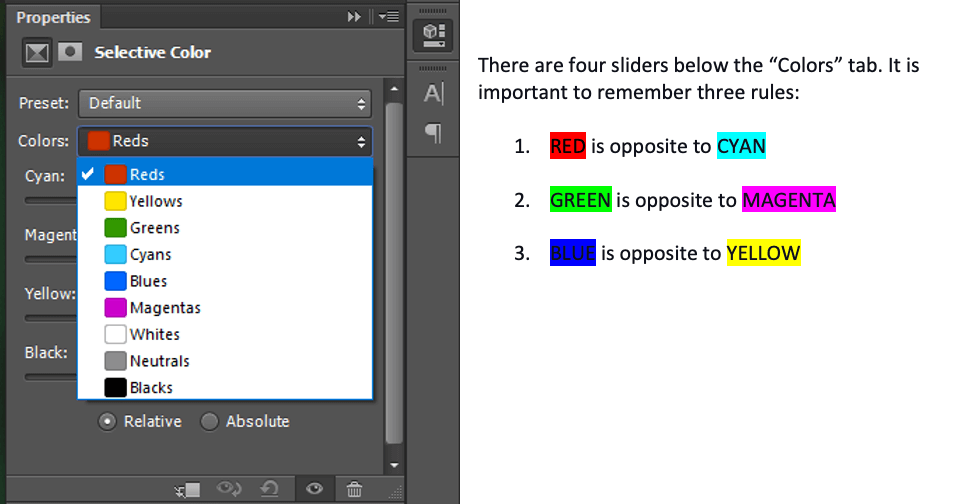
Notice that there is no sliders labeled “Red”, “Green”, or “Blue”.  This is because the “Cyan”, “Magenta”, and “Yellow” sliders are correlated. 

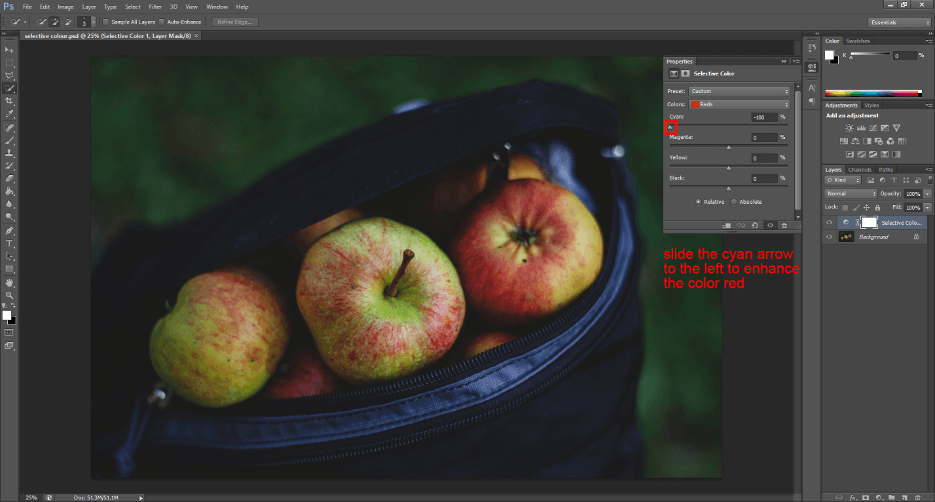
With “Reds” selected in the “Colors” tab, sliding the CYAN arrow to the LEFT will decrease the cyan in the photo which will enhance the red. 

enhancing color in photoshop

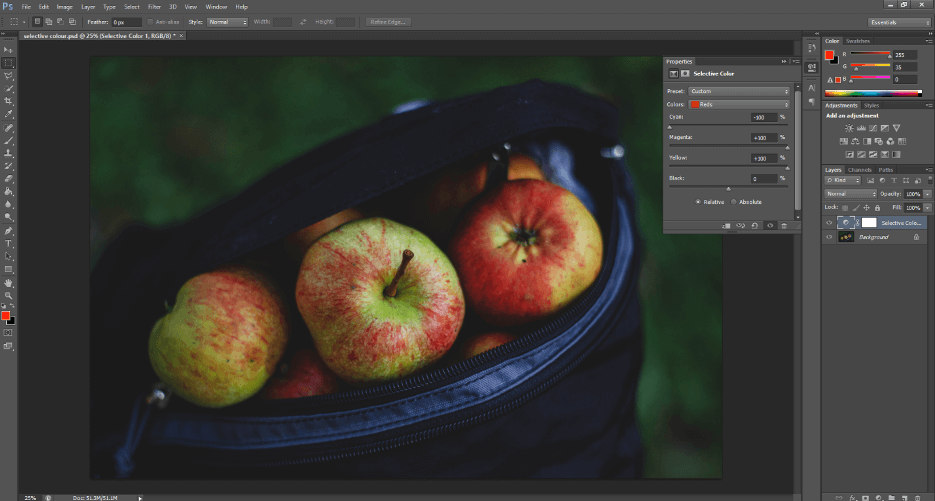
Now, the apples are looking a little TOO green, so I want to take the color opposite to green, and enhance it.  This is the MAGENTA slider, which I will move to the RIGHT.

The apples stiil have a cool tone to them that I want to warm up, so I want to decrease the amount of blue in the red apples.  To do that, locate the YELLOW slider and move the arrow to the RIGHT. 

how to enhance color in photoshop

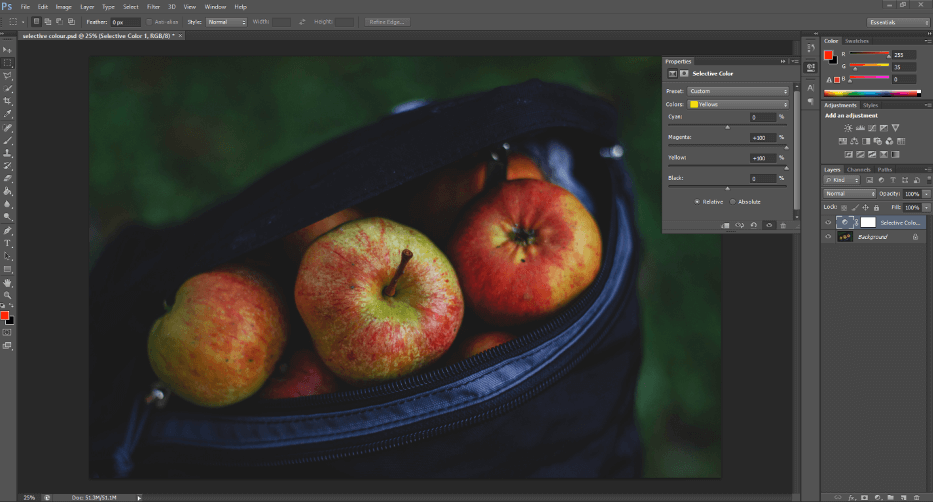
There is STILL a significant amount of green in the apples that I want to tone down.  To do that, choose the Colors Tab > Yellows to alter the yellow color in the apples.  Slide the MAGENTA arrow to the RIGHT to decrease the amount of green in the yellow and slide the YELLOW arrow to the RIGHT to increase the saturation of yellow.

3 ways to enhance color in Photoshop

Finally, choose the Colors Tab > Greens to alter the green color in the apples.  Slide the CYAN arrow to the LEFT to increase the amount of red in the green and slide the MAGENTA arrow to the RIGHT to increase the saturation of magenta. 

using selective color to enhance color in Photoshop

As before, I will finish the photo off with a level adjustment layer.

Conclusion

Congratulations!  You now have everything you need to enhance the color of your photos using only two adjustment layers. 

Now that you have an arsenal of ways to edit color in Photoshop, feel free to experiment and combine these techniques.  You can even create a “Photoshop Action” to save and replicate your specific color enhancement settings.

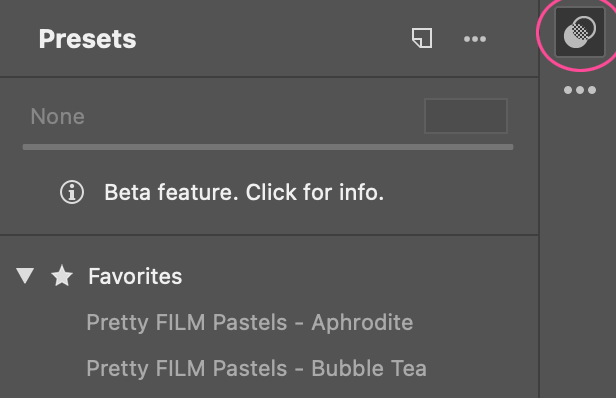
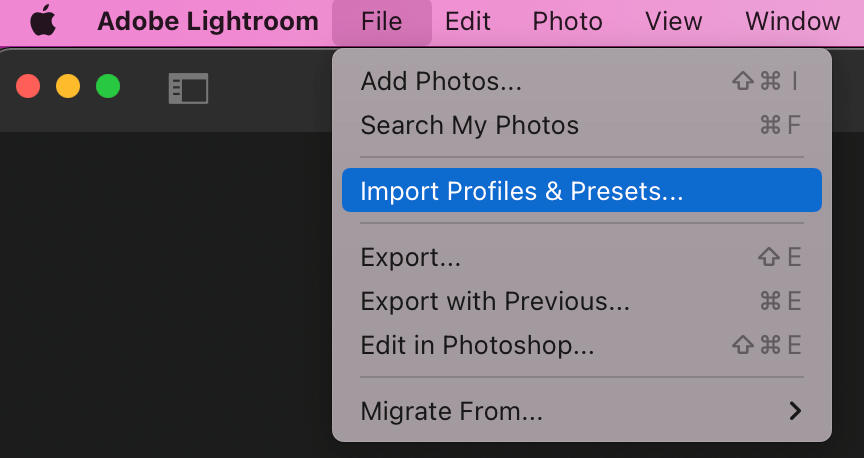
You can also purchase professional-quality Photoshop Action Collections from Pretty Presets and Actions that will take care of all the color enhancements for you!

These tips are just scratching the surface of what you can do in Photoshop; there are infinite ways to edit a photo to suit your purpose.  Have fun editing; be cheeky and try changing your eyes to a different hue, or reveal a radiant rainbow on a rainy morning.

Colors are meant to be seen, so let yours shine.

Do you have any questions or comments about Enhancing Color in Photoshop?  Leave us a comment below – we would LOVE to hear from you!  And PLEASE SHARE this post using the social sharing buttons (we really appreciate it)!

Portrait Photoshop Actions

How to Use the Powerful New Masking Feature in Lightroom

What Does Masking Do in Lightroom

How to Use the Powerful New Masking Tools in Lightroom

In October 2021, Lightroom released one of the BIGGEST UPDATES TO LIGHTROOM CLASSIC EVER!

I am not being overly dramatic here — this update is GAME CHANGING and WORKFLOW CHANGING!  it has been quite a while since something this big has come to Lightroom (think Lightroom 3 – if you’ve been here that long – or maybe the addition of the Radial Filter).

In this post, I will focus solely on the new Lightroom masking feature and how to find and use this exciting new tool!  

Let’s dive right in…..

Warm Lightroom Presets

FIRST THINGS FIRST—Where are the Brush and Filter tools now?

This is THE #1 QUESTION we are getting asked about right now regarding this new update and something you should know BEFORE we get into masking.

Why, you ask?

After the update, the tool bar in the Develop Module looks VERY different, so it’s quite easy to get confused with the new layout and how to proceed. 

To find your brushes and filters, simply click on the far-right circle on the tool bar and navigate down to “Brush”, “Linear Gradient”, or “Radial Gradient” (these are the new names for the Graduated Filter and Radial Filter).  When you click on these, the familiar tools will open and your brush presets will still be there, too.

Masking in Lightroom CC

If you open an old image to work on that has been previously edited using filters and/or brushes, the NEW Masking Panel will open.  When it opens, simply click on “Create New Mask”.  Choosing any of the top 5 options in that panel will open a tool menu where you can find and use your brush presets.

What is Masking in Lightroom

What Does Masking Do in Lightroom?

MASKS and MASKING are the new words for ANY TYPE OF SELECTION or ADJUSTMENT to your image that DOESN’T AFFECT THE WHOLE IMAGE.

In previous versions of Lightroom, these tools were called local adjustments.  MASKS OR MASKING is a term borrowed from Photoshop.  In Photoshop, a mask allows you to make a change to a SPECIFIC AREA of an image, and that is exactly what the new Lightroom tools in the new Masking Panel will help you do.

Lightroom & Photoshop Facebook Group

Where to Find the Masking Panel?

To find these new masking tools, move to the Develop Module by clicking the word “Develop” at the top right side of Lightroom.  Once inside the Develop Module, you will notice the tool panel thats located just above the Basic Panel looks a little different. 

After the update, the Adjustment Brush, Radial Gradient (formerly Radial Filter), and Linear Gradient (formerly Graduated Filter) are now located inside the new Masking Panel, which can be accessed by clicking the “dotted circle” icon on the far-right. 

All three of these tools will allow you to make changes to a specific area of your image that you choose.

Where to find the new masking tools in Lightroom version 11

Once you have clicked on the “dotted circle” icon, a Masking Panel will appear floating over your image.  You can leave it floating or you can dock it with the other panels on the right-side of Lightroom.

As I mentioned previously, once you open the Masking Panel will see some familiar options such as Brush, Linear Gradient, and Radial Gradient. These tools are going to behave in the same way they did previously.

We have in-depth tutorial blog posts on each of these tools that will help you learn how to use them.  Keep in mind, we will be updating these with updated tool names and screenshots from Lightroom 11.

Where to find Lightroom Brushes and Filters after update

You will also find some some BRAND NEW options in the Masking Panel that are going to BLOW YOUR MIND WITH THEIR POWER TO SAVE YOU TIME.  These tools are:

  • Select Subject
  • Select Sky
  • Color Range
  • Luminance Range
  • Depth Range

We’ll talk about each of these tools in-depth below:

Where is Auto Mask In Lightroom

Masking Tool #1: Select Subject

The Select Subject Tool utilizes Adobe’s incredible new Lightroom AI technology to identify the subject(s) of your photo and select it for you quickly.

With this tool you can now make adjustments to your subject (only) using the tool panel or your brush presets WITHOUT having to painstakingly brush over your subject OR create a radial filter.

How to Use Masking in Lightroom

Equally game-changing, Lightroom has added an “INVERT” feature to each of these masks that will automatically select EVERYTHING EXCEPT THE SUBJECT(S) so you can make changes to the background of your image without having to painstakingly brush everywhere.

You will find the invert option when you click on the mask thumbnail.  When you click on the mask thumbnail, you will see another box called Subject1 and to the right of that you will see three dots.  When you click on the three dots, it will bring up several options, including an option to invert the mask.

How to Invert a Mask in Lightroom Classic

Masking Tool #2: Select Sky Tool

The Select Sky Tool works the same way as the Select Subject Tool.  In this case, it utilizes Lightroom AI technology to identify the sky area(s) of your image.  Once your sky selection is made using this tool, you can use any of the Lightroom sliders OR brush presets to enhance your sky.

What Does Masking Do in Lightroom

And just like the Select Subject Tool, you can also invert this selection.  The inverted selection will allow you to select and make adjustments to EVERYTHING EXCEPT THE SKY.

Auto Mask Lightroom

Masking Tool #3 & 4: Color Range and Luminance Range Tools

Two additional tools in the Masking Panel allow you to make selections based on a color (Color Range) or luminance value (Luminance Range). 

If you aren’t sure what luminance is I can quickly tell you that refers to the brightness or darkness of a particular color.  There was some ability to make changes like this in previous versions of Lightroom, but those tools were well hidden and rarely used.  Now, the Masking Panel brings these tools to the forefront.

Once you click either of these options, you will be presented with an eyedropper tool.  Using the eyedropper, simply click on the area of the photo you want to adjust.

  • If you have selected the Color Range tool, the eye dropper will select all the color values similar to the one you clicked on
  • If you have selected the Luminance Range tool, a click of the eye dropper will select all the values in your image that are approximately the same brightness or darkness as what you clicked on.

Lightroom Mask Panel Select Color Range

You can then refine your selection using the accompanying adjustment tools that open up.

  • For the Luminance Range Tool you can use the gradient box and sliders to really target the exact value you want selected. 
  • For the Color Range Tool, you can further refine your selection using the Color Range slider to adjust exactly what color is selected.

How to Add and Subtract from Masks

While Lightroom’s Masking Panel uses some amazing technology to help you make selections, IT ALSO GIVES YOU THE ABILITY TO REFINE THOSE SELECTIONS MANUALLY, IF NEEDED. 

Once you start working with a mask, an “Add” and “Subtract” button will appear just beneath the mask icon (see image below).

  • To add to the areas in your selection, click on the “Add” button and then choose the selection tool that will best help you add to the area you also want to adjust. 
  • To remove some areas from the selection, click the “Subtract” button and then choose the selection tool that will best help you subtract areas from your selection.

How to Add and Subtract from Lightroom Mask

Conclusion

Masking in Lightroom is an incredible new feature that’s going to revolutionize and speed up your workflow!

Keep in mind however, these changes are big and with most big changes, they certainly come with a learning curve.

My recommendation is to take it slow and ask questions in our Facebook group. Subscribe to our blog and mailing list.  We will continue to create written and video tutorials to teach you how to use all these new features!

How to Mask in Lightroom – Video Tutorial


Do you have any questions or comments about How to use the Masking Feature in Lightroom Classic?  Leave us a comment below – we would LOVE to hear from you!  And PLEASE SHARE this post using the social sharing buttons (We really appreciate it)!

Dark & Moody Lightroom Presets

2 Simple Ways to Install Presets in Adobe Camera Raw (ACR)

2 simple ways to install presets in Adobe Camera Raw (ACR)

Adobe has made installing and using presets in Photoshop’s Adobe Camera Raw much easier recently.  This post will share two simple ways to install your presets in ACR.

Install Lightroom Presets Directly in ACR

Recently, Adobe has added a very simple way to install your Lightroom Presets into ACR.  Just follow these steps to add any of your presets for use in Photoshop.

First, download your new Pretty Presets zip file. 

Then, open a photo in Photoshop. In the menus at the top of Photoshop choose, Filter>Camera Raw Filter. 

How to install Lightroom presets in Adobe Camera Raw

Next, click on the presets icon on the right of Camera Raw (two interlocking circles). 

Installing Lightroom Presets into Adobe Camera Raw (ACR)

Then, click on the three dots “…” at the top of the Presets Panel. From the options that open, choose “Import Profiles and Presets”. 

Simple ways to install Lightroom Presets in Photoshop ACR
Navigate to the ZIPPED preset file you downloaded. Highlight the file and click “Import”. You’re done! Your presets will be installed. 

Install Presets in Lightroom

It may seem like I typed the wrong Adobe program above.  However, when you install presets into Lightroom (not Classic—the desktop app) your presets will appear in several programs at once—including Photoshop’s ACR and the Lightroom Mobile app.

To install presets into Lightroom, follow the instructions below:

Download your new Pretty Presets zip file. Then, open Lightroom CC and click on an image. 

Next, go to File>Import Develop Profiles and Presets. 

Install presets in Lightroom to have them appear in ACR
Last, navigate to the ZIPPED preset file you downloaded. Highlight the file and click “Import”. You’re done! Your presets will be installed in three places at once!

How to Apply Presets in ACR

Open the Presets Panel by clicking the two interlocking circles on the far-right of Adobe Camera Raw. Use the small triangle to open the folder. Click a preset in the folder to apply the preset to the image.

Adobe has made it so simple to have your presets available across several of the Adobe platforms.  Now that the process is so simple, It makes sense that yor presets should be in all the places you can use them!

Do you have any questions or comments about Installing your Lightroom Presets in Adobe Camera Raw?  Leave us a comment below – we would LOVE to hear from you!  And PLEASE SHARE this post using the social sharing buttons (We really appreciate it)!

The Aesthetics of Materials

Some material thoughts: even though there are some materials which are great, aesthetically they don’t really look that nice.

For example, I recently got these black merino wool shorts, and even though the material and performance is quite good, I just don’t really like the way it looks. The material is too floppy, piles too much, and looks worn out in a bad way.

Even merino wool leggings, sooner or later, they lose their elasticity, and the wear pattern is not that aesthetically appealing.

So the question on my mind is this: how do we get the best materials, that have the best performance, yet aesthetically still is beautiful to us and interesting to us?

Aesthetics means perception

In ancient Greek, “aesthetikos” means the philosophy of perception. How we perceive the world, materials, things, and anything visual.

Don’t Trust Your LCD Screen

Don’t put too much faith in your LCD screen, whether it comes to matters of framing, or reviewing. Rather, stick to ‘highlight exposure‘ priority, and just wait later until you download your photos to your laptop.