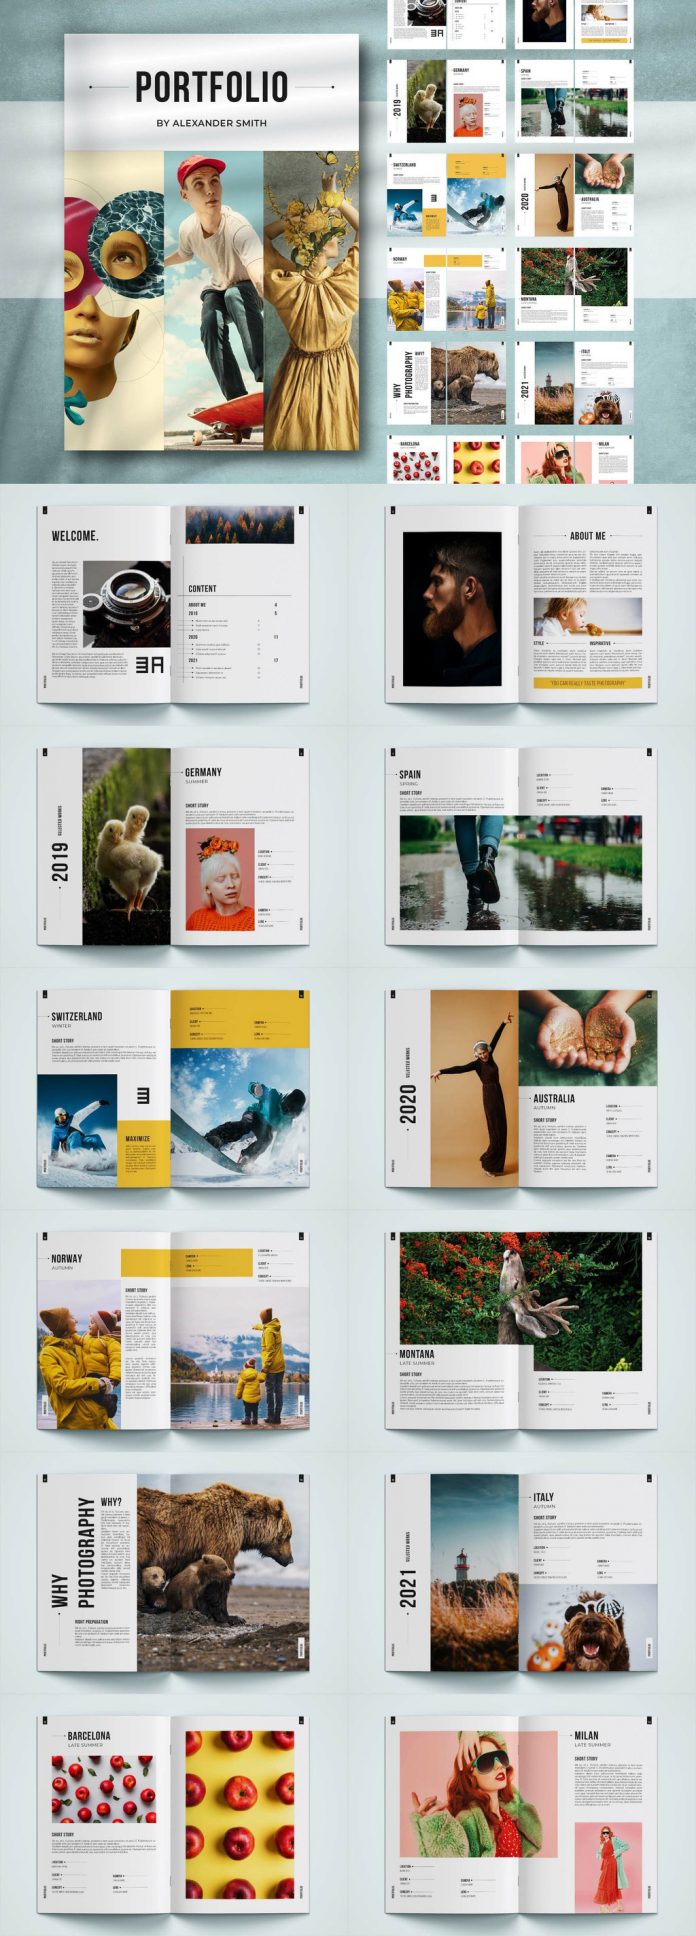
This portfolio template is perfect for photographers and all kinds of high-quality imagery.
Created by Adobe Stock contributor @GrkiCreative, this A4 InDesign portfolio template is equipped with 25 fully editable pages. It’s the perfect choice to showcase stunning photography projects and all kinds of high-quality imagery including art and design. All sample texts are for display only and may not be included in the end-use. With just a few simple clicks, you can add your own text or images in seconds. The template is completely print-ready but you can also use it for screen presentations if you want.
This photography portfolio template requires Adobe InDesign. You can get the latest version from the Adobe Creative Cloud website—just take a look here. Feel free to click on the following link to learn more about this premium InDesign template or check out the preview images below.
Download on Adobe Stock
This photography portfolio InDesign template is available here.
Download on Adobe Stock
Do not hesitate to take a look at our Templates category to find more professional design assets.
Subscribe to our newsletter!
The post Download a Photography Portfolio InDesign Template with 25 Pages appeared first on WE AND THE COLOR.
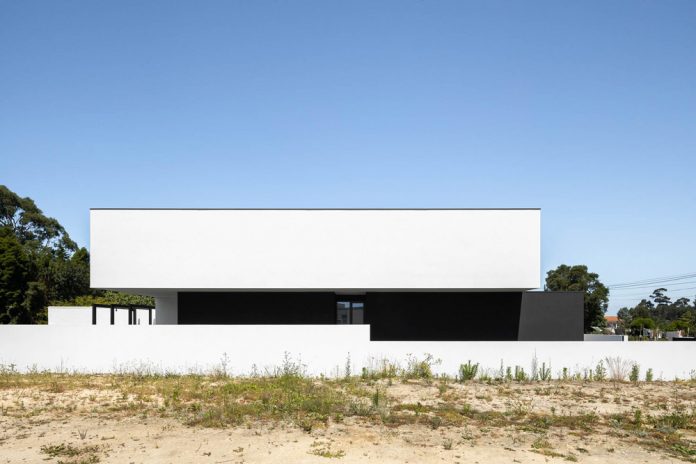
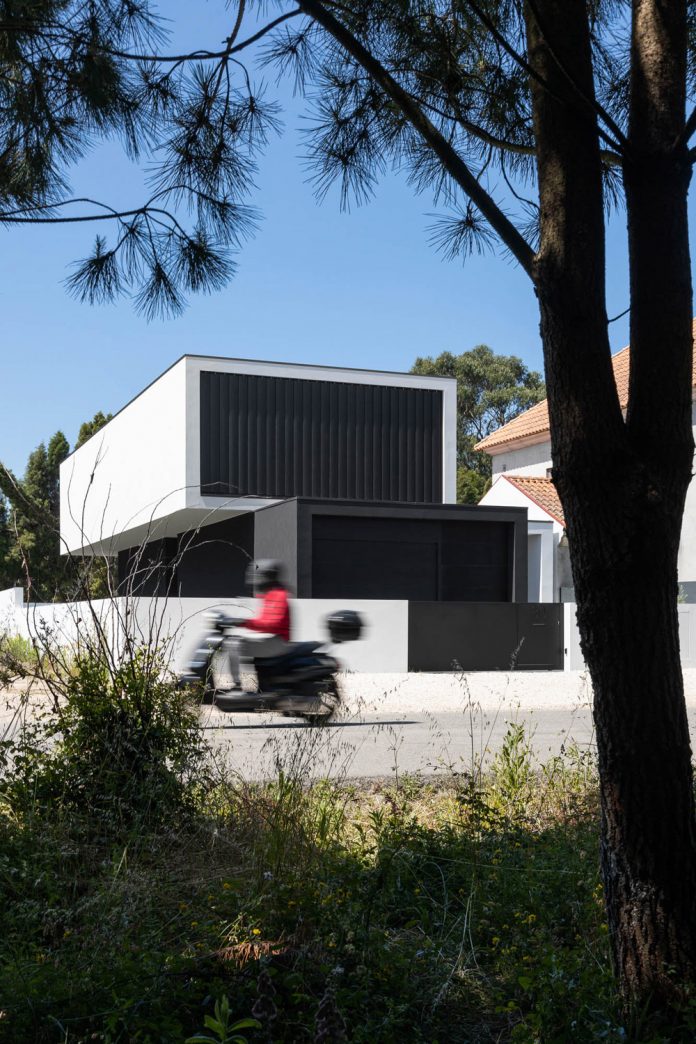
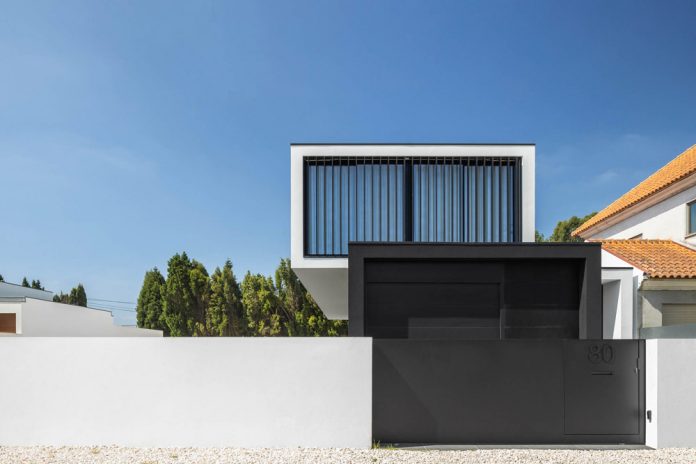
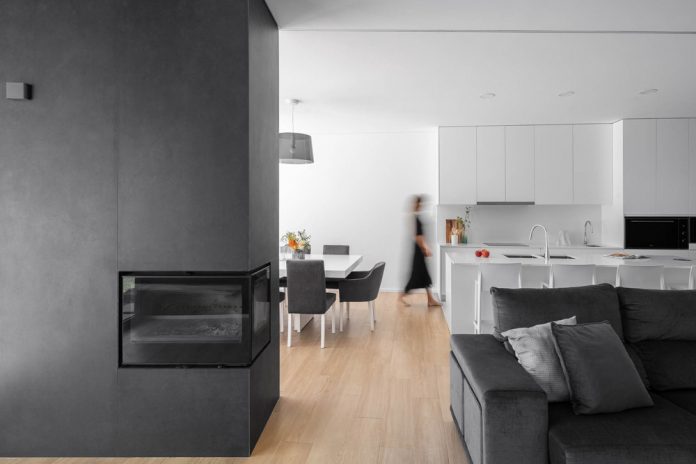
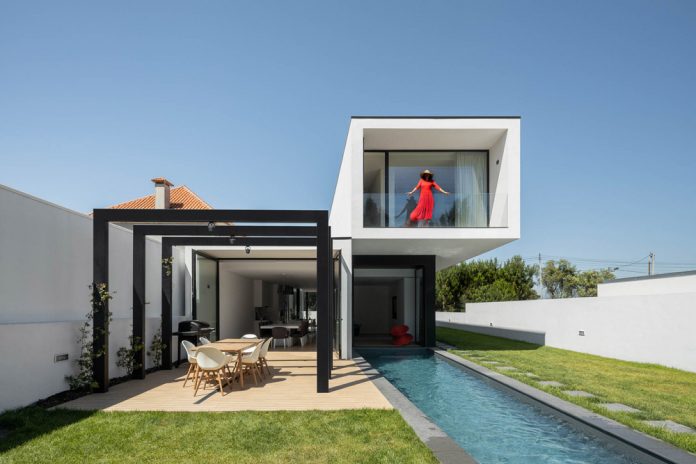
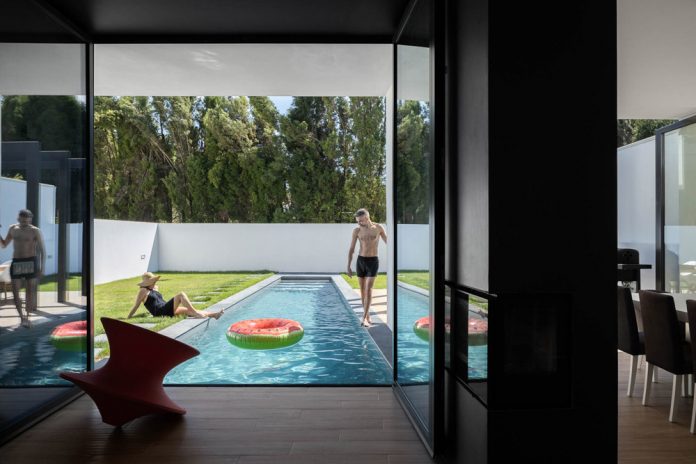
Discover an architecture project where the pool enters the house where fun and connectivity to the outside is part of the living experience.
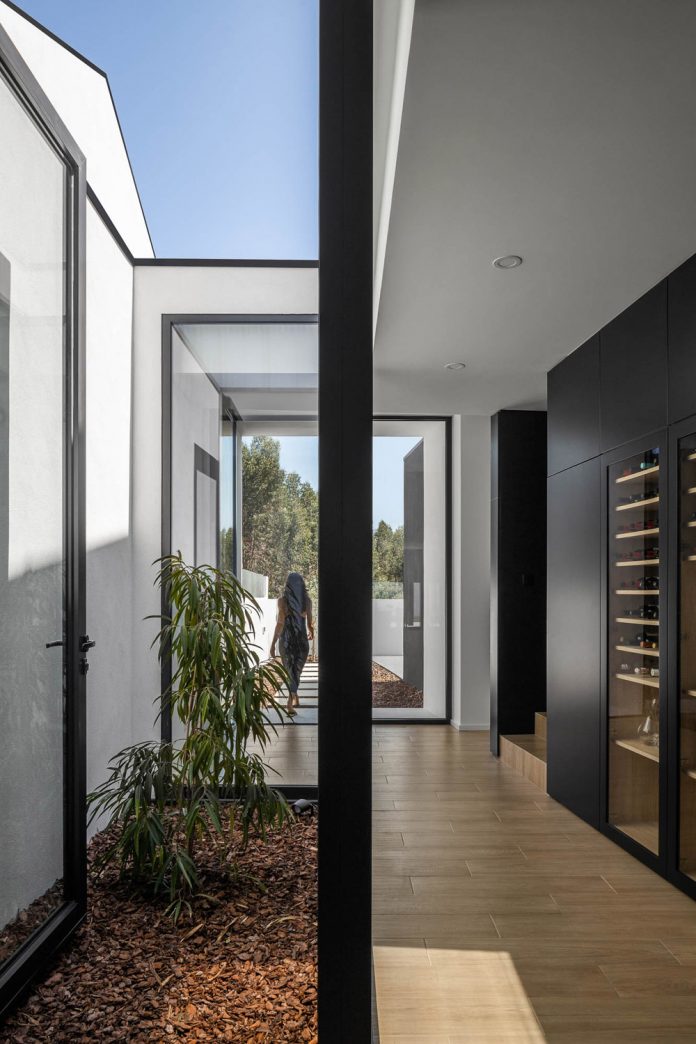
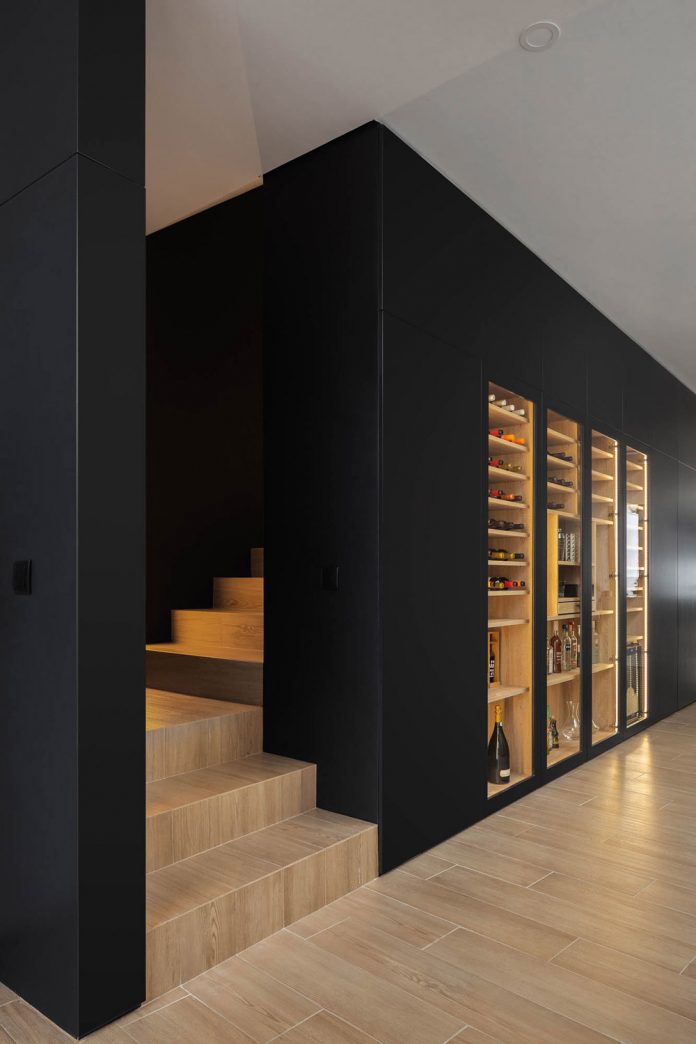
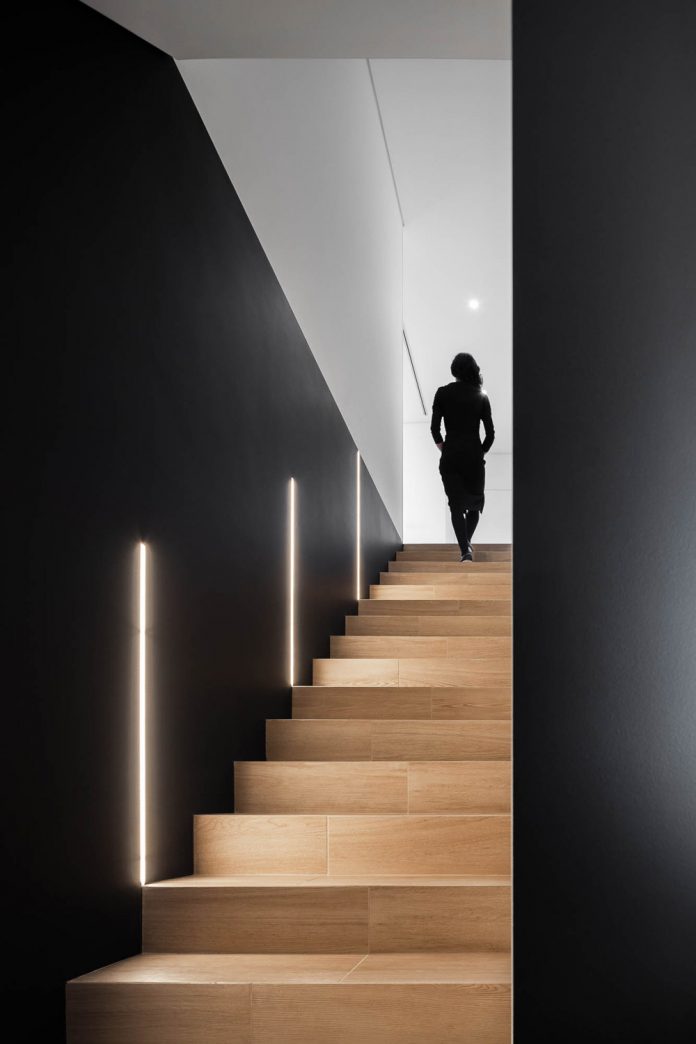
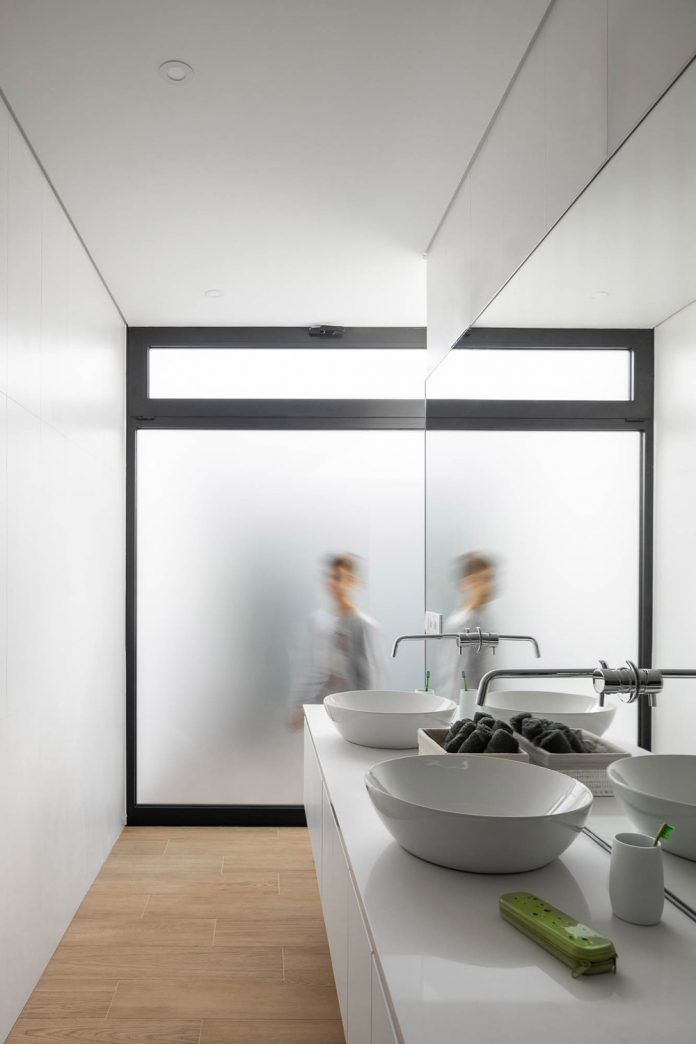
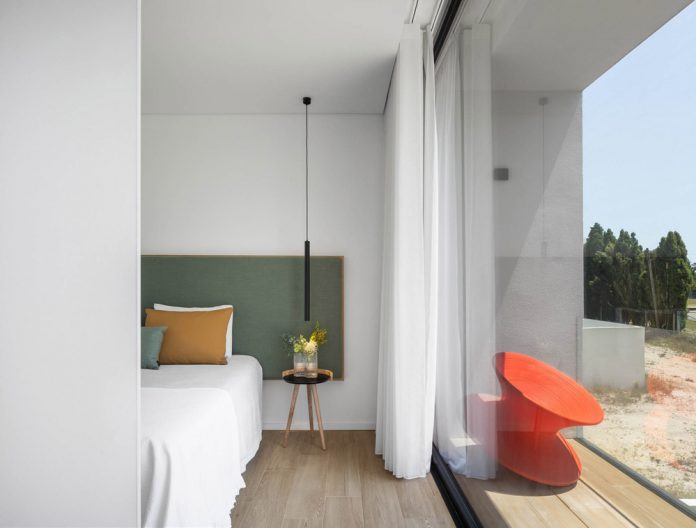
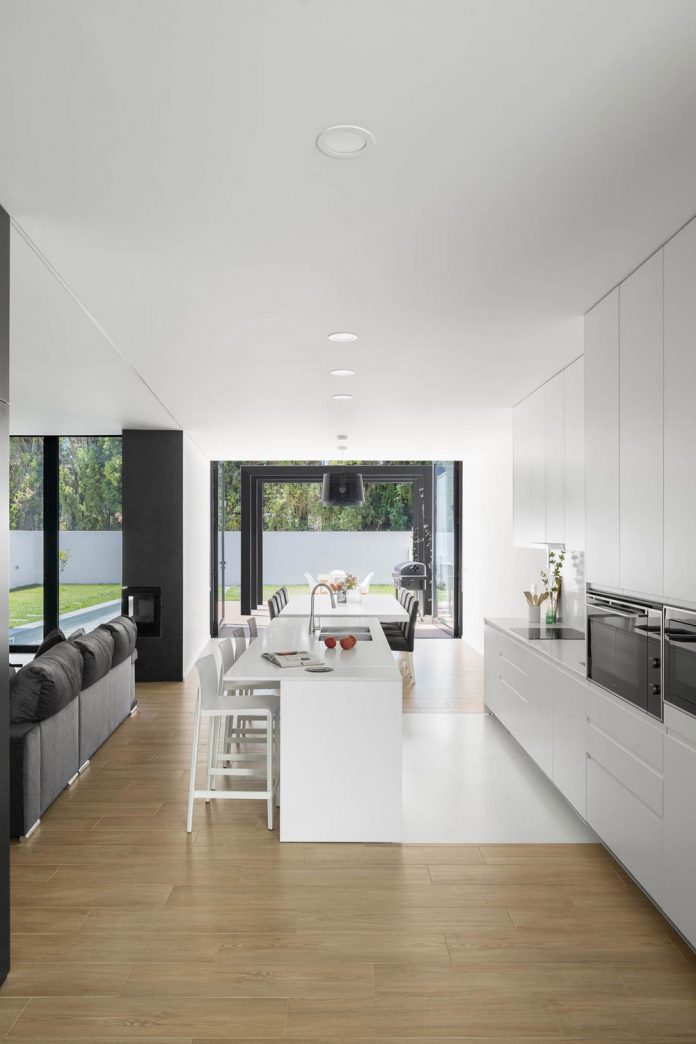
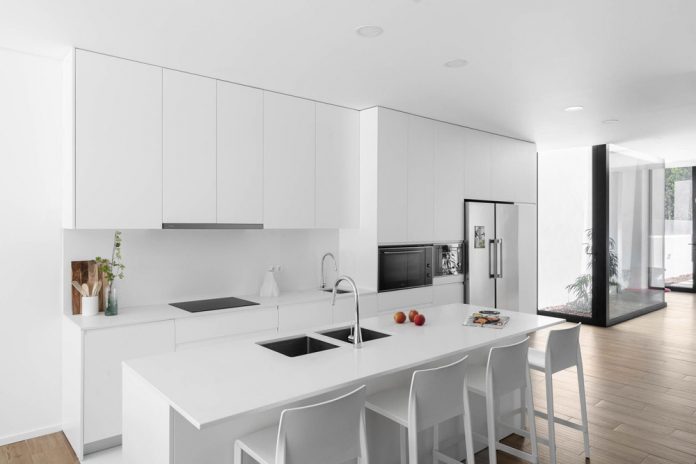
This modern villa, which is located in the vicinity of the city of Aveiro, is part of a residential area with a low occupancy rate. The proposed building is an inhomogeneous piece made up of different volumes that form a single body. The common rooms are organized on the ground floor with an entrance hall, a kitchen with a dining area, a living room, and a toilet as well as the technical areas including a double garage, machine room, and laundry room. The private rooms are organized on the first floor with two bedrooms served by a common hallway with a closet, work area, and a bathroom as well as a suite with its own wardrobe and bathroom. Formally, the architectural piece is delimited by the lines of the allotment garden plan into which it is inserted and delimits its outer boundaries. The volume resulting from these alignments is then developed through a diagonal cut. This enables a vertical division of the volume with facades of different widths in order to ensure the desired programmatic distribution. The division into floors and the subsequent elimination of the upper western volume results in a three-volume form through successive sections to the initial volume. Each volume is treated as a “box” with uniform sizes. The volumes enable different experiences inside and different relationships to the outside, which everyone can use for orientation. This guarantees the variety of the desired (indoor/outdoor experiences at the expense of the small size of the property. One of the volumes on the ground floor expands towards the street and ensures a frontal alignment with the rest of the apartments. This also allows the same volume to be withdrawn on the rear facade so that the pool approaches the facade of the building and thus ensures a direct relationship between them. At this point, it is possible to jump from the house directly in the pool or simply enjoy the lighting effects that the reflection of the water gives on the upper console. The play of colors between white and black makes it possible to define the exception to this volume, which, in contrast to the other two, is dark gray. Regarding the exterior design, the house is surrounded by green landscaped spaces, with the exception of a ceramic terrace in the back yard, which allows the transition from the use of the dining room to the outside. This area is protected by a pergola, which guarantees the right shade for this space. The pergola is drawn in continuation of the adjoining volume as if it were fragmented until it became minimal, stylized parts that form the structural portal.
Photographer Ivo Tavares just sent over a few shots of the house. You can find more of his photographic work on his website or Instagram account. Do not hesitate to check out other architectural projects by Maria Fradinho of FRARI atelier here.
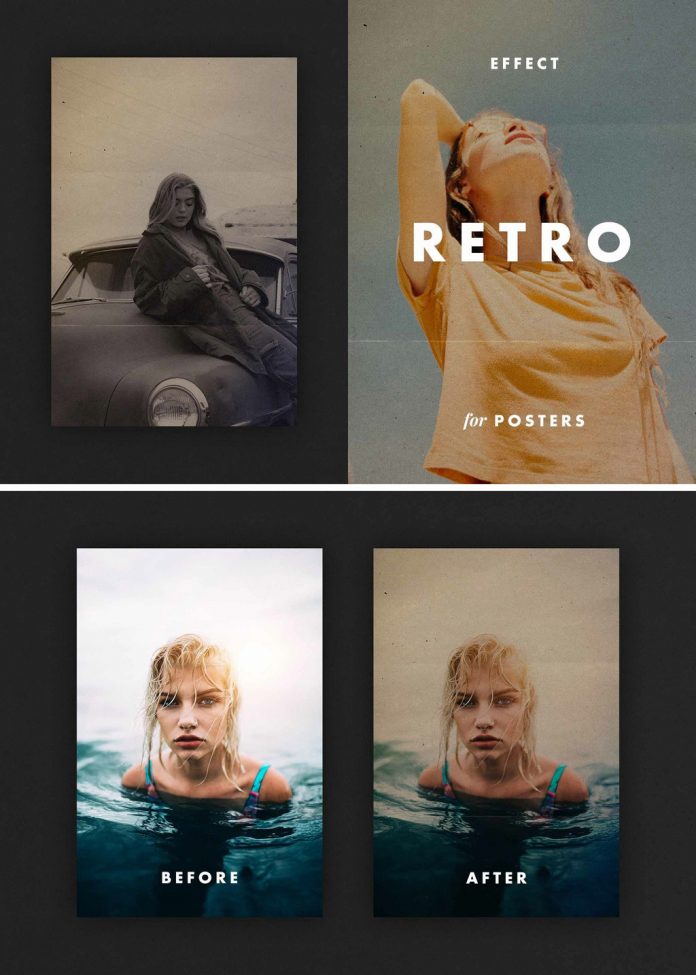
Available for free download with an Adobe Stock trial subscription, this Photoshop mockup lets you create stylish retro photo effects in no time.
Created by the skilled team of @Pixelbuddha, this retro photo effect mockup for Adobe Photoshop comes with seven different design options. These effects are optimized for a high resolution of 3000 x 4500 px.
Please note, this mockup requires Adobe Photoshop. You can get the latest version from the Adobe Creative Cloud website—just take a look here. Feel free to click on the following link to learn more about this amazing Photoshop mockup or check out the preview images below.
Download on Adobe Stock
This retro photo effect mockup for Adobe Photoshop is available here.
Download on Adobe Stock
Do not hesitate to take a look at our Templates category to find more recommended design assets.
Subscribe to our newsletter!
The post Retro Photo Effect Mockup for Adobe Photoshop appeared first on WE AND THE COLOR.
Lightroom Classic (LrC) has three important tools to help you explore different editing looks, create different versions of your photos, to go back in time, and to compare where you are now to where you were before. Some of these tools only exist in the Develop module, but one of them is visible in all modules, and one can even travel with your photo outside of LrC. What am I talking about here? I am referring to the ability to create virtual copies and snapshots, as well as utilize the functionality found in the History panel of the Develop module. These features can work together but can also be used separately.
[Editor’s note: This article first appeared in the October 2021 issue of Photoshop User.]
The History panel and virtual copies are unique to LrC because they only exist in the catalog file that contains all the work you do inside of LrC. Snapshots can be created inside of LrC’s Develop module but can also be written to a photo’s own XMP metadata (virtual copies and history cannot be written to XMP), which allows snapshots to be saved with the photo and even accessed in Adobe Camera Raw (we’ll explore this later). Let’s drill down a little into each of these features to better understand them, and then look at how they can be used in your workflow.
Virtual Copies
The key to understanding virtual copies is remembering that all the work you do in LrC is stored in the catalog file, and that the catalog file is only ever referencing each imported photo wherever it may be stored on your system. In other words, each imported photo has a record in the catalog (database) that contains all the information about that photo, and all edits are stored as a set of instructions that are applied to all copies created on export/output. By default, each photo has one set of instructions (represented by the preview we see inside LrC), but the virtual copy functionality allows us to create multiple sets of instructions that all reference the same source photo. Each time we create a new virtual copy we see what looks like a duplicate of the photo in LrC, but it is only the set of instructions that are duplicated along with a corresponding preview that is stored in the preview cache.
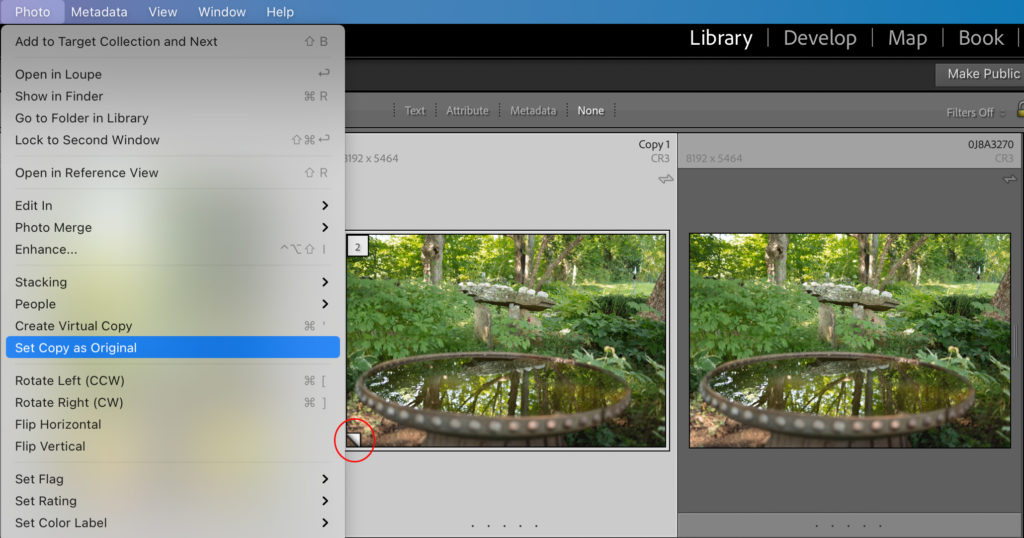
A virtual copy is visually identified by the page curl icon in the lower-left corner of the thumbnail (whereas the original has no such icon), as well as the Copy Name field of the Metadata panel will be automatically populated with the word Copy and a number that increments with each virtual copy made.
The moment the virtual copy is created we have free reign to take the edits in any direction that is separate from the original and any other virtual copies of that original. Because LrC does not duplicate the source photo this is a huge savings in disk space (keeping in mind the preview created does take up a relatively small amount of disk space in the preview cache).
Because the virtual copy appears as a duplicate copy in LrC it allows for easy side-by-side comparisons of multiple versions of the same photo. This also allows for virtual copies to exist separately from the source photo in different collections if that is useful to you (knowing that all virtual copies can easily be found in the source folder next to the original). And since these are all just separate sets of instructions for the same source photo you can even select a virtual copy and go to Photo > Set Copy as Original, which will designate that set of instructions (virtual copy) as the original photo and what was formerly the original instructions will become a virtual copy. This is useful if you prefer the edits in that virtual copy and want to ensure they are kept while relegating any edits made to the original as a separate virtual copy.
Snapshots
A snapshot is a way to preserve an editing state, or version, without creating a duplicate iteration of the photo. Located on the left side of the Develop module, the Snapshots panel is where you will find the functionality to create and manage snapshots. You can also find the command to create a new snapshot under the Develop menu (along with its shortcut).
Because snapshots are only visible within the Develop module you can think of these as a means to track or preserve different steps in your editing workflow, as well as a way to create different versions of edits as you explore possibilities with an easy way to go back to a former state.
History
The History panel is always quietly working in the background and is easy to overlook. Again, thanks to the fact that we’re working in this catalog file all the work we do is recorded to the catalog as we go without us having to manually save that work. If you switch to the Develop module and expand the History panel you will see all the individual edit steps, the import state, and more, recorded in an ever-growing list. Some steps are easy to discern, like Exposure +1, but others may indicate nothing more than that an adjustment brush stroke was applied.
The important thing to know about the History panel right now is that we can go back in time in our editing history of a selected photo just by clicking a previous step in the history panel. This can be useful when we’ve made a mistake (or made a creative exploration of settings) and want to go back to a last known good state, or even if we just want to compare where we are now with where we were before. By default, the Before/After view function compares where we are now with how the photo looked at import. That may be helpful sometimes, but there may also be times when we want to compare where we are now with a more recent point in our history, and that’s where this panel can help. If you right-click any step in the History panel, you’ll see an option to Copy History Step Settings to Before appear in the contextual menu.
That means you can set the behavior of the Before state to display the way the photo looked at the selected history step. For example, say you completed the edits in the Basic panel and applied a B&W profile, and as you continue to refine your edits with other tools you want to be able to use the Before/After function to compare against the moment after you converted to B&W not back to when it appeared in color after import. Simply right click the Convert to Black & White step in the History panel and set it as the Before state. Now when you invoke Before/After view (press the key) you will compare against that history step until you change it to something else.
Using These Together
You might be thinking that there are some similarities in purpose between snapshots and virtual copies, and you would be right. The main difference is that virtual copies appear as separate files within LrC and snapshots can only be accessed from within the Develop module. However, because virtual copies of a single photo all reference the same source photo they also all have access to the same snapshots created for that photo.
So, let’s say you created two virtual copies of a single source photo, which would appear as three separate previews/instances/photos within LrC. You could edit each one independently in LrC, and when you’ve finished editing you could preserve the final state of each one in a snapshot from within each instance of that photo. It can be very useful to see those different instances side-by-side, but that can also really clutter up the folder or collection you are viewing. If you no longer need to see the separate virtual copies you can simply delete them knowing that you’ve preserved the different versions in the Snapshots panel accessible from the original.
What about making snapshots from a history step? Yes, that’s possible too! Earlier I showed you how to set the Before state to a history step. In that same contextual menu when you right-click a history step you’ll see the option to Create Snapshot. This can make accessing a step in your development history a lot easier as a means to go back to a known good point or to preserve a creative exploration before going in a different direction.
Additionally, if you are the type of person who likes to have LrC write to each photo’s XMP metadata you can take comfort in knowing that your snapshots are included in that process. This is not something everyone needs to do (or wants to do), but it is worth knowing if that fits your workflow. To have LrC write the data stored in the catalog to a photo’s metadata just select that photo in Library and use the Metadata > Save Metadata to File(s) menu. You may get prompted by LrC to let you know that it will create sidecar .XMP files for non-DNG raw files but can write to the file itself for all other file types. Click Continue if that works for you.
Access Snapshots in Photoshop
Another cool thing about snapshot functionality is that if you use the Photo > Edit in > Open as Smart Object in Photoshop command to embed a copy of the raw photo in a smart object layer while opening it in Photoshop, then you can access your snapshots in the Camera Raw plug-in too! When you send a copy to Photoshop in this way all the edits that can be written to XMP should go along for the ride (no need to manually invoke the write to metadata command first). So when the copy opens in Photoshop, just double-click the smart object icon in the Layers panel to open the embedded copy of the raw photo into the Camera Raw plug-in. Open the Snapshots panel in Camera Raw, and there you will find all the snapshots you created in LrC, which can open up new creative possibilities for working with different versions of your photos in Photoshop too.
Hopefully this has shown you that when used together these three features have the ability to really enhance each other’s strengths and your workflow.
The post Virtual Copies and Snapshots and History, oh my! appeared first on Lightroom Killer Tips.
I love the new Masking tools in the latest version of Lightroom Classic, Lightroom, and Adobe Camera Raw, but I admit, it can take a bit of getting used to when you first see the change to the icons in the Develop module. If you’re a KelbyOne member, be sure to check out Scott’s latest class on Masking to get the full scoop. This week, I just want to help you get oriented to the new icons, the new panel, and some of the features you’ll find within.
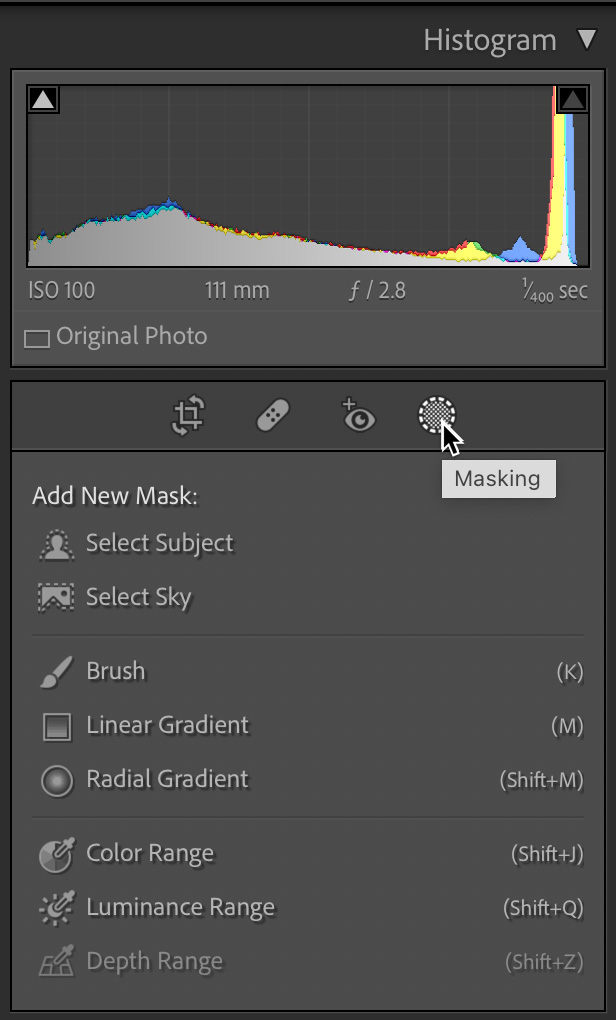
The most disorienting change is the replacement of the old Adjustment Brush, Graduated Filter, and Radial Filter icons with the single new Masking icon. Hopefully, once you click that Masking icon you are relieved to see tools you were looking for. However, they did get a slight refresh on the names, and while the names have changed, the basic functionality is the same. Here’s the cheat sheet with the old name first:
Adjustment Brush = Brush
Graduated Filter = Linear Gradient
Radial Filter = Radial Gradient
Why the name change? I suppose to bring it in line with the names used in the cloud-based version of Lightroom. Thankfully the keyboard shortcuts remained the same for all three.
Additionally, we gained completely new AI-based tools for selecting the sky and a subject. While the sky sort of goes without saying, the subject, in my experience, seems optimized on people and animals, but if there aren’t either of those in the scene it will grab the most prominent subject (YMMV). Experimentation is the best way to learn the limits and power of those tools.
In the previous version we were able to apply a Range Mask within one of the three local adjustment tools (brush, grad, and rad), but now the former range mask tools can be used on the entire photo by themselves. To learn how to mimic the old Range Mask behavior check out my post from last week on Intersect Mask. I’m sure there will be many more tutorials exploring how to use those tools in the future as well.
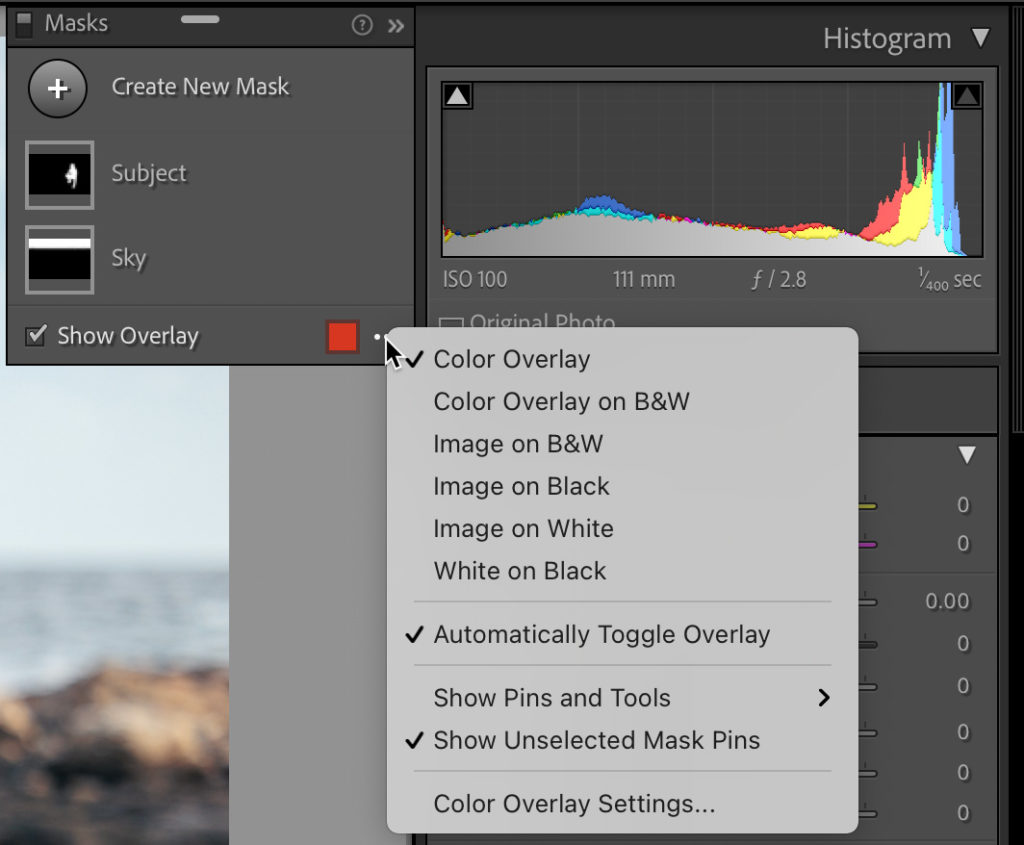
The other new functionality we gained is in how we interact with the masks we create. In this case I applied a Select Sky and Select Subject mask to help me edit this photo. We can rename individual mask groups by double-clicking the name or clicking the three-dot menu and choosing rename. This is a huge help when you have multiple masks on an image (and you will have multiple masks).
Then there are the options for the overlay. We still have the default colors of red, green, white, and black, but now we can also apply a completely custom color of our choosing (click Color Overlay Settings to access color picker). Beyond colors we display the color overlay on a B&W image, image on B&W, image on black, image on white, and white on black. If you’ve ever used the Select & Mask feature in Photoshop you’ll understand these options right away, but if you haven’t simply try each one in turn and you’ll quickly get the hang of it. The goal of each of these overlays is to give us more power to evaluate what is affected by the mask so that we can refine it further.
By default, the overlay will appear as soon as the mask is applied to show you where it is, but then will automatically disappear as soon as you move any of the adjustment sliders. You can disable that behavior by unchecking Automatically toggle overlay. When disabled, you can toggle the overlay manually by pressing O just as you could in the previous version.
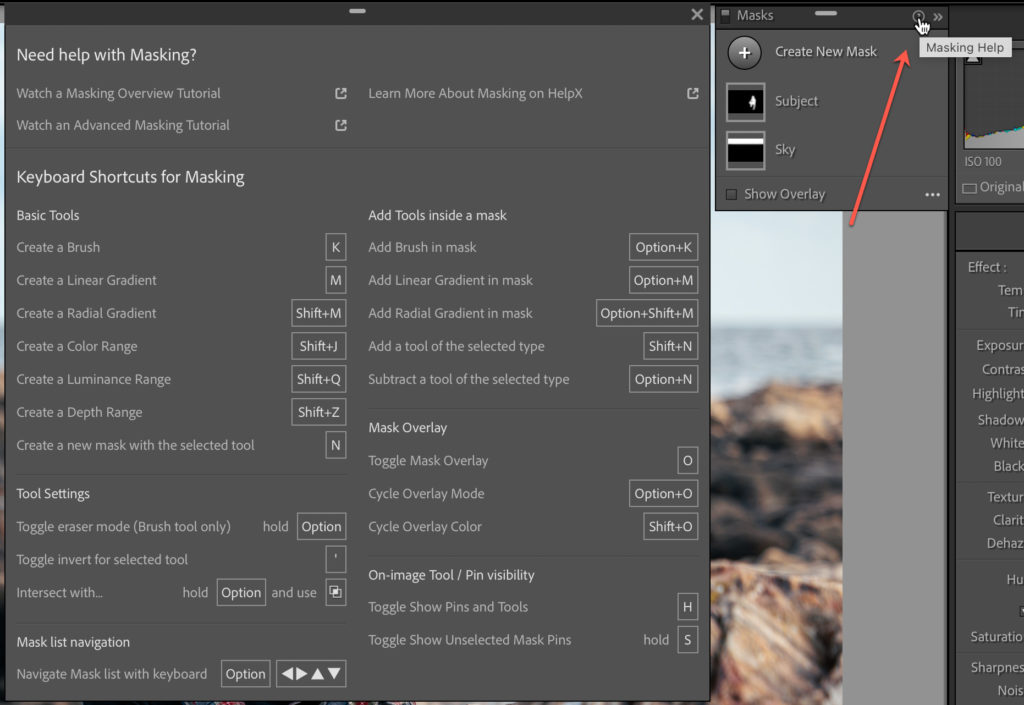
For a full look at associated keyboard shortcuts for Masking, click the question mark icon at the top of the Masks panel. While you’re up there, notice the Turn off masks icon at the top-left of the Masks panel for a quick way to see the Before/After view of your masking edits.
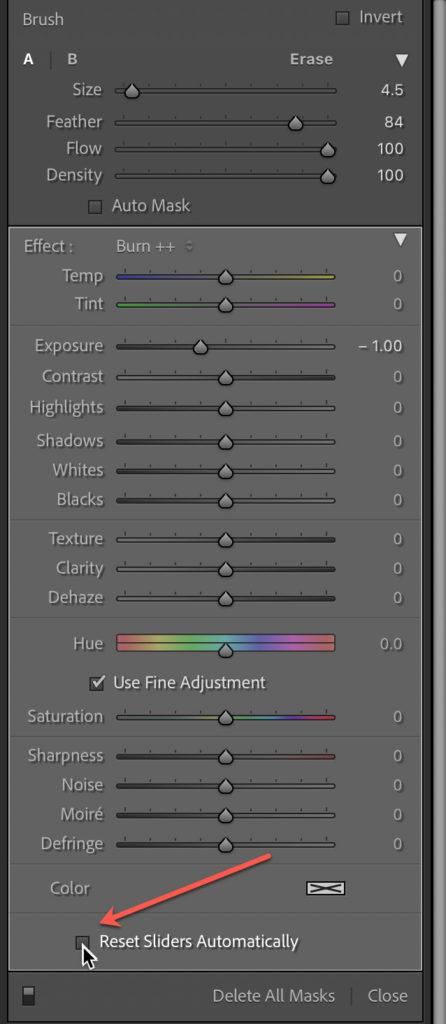
One last tip, another new default behavior is to automatically reset all editing sliders to 0 for each new mask. If you want to retain the mask settings from the last mask uncheck Reset Sliders Automatically at the bottom of the panel containing the adjustments. This way you can select a preset from the Effects drop-down menu for the mask you create, and those settings will remain for the next mask you create, and so on. However, if you want to start with a clean slate for each mask leave that box checked.
Ok final note, if you don’t see your local adjustment presets under Effects after upgrading to the new version, the most likely suspect is the Store presets with this catalog checkbox on the Presets tab of the Preferences. That setting may have been changed/lost in the upgrade to the new version, and if that happens your presets appear to have vanished. Changing the setting on that preference to what it was in the previous version should bring your presets back.
The post Get Oriented to Masking appeared first on Lightroom Killer Tips.