Get Oriented to Masking

I love the new Masking tools in the latest version of Lightroom Classic, Lightroom, and Adobe Camera Raw, but I admit, it can take a bit of getting used to when you first see the change to the icons in the Develop module. If you’re a KelbyOne member, be sure to check out Scott’s latest class on Masking to get the full scoop. This week, I just want to help you get oriented to the new icons, the new panel, and some of the features you’ll find within.

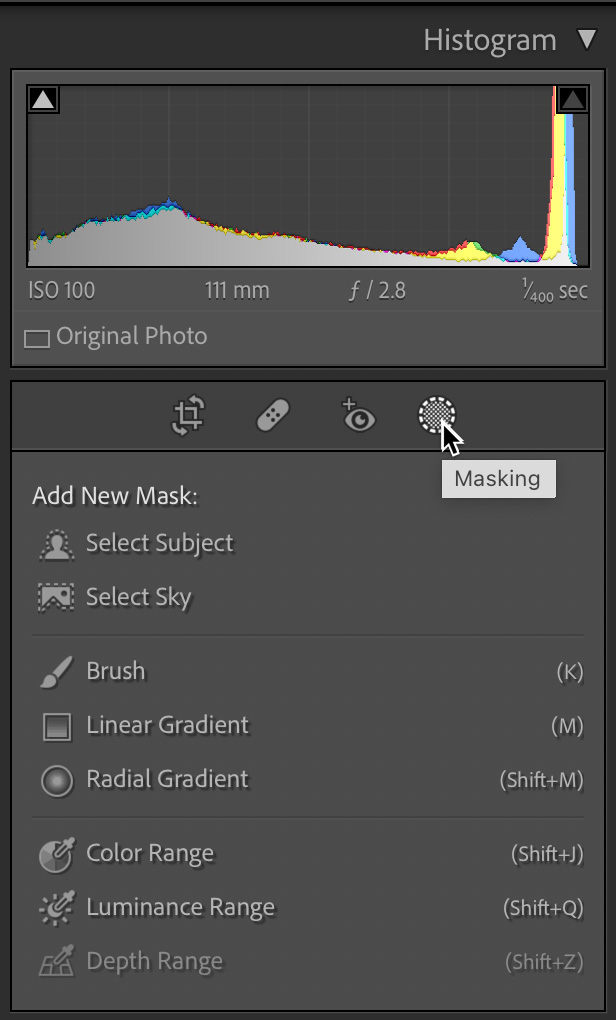
The most disorienting change is the replacement of the old Adjustment Brush, Graduated Filter, and Radial Filter icons with the single new Masking icon. Hopefully, once you click that Masking icon you are relieved to see tools you were looking for. However, they did get a slight refresh on the names, and while the names have changed, the basic functionality is the same. Here’s the cheat sheet with the old name first:

  • Adjustment Brush = Brush
  • Graduated Filter = Linear Gradient
  • Radial Filter = Radial Gradient

Why the name change? I suppose to bring it in line with the names used in the cloud-based version of Lightroom. Thankfully the keyboard shortcuts remained the same for all three.

Additionally, we gained completely new AI-based tools for selecting the sky and a subject. While the sky sort of goes without saying, the subject, in my experience, seems optimized on people and animals, but if there aren’t either of those in the scene it will grab the most prominent subject (YMMV). Experimentation is the best way to learn the limits and power of those tools.

In the previous version we were able to apply a Range Mask within one of the three local adjustment tools (brush, grad, and rad), but now the former range mask tools can be used on the entire photo by themselves. To learn how to mimic the old Range Mask behavior check out my post from last week on Intersect Mask. I’m sure there will be many more tutorials exploring how to use those tools in the future as well.

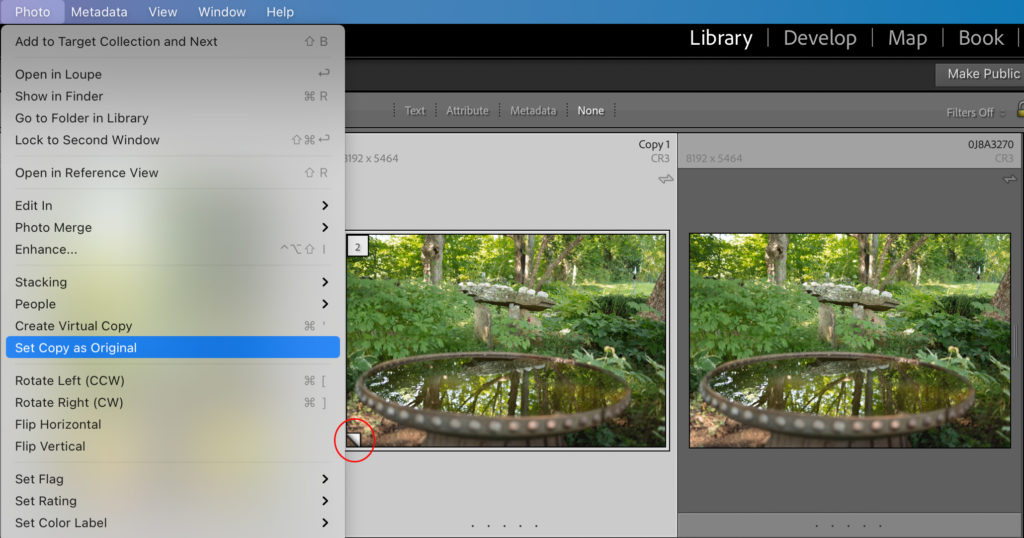
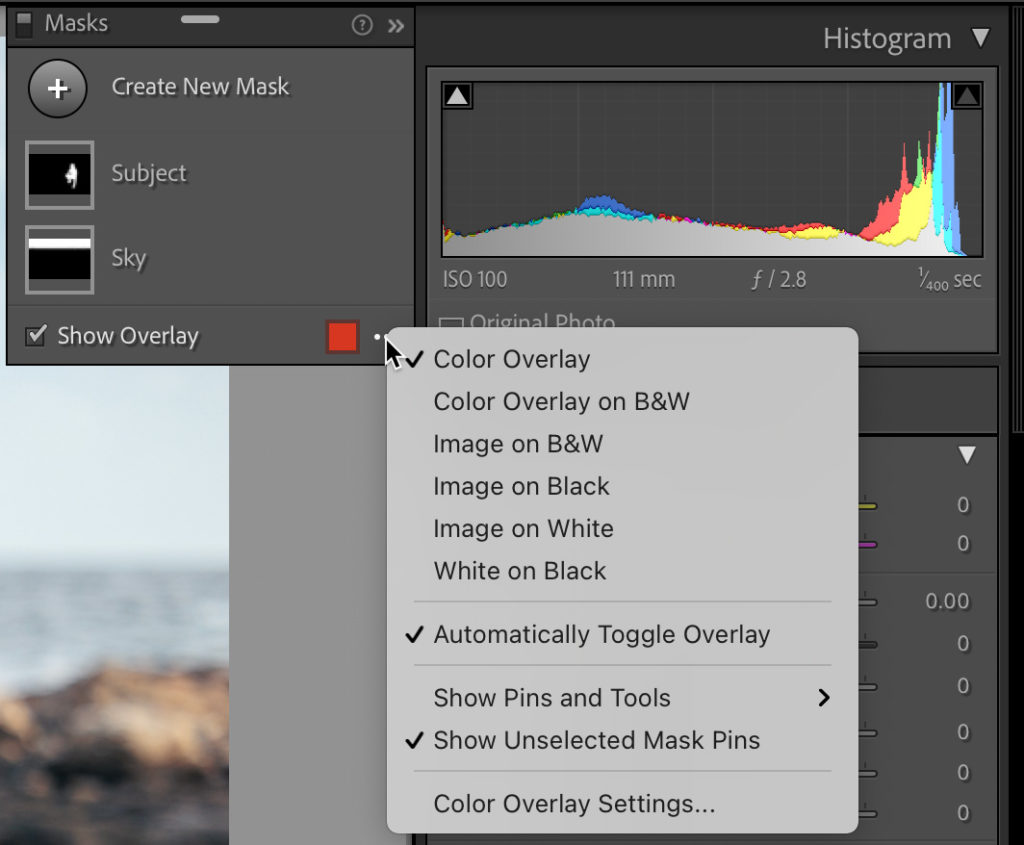
The other new functionality we gained is in how we interact with the masks we create. In this case I applied a Select Sky and Select Subject mask to help me edit this photo. We can rename individual mask groups by double-clicking the name or clicking the three-dot menu and choosing rename. This is a huge help when you have multiple masks on an image (and you will have multiple masks).

Then there are the options for the overlay. We still have the default colors of red, green, white, and black, but now we can also apply a completely custom color of our choosing (click Color Overlay Settings to access color picker). Beyond colors we display the color overlay on a B&W image, image on B&W, image on black, image on white, and white on black. If you’ve ever used the Select & Mask feature in Photoshop you’ll understand these options right away, but if you haven’t simply try each one in turn and you’ll quickly get the hang of it. The goal of each of these overlays is to give us more power to evaluate what is affected by the mask so that we can refine it further.

By default, the overlay will appear as soon as the mask is applied to show you where it is, but then will automatically disappear as soon as you move any of the adjustment sliders. You can disable that behavior by unchecking Automatically toggle overlay. When disabled, you can toggle the overlay manually by pressing O just as you could in the previous version.

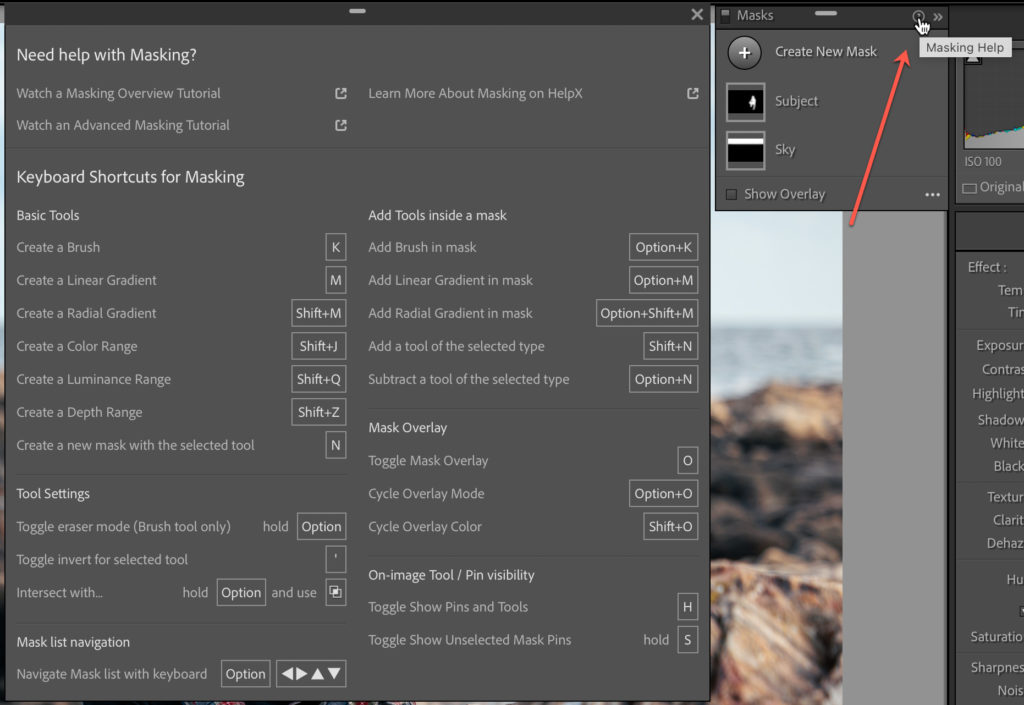
For a full look at associated keyboard shortcuts for Masking, click the question mark icon at the top of the Masks panel. While you’re up there, notice the Turn off masks icon at the top-left of the Masks panel for a quick way to see the Before/After view of your masking edits.

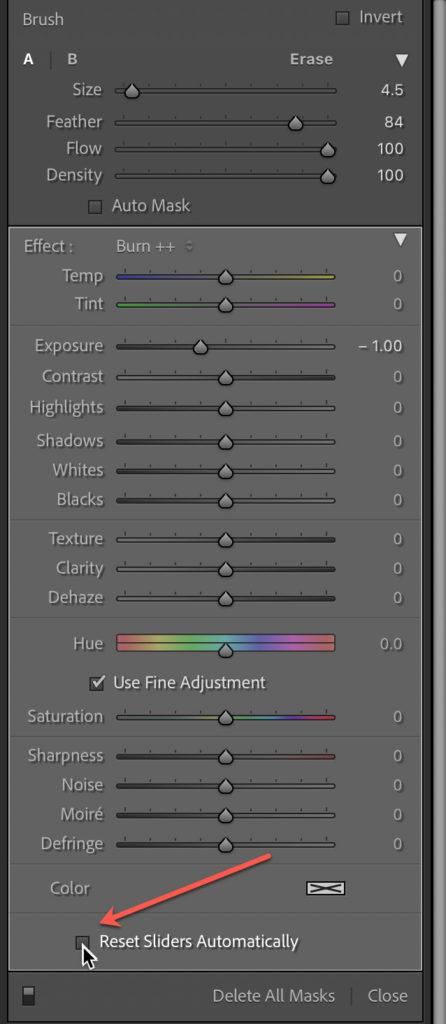
One last tip, another new default behavior is to automatically reset all editing sliders to 0 for each new mask. If you want to retain the mask settings from the last mask uncheck Reset Sliders Automatically at the bottom of the panel containing the adjustments. This way you can select a preset from the Effects drop-down menu for the mask you create, and those settings will remain for the next mask you create, and so on. However, if you want to start with a clean slate for each mask leave that box checked.

Ok final note, if you don’t see your local adjustment presets under Effects after upgrading to the new version, the most likely suspect is the Store presets with this catalog checkbox on the Presets tab of the Preferences. That setting may have been changed/lost in the upgrade to the new version, and if that happens your presets appear to have vanished. Changing the setting on that preference to what it was in the previous version should bring your presets back.

The post Get Oriented to Masking appeared first on Lightroom Killer Tips.

Virtual Copies and Snapshots and History, oh my!

Lightroom Classic (LrC) has three important tools to help you explore different editing looks, create different versions of your photos, to go back in time, and to compare where you are now to where you were before. Some of these tools only exist in the Develop module, but one of them is visible in all modules, and one can even travel with your photo outside of LrC. What am I talking about here? I am referring to the ability to create virtual copies and snapshots, as well as utilize the functionality found in the History panel of the Develop module. These features can work together but can also be used separately.

[Editor’s note: This article first appeared in the October 2021 issue of Photoshop User.]

The History panel and virtual copies are unique to LrC because they only exist in the catalog file that contains all the work you do inside of LrC. Snapshots can be created inside of LrC’s Develop module but can also be written to a photo’s own XMP metadata (virtual copies and history cannot be written to XMP), which allows snapshots to be saved with the photo and even accessed in Adobe Camera Raw (we’ll explore this later). Let’s drill down a little into each of these features to better understand them, and then look at how they can be used in your workflow.

Virtual Copies

The key to understanding virtual copies is remembering that all the work you do in LrC is stored in the catalog file, and that the catalog file is only ever referencing each imported photo wherever it may be stored on your system. In other words, each imported photo has a record in the catalog (database) that contains all the information about that photo, and all edits are stored as a set of instructions that are applied to all copies created on export/output. By default, each photo has one set of instructions (represented by the preview we see inside LrC), but the virtual copy functionality allows us to create multiple sets of instructions that all reference the same source photo. Each time we create a new virtual copy we see what looks like a duplicate of the photo in LrC, but it is only the set of instructions that are duplicated along with a corresponding preview that is stored in the preview cache.

A virtual copy is visually identified by the page curl icon in the lower-left corner of the thumbnail (whereas the original has no such icon), as well as the Copy Name field of the Metadata panel will be automatically populated with the word Copy and a number that increments with each virtual copy made.

The moment the virtual copy is created we have free reign to take the edits in any direction that is separate from the original and any other virtual copies of that original. Because LrC does not duplicate the source photo this is a huge savings in disk space (keeping in mind the preview created does take up a relatively small amount of disk space in the preview cache).

Because the virtual copy appears as a duplicate copy in LrC it allows for easy side-by-side comparisons of multiple versions of the same photo. This also allows for virtual copies to exist separately from the source photo in different collections if that is useful to you (knowing that all virtual copies can easily be found in the source folder next to the original). And since these are all just separate sets of instructions for the same source photo you can even select a virtual copy and go to Photo > Set Copy as Original, which will designate that set of instructions (virtual copy) as the original photo and what was formerly the original instructions will become a virtual copy. This is useful if you prefer the edits in that virtual copy and want to ensure they are kept while relegating any edits made to the original as a separate virtual copy.

Snapshots

A snapshot is a way to preserve an editing state, or version, without creating a duplicate iteration of the photo. Located on the left side of the Develop module, the Snapshots panel is where you will find the functionality to create and manage snapshots. You can also find the command to create a new snapshot under the Develop menu (along with its shortcut).

Because snapshots are only visible within the Develop module you can think of these as a means to track or preserve different steps in your editing workflow, as well as a way to create different versions of edits as you explore possibilities with an easy way to go back to a former state.

History

The History panel is always quietly working in the background and is easy to overlook. Again, thanks to the fact that we’re working in this catalog file all the work we do is recorded to the catalog as we go without us having to manually save that work. If you switch to the Develop module and expand the History panel you will see all the individual edit steps, the import state, and more, recorded in an ever-growing list. Some steps are easy to discern, like Exposure +1, but others may indicate nothing more than that an adjustment brush stroke was applied.

The important thing to know about the History panel right now is that we can go back in time in our editing history of a selected photo just by clicking a previous step in the history panel. This can be useful when we’ve made a mistake (or made a creative exploration of settings) and want to go back to a last known good state, or even if we just want to compare where we are now with where we were before. By default, the Before/After view function compares where we are now with how the photo looked at import. That may be helpful sometimes, but there may also be times when we want to compare where we are now with a more recent point in our history, and that’s where this panel can help. If you right-click any step in the History panel, you’ll see an option to Copy History Step Settings to Before appear in the contextual menu.

That means you can set the behavior of the Before state to display the way the photo looked at the selected history step. For example, say you completed the edits in the Basic panel and applied a B&W profile, and as you continue to refine your edits with other tools you want to be able to use the Before/After function to compare against the moment after you converted to B&W not back to when it appeared in color after import. Simply right click the Convert to Black & White step in the History panel and set it as the Before state. Now when you invoke Before/After view (press the key) you will compare against that history step until you change it to something else.

Using These Together

You might be thinking that there are some similarities in purpose between snapshots and virtual copies, and you would be right. The main difference is that virtual copies appear as separate files within LrC and snapshots can only be accessed from within the Develop module. However, because virtual copies of a single photo all reference the same source photo they also all have access to the same snapshots created for that photo.

So, let’s say you created two virtual copies of a single source photo, which would appear as three separate previews/instances/photos within LrC. You could edit each one independently in LrC, and when you’ve finished editing you could preserve the final state of each one in a snapshot from within each instance of that photo. It can be very useful to see those different instances side-by-side, but that can also really clutter up the folder or collection you are viewing. If you no longer need to see the separate virtual copies you can simply delete them knowing that you’ve preserved the different versions in the Snapshots panel accessible from the original.

What about making snapshots from a history step? Yes, that’s possible too! Earlier I showed you how to set the Before state to a history step. In that same contextual menu when you right-click a history step you’ll see the option to Create Snapshot. This can make accessing a step in your development history a lot easier as a means to go back to a known good point or to preserve a creative exploration before going in a different direction.

Additionally, if you are the type of person who likes to have LrC write to each photo’s XMP metadata you can take comfort in knowing that your snapshots are included in that process. This is not something everyone needs to do (or wants to do), but it is worth knowing if that fits your workflow. To have LrC write the data stored in the catalog to a photo’s metadata just select that photo in Library and use the Metadata > Save Metadata to File(s) menu. You may get prompted by LrC to let you know that it will create sidecar .XMP files for non-DNG raw files but can write to the file itself for all other file types. Click Continue if that works for you.

Access Snapshots in Photoshop

Another cool thing about snapshot functionality is that if you use the Photo > Edit in > Open as Smart Object in Photoshop command to embed a copy of the raw photo in a smart object layer while opening it in Photoshop, then you can access your snapshots in the Camera Raw plug-in too! When you send a copy to Photoshop in this way all the edits that can be written to XMP should go along for the ride (no need to manually invoke the write to metadata command first). So when the copy opens in Photoshop, just double-click the smart object icon in the Layers panel to open the embedded copy of the raw photo into the Camera Raw plug-in. Open the Snapshots panel in Camera Raw, and there you will find all the snapshots you created in LrC, which can open up new creative possibilities for working with different versions of your photos in Photoshop too.

Hopefully this has shown you that when used together these three features have the ability to really enhance each other’s strengths and your workflow.

The post Virtual Copies and Snapshots and History, oh my! appeared first on Lightroom Killer Tips.

Long Live the Vaporwave Aesthetic

Long Live the Vaporwave Aesthetic

Vaporwave has been robbed of its rightful place in art history. Take a look at its origins—and what it tells us about the future of design.

Vaporwave, a product of the 2010s internet, isn’t just one thing. It’s a musical genre, a visual art form, an aesthetic. Perhaps because it’s so hard to define, the movement has been widely dismissed as meaningless and fleeting.

But, in fact, vaporwave has had a lasting impact on design. Here we take a look back at the movement, its themes, and what it tells us about how the internet shapes creativity.

Vaporwave Background
Vaporwave is a microgenre of electronic music that inspired an art style. Image via Swill Klitch.

What Is Vaporwave?

Vaporwave has its roots in sound. Musically, vaporwave is a slowed down, remixed, and chopped genre that reconfigures dance music of the ’80s and ’90s, lounge-y elevator tunes, and samples from television, infomercials, and video games. 

The movement’s equally recognizable visual language is deeply entwined with the audio that preceded it. Aesthetically, vaporwave provides a distorted and melancholic look of the ’80s and ’90s. It often incorporates web design from the early days of the internet, imagery from music videos, and other pop culture elements of the era.

The world of vaporwave is full of neon-lit, futuristic dreamscapes, cotton candy skies, and Japanese iconography, all set to the sound of smooth elevator jazz chopped and screwed to 80’s synths. It’s modern and retro, and evokes both comforting and deeply uncomfortable nostalgia. 

Some argue that the genre offers a critique of consumerism, globalization, and capitalism. In that respect, vaporwave connects with punk, a genre typically aligned with anarchy and anti-capitalism. Only, it’s the punk of the internet era.

So, what are the design elements that define this unapologetic, polarizing movement?


The Internet 

Without the internet, vaporwave would quite simply not exist. It’s perhaps unsurprising then that early internet imagery features in vaporwave design. Late 1990s web design, glitch art, 3D-rendered objects, animation, and cyberpunk tropes all serve as visual references to the worldwide web. 


Japanese Iconography

From 1967 to the early 1990s, Japan developed the most cutting-edge technologies and, eventually, the country’s GDP skyrocketted to become the second-highest in the world. Economists around the world referred to this time period in Japan as the Japanese Economic Miracle, and the era hit its peak in the ’80s and ’90s.

Vaporwave, with its bright neon city lights, cropped anime girls, and 16-bit Nintendo video games, is a nod to Japan at the height of its economic power. It freezes the country during its two decades of unrestrained consumption, critiquing its consumerist era under the guise of idealizing it. 


Ancient Greek and Roman Busts 

Greek and Roman busts feature predominantly in vaporwave design to represent the reappropriation of classical art into popular culture.

It’s a playful reference to classical aesthetics, combining highbrow classical imagery with lowbrow modern elements. The Helios statue featured on the cover of Floral Shoppe’s album, Macintosh Plus, offers the most notable use of Greek imagery in vaporwave art. 


High-Tech and Low-Tech Digital Art Mashups  

Vaporwave design often incorporates pixel art and pixelated text. The use of heavy outlines, isometric shapes, and extruded letters, grids, and dots provide an element of depth to what would otherwise be a flat composition.

Designers often deploy shadows and outlines to suggest a 3D space and create digital compositions. 


Final Thoughts 

As new technologies such as virtual reality and blockchain promise to become ubiquitous in our lives, it’s essential that we—especially designers—embrace these new technological landscapes to usher in and encourage new eras in design.

Anime Character Blowing Bubblegum Bubble Against a How Pink Background. Text Under Character Reads
Images via Dead Color, EnkaArt, and local_doctor.

Vaporwave was the result of the internet. If this aesthetic has taught us anything, it’s that we should give the benefit of the doubt to any movement born from such technological landscapes, and to anticipate a new era of design in their wake.


Cover image via local_doctor.  

The post Long Live the Vaporwave Aesthetic appeared first on The Shutterstock Blog.

Deal Alert: Save Big on Datacolor Color Workflow Tools

Datacolor is famous for helping creatives bring out the best colors in their work. And right now, they’re giving you the opportunity to save up to $80 on the Datacolor Spyder and ColorReader range. But don’t wait around! This special is only on offer until December 3rd or while stocks last.

Full disclosure: This sponsored article was brought to you by Datacolor.

To the professional creatives out there, here’s a deal you do not want to miss! Datacolor is taking $80 off the SpyderX Elite monitor calibration tool – their fastest and most accurate Spyder ever. This handy device gives photographers, designers, and filmmakers total control of the color workflow with unlimited calibration setting choices, and advanced tools for display mapping and analysis. Normally valued at $279.99, this week Datacolor is selling the SpyderX Elite for just $199.99.

If you’re serious about your photography, the SpyderX Pro is also on special this week. Aimed at photographers and designers looking for a super fast and accurate calibration tool that doesn’t require a science degree to figure out, the SpyderX Pro is selling for $129.99 right now. That’s $40 off the normal price.

If design or product photography is your thing, you might have been eyeing the ColorReader EZ as the next new tool in your kit. Guess what… It’s $10 off at the moment! And while you’re at it, pick up the Spyder Checkr 24 color card and software combo for another $10 saving.

Don’t wait around! Add some extra jingle to your pocket this holiday season and save big on Datacolor Spyder and Datacolor ColorReader products today! Check these four special deals out below or head over to the Datacolor Black Friday sale now.

SpyderX Pro

For serious photographers and designers who want a fast, precise and easy-to-use monitor calibrator that helps achieve their creative vision.

  • The Fastest Spyder Ever: Calibrating your monitor now takes just a minute or two.
  • The Most Accurate Spyder Ever: Groundbreaking lens-based color engine provides a higher level of color accuracy for multiple monitors.
  • See The Difference Instantly: SpyderProof functionality provides before-and-after evaluation of your images.

Sale Price: $129.99 $169.99

SpyderX Elite

For Expert and professional photographers and motion image makers looking for the most comprehensive monitor calibration tool for maximum control of their color workflow.

  • The Fastest Spyder Ever: Calibrating your monitor now takes just a minute or two.
  • The Most Accurate Spyder Ever: Groundbreaking lens-based color engine provides a higher level of color accuracy for multiple monitors and projectors.
  • See The Difference Instantly: SpyderProof functionality provides full-screen before-and-after evaluation of your images.

Sale Price: $199.99 $279.99

Spyder Checkr 24

Boost efficiency and color precision by color correcting your image file for one or multiple camera combinations.

  • Incudes 24 standard color patches.
  • Consistent, accurate color within a post-production workflow in Adobe Lightroom Classic, Adobe Photoshop and Hasselblad Phocus.
  • Generate HSL-presets with the Spyder Checkr software.
  • Can be integrated with DaVinci Resolve for auto-color Correction.

Sale Price: $39 $49

ColorReader EZ

Color-coordinate your photo shoot seamlessly. Scan a color to instantly find its Savage Universal background color match, paint color match, plus precise color values for easy conversion to Pantone.

  • Match to the closest Savage Universal Seamless Background paper color.
  • Get the 3 closest paint matches across all major paint brands.
  • “Try on” paint color with Samplize peel-&-stick paint samples.
  • Get CIE Lab, RGB and Hex color values for your measured color.

Sale Price: $49 $59

Head over to the Datacolor Black Friday sale now, and get yours today.

Back Where We Started: The Camera Industry Is Again a Bit-Part Player

An illustration of a photographer in front of a declining sales chart

Remember those heady days of 2010? The release of the iPhone 4 and iPad, the New Orleans Saints won Superbowl XLIV, Iron Man 2 hit the cinemas, Eminem released Recovery, and Biden was Vice-President. It was also the year when camera shipments peaked at over 120 million units. How did the industry become the bit-part player it now is, shifting 9 million units just ten short years later?

In terms of shipments and sales, 2020 really was a year to forget for the camera industry – annus horribilis – where it hit new depths that no one thought possible during those highs of 2010. Going from CIPA data of manufacturer shipments, we can see that 2010 just pushed out 2008 as the year to celebrate the fortunes of the camera with an inexorable rise from its base in 1999.

CIPA Camera Shipments

It must have seemed that anything was possible as factories popped up to produce ever more – cheaper – cameras to a mass market that was all too happy to buy them. Of course, the reality was perhaps a little more nuanced and cracks had already started to appear in the facade of an industry predicated on the mass market.  If we factor in the value of those shipments, along with lens shipments then we can see what was really happening.

Camera and Lens Shipments and Value

In fact, by 2008 the industry had already peaked in value; two short years later that amount had dropped by 25%. The writing was on the wall and while fable will point to the release of the iPhone in 2007 as the defining moment, that wasn’t actually the case. Sharp’s J-SH04 incorporated the first digital camera into a phone back in 2000 and by 2003 feature phones were outselling compact cameras.

It’s a salutary reminder that a product’s unique selling point (USP) has to remain, well, unique! In the case of the compact camera, that was an “adequate digital image” and phones subsequently plundered their sales.

This is what we might consider the classic boom and bust history of the digital camera going from nothing and potentially ending in nothing: the rise and fall of the camera industry. What’s interesting, however, is that flat trajectory for lens shipments, which hints at something else going on in the market.

Camera Shipments By Type

Crucially then, if we split shipments by camera type (DSLR, MILC, and Integrated) we see a different picture. Sure, it is still trending down but that boom and bust scenario is restricted to the Integrated camera and they are now only just shipping more than DSLRs and MILCs.

In fact, what shipment value shows is where the bulk of the money lies. In 2010, the sheer volume of Integrated cameras meant that that was where value lay, along with the profit. That is not true today where the value of DSLRs and MILCs now exceeds that of Integrated models. This has been the case for DSLRs since 2013, but their shipment numbers are genuinely in freefall and MILCs eventually exceeded them in value in 2019 and then unit volume in 2020.

The Rise of the MILC

The mirrorless camera – at least in its current guise – can be traced back to the Micro Four Thirds format and the release of the Panasonic Lumix DMC-G1 in 2010 although that was really a reboot of the 2003 Olympus Four Thirds E1 (minus the mirror box). After that, every manufacturer rushed up to the plate to present their variation of the mirrorless camera.

Quite why Panasonic, Olympus, and Sony came to market at that point with entirely new systems remains less clear. Sony had relatively recently acquired Minolta and was developing its camera business, while Olympus had singularly failed to transition effectively to manufacturing DSLRs. Fuji had had a similarly poor digital transition and was undergoing major restructuring as it came to terms with the death of film. Pentax had made a DSLR transition but lagged behind Nikon and Canon, who had very successfully moved into the digital era.

What is undeniable is that they were all making significant sums of money from selling Integrated cameras. The MILC was born out of an abundance of profit, combined with a number of manufacturers who were unsure what to do next.

The reason for the success of the MILC was more simple: Sony, Olympus, Fuji, and Panasonic achieved significant sales success. Meanwhile, Nikon and Canon had a vested interest in maintaining the DSLR market that was essentially sown up, but that gentle trickle of MILC sales turned into bubbling brook.

The writing was on the wall when Nikon and Canon pivoted to mirrorless in 2018, sounding the not-so-quiet death knell for the DSLR. This left Pentax swinging in the wind and – yes – releasing a new DSLR model in the form of the K-3 Mark III!

That said, the imploding shipments of DSLRs are a result of both customers choosing to buy MILCs and manufacturers reducing their shipments. There is no better sign that the market is finished as sales implode and substantial R&D ends; sure, we are likely to have old models sold for the foreseeable future in the same way the Nikon F6 persisted through to 2020, but new models are all but finished (although Pentax may still try to beat that drum).

What is the Future of Camera Sales and Shipments?

The key question for manufacturers going forward is what size is the market for selling cameras? Canon is a little pessimistic on this point believing it will naturally fall be below 10 million units, COVID excepting. To better understand the digital future, we need to understand the analog past.

Film Camera Shipments

Again using CIPA data, we can see that focal plane shutter models (ILCs) peaked in 1982 at 7.5 million units, but what’s remarkable is the ¥230 billion (~$2B) in value this represents (not adjusted for inflation). With the rise of the compact camera (“Shutter” models) and mass-market consumption, we can see that total shipments eventually reached 36 million, but their value was on a long-term downward path as the mantra of “pile it high, sell it cheap” took hold.

What’s more instructive is understanding the underlying professional and amateur market and looking specifically at interchangeable lens models; the graph below combines together the film and digital figures (again not adjusted for inflation).

A chart showing ILC shipments

And this tells the remarkable story of the digital boom which took the historic baseline of around 4 million annual shipments of film cameras and pushed it up to 20 million by 2013. That volume has been in freefall since, but Canon’s expectation that this value sits somewhere between 5 and 10 million is probably about right.

Value is more difficult to gauge because of the effect of inflation, but since 1980, goods in general have increased in price by about x2.5 which probably means that the total value of the market – about ¥230 billion – is more or less the same as today.

So where does that leave us? Probably back where we started in the 1980s! Cameras have always been an emergent, expensive and, as a result, high-end tech sector. The first (analog) consumer boom came in the 1980s because film cameras could be manufactured very cheaply, with the mass-market scale used to minimize the cost of film, development, and printing. The second (digital) boom of the 2000s took advantage of microelectronics, miniaturization, supply chain sourcing, and just-in-time manufacturing.

Both booms came during periods of relative consumer wealth. Film’s mantle was stolen by digital which was subsequently lost to the smartphone, but the underlying system camera sales have remained surprisingly stable.

The camera sector remains a bit-part player in the global market place and manufacturers need to work out how they are going to make it pay for itself. Sony, Canon, and Fuji have largely been successful in achieving this, all in different ways but with their camera divisions subsumed into much larger organizations.

Significant question marks remain as to whether Olympus can survive and only time will tell. The fortunes of Pentax and Panasonic within their respective conglomerates remain to be seen.

Nikon is an anomaly here because it is relatively small as a business yet still reliant upon its camera business. It is unlikely to fail commercially, but what it looks like as a business in 10 years’ time will be fascinating.


Image credits: Header illustrations licensed from Depositphotos